iOS
本文旨在介绍如何设置 Apple 身份验证,让您的游戏可以使用 Player Network 登录鉴权服务通过 Apple 渠道登录。
前提条件
1. 在 Apple Developer 上配置 iOS 应用
1. 创建 App ID
创建一个 client_id 作为向 Apple 发送请求的来源,iOS 应用的 client_id 为 App ID(Bundle ID)。
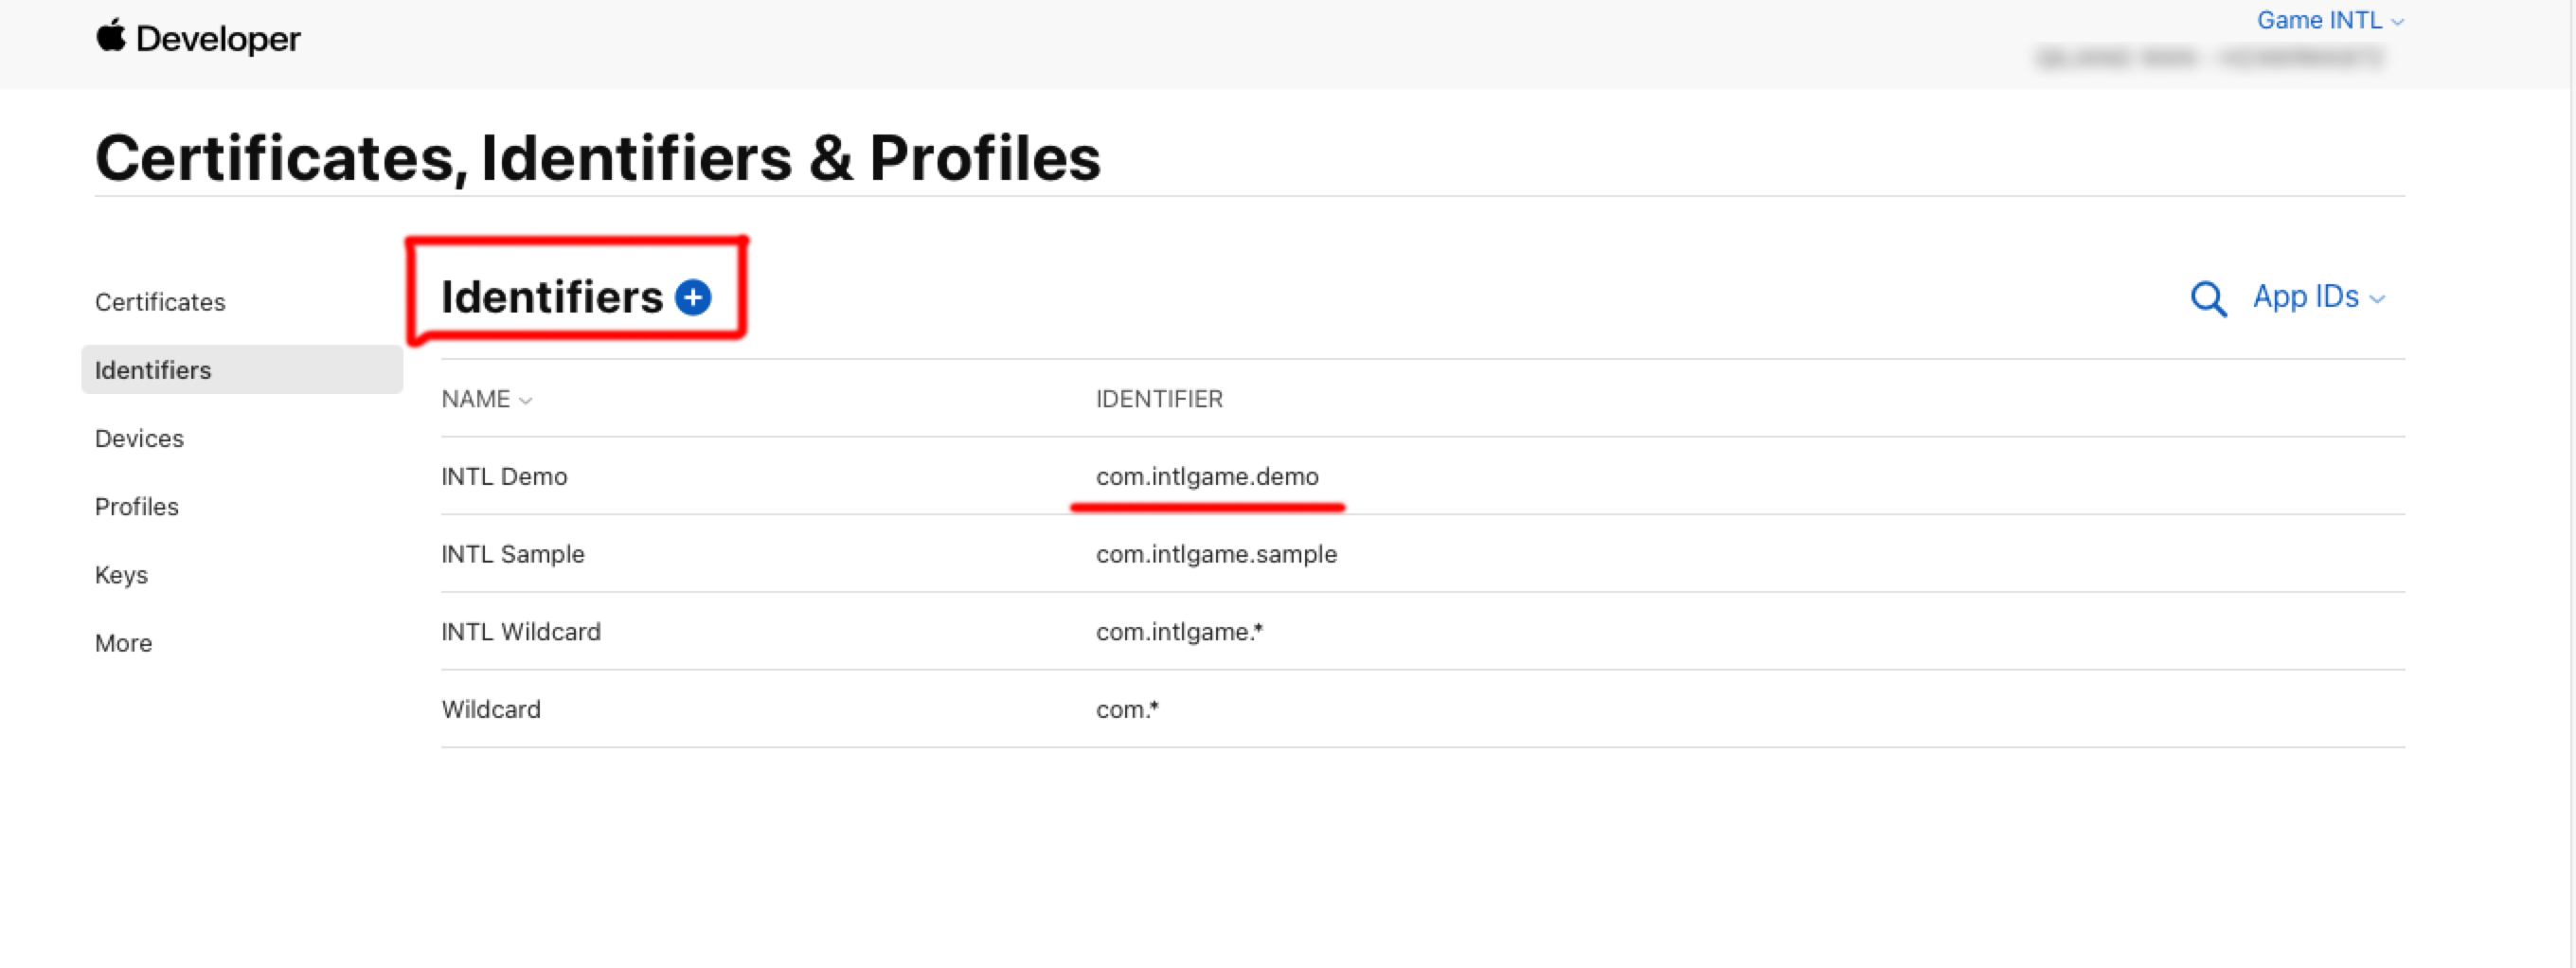
如果您使用的是现有的 App ID,只需在 Identifiers 页面中点击对应的 App ID 后,在 Edit your App ID Configuration 下打开 Sign in with Apple 选项即可。
-
登录 Apple Developer,并在在顶部导航栏中点击 Account,并选择 Certificates, IDs & Profiles 下的 Identifiers。
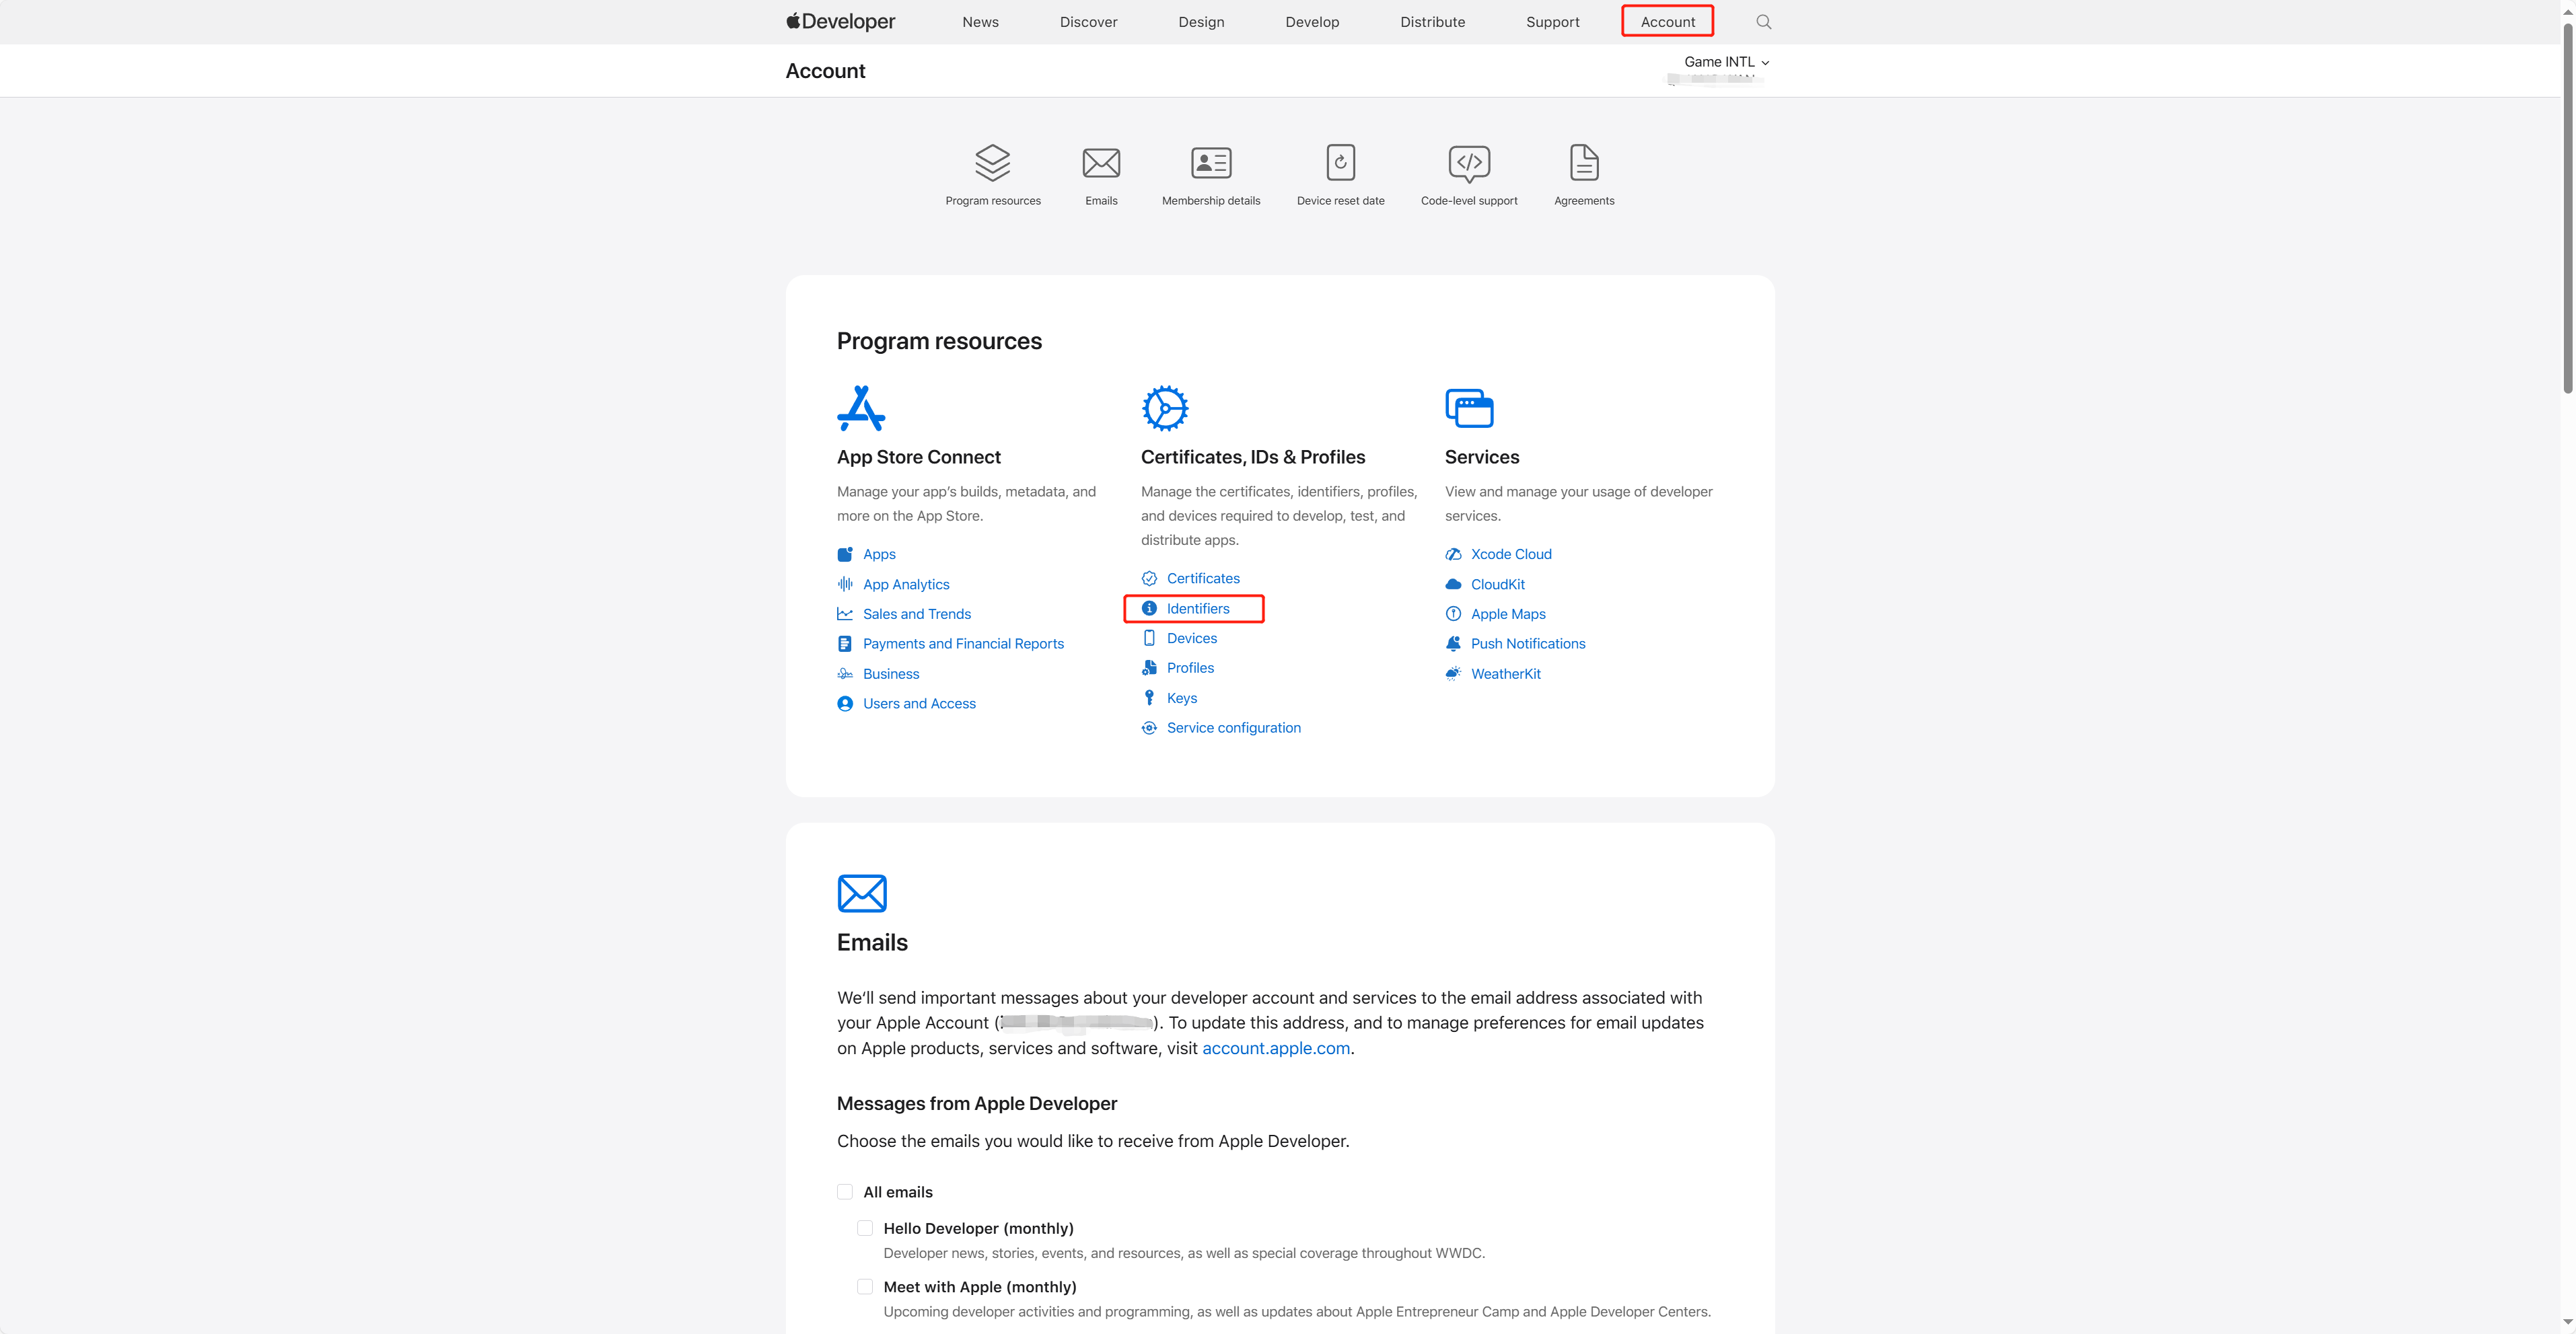
-
点击蓝色添加图标(+)。
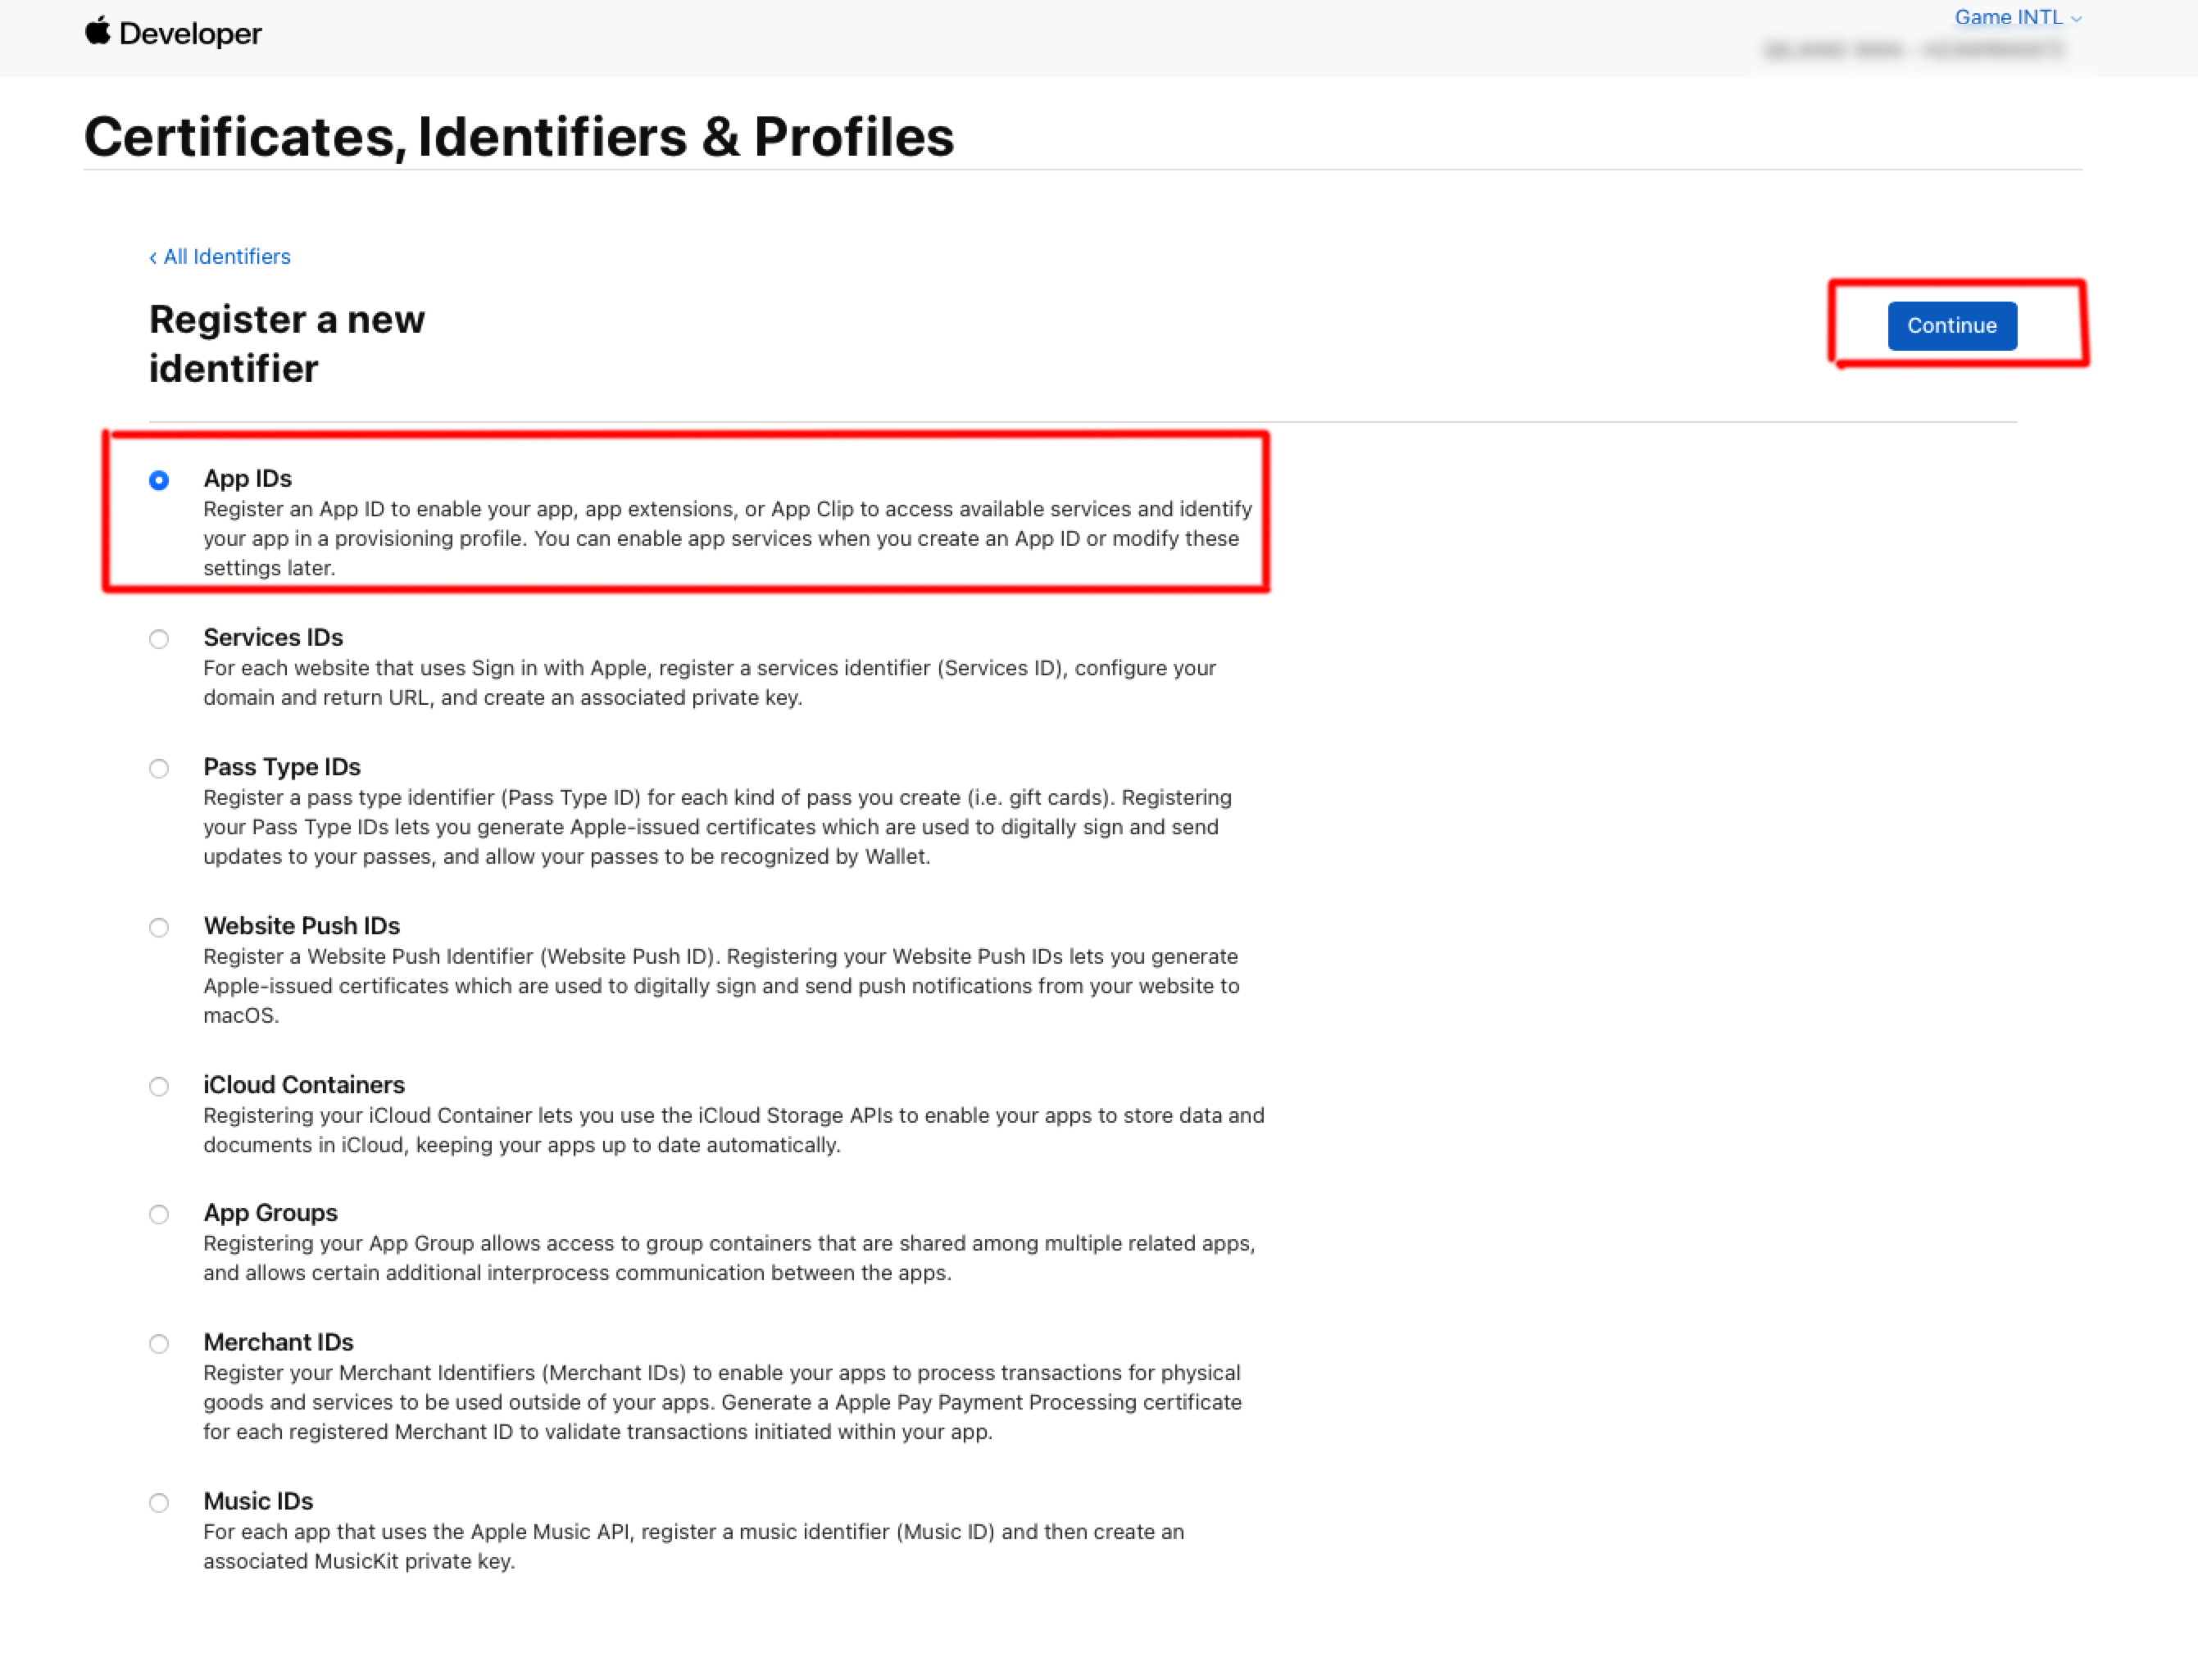
-
选择 App IDs 后,点击 Continue。
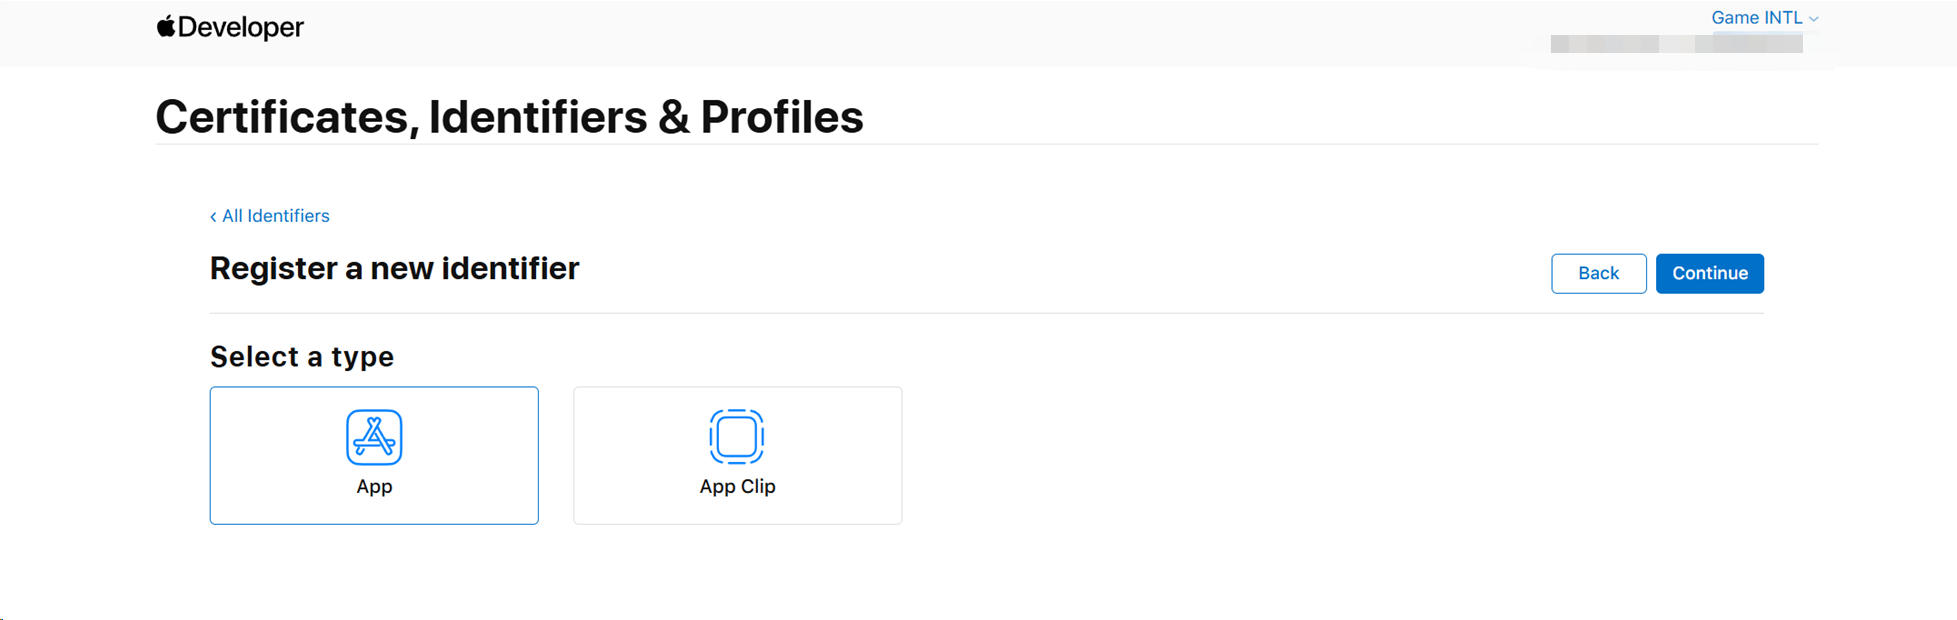
-
选择 App 后,点击 Continue。
-
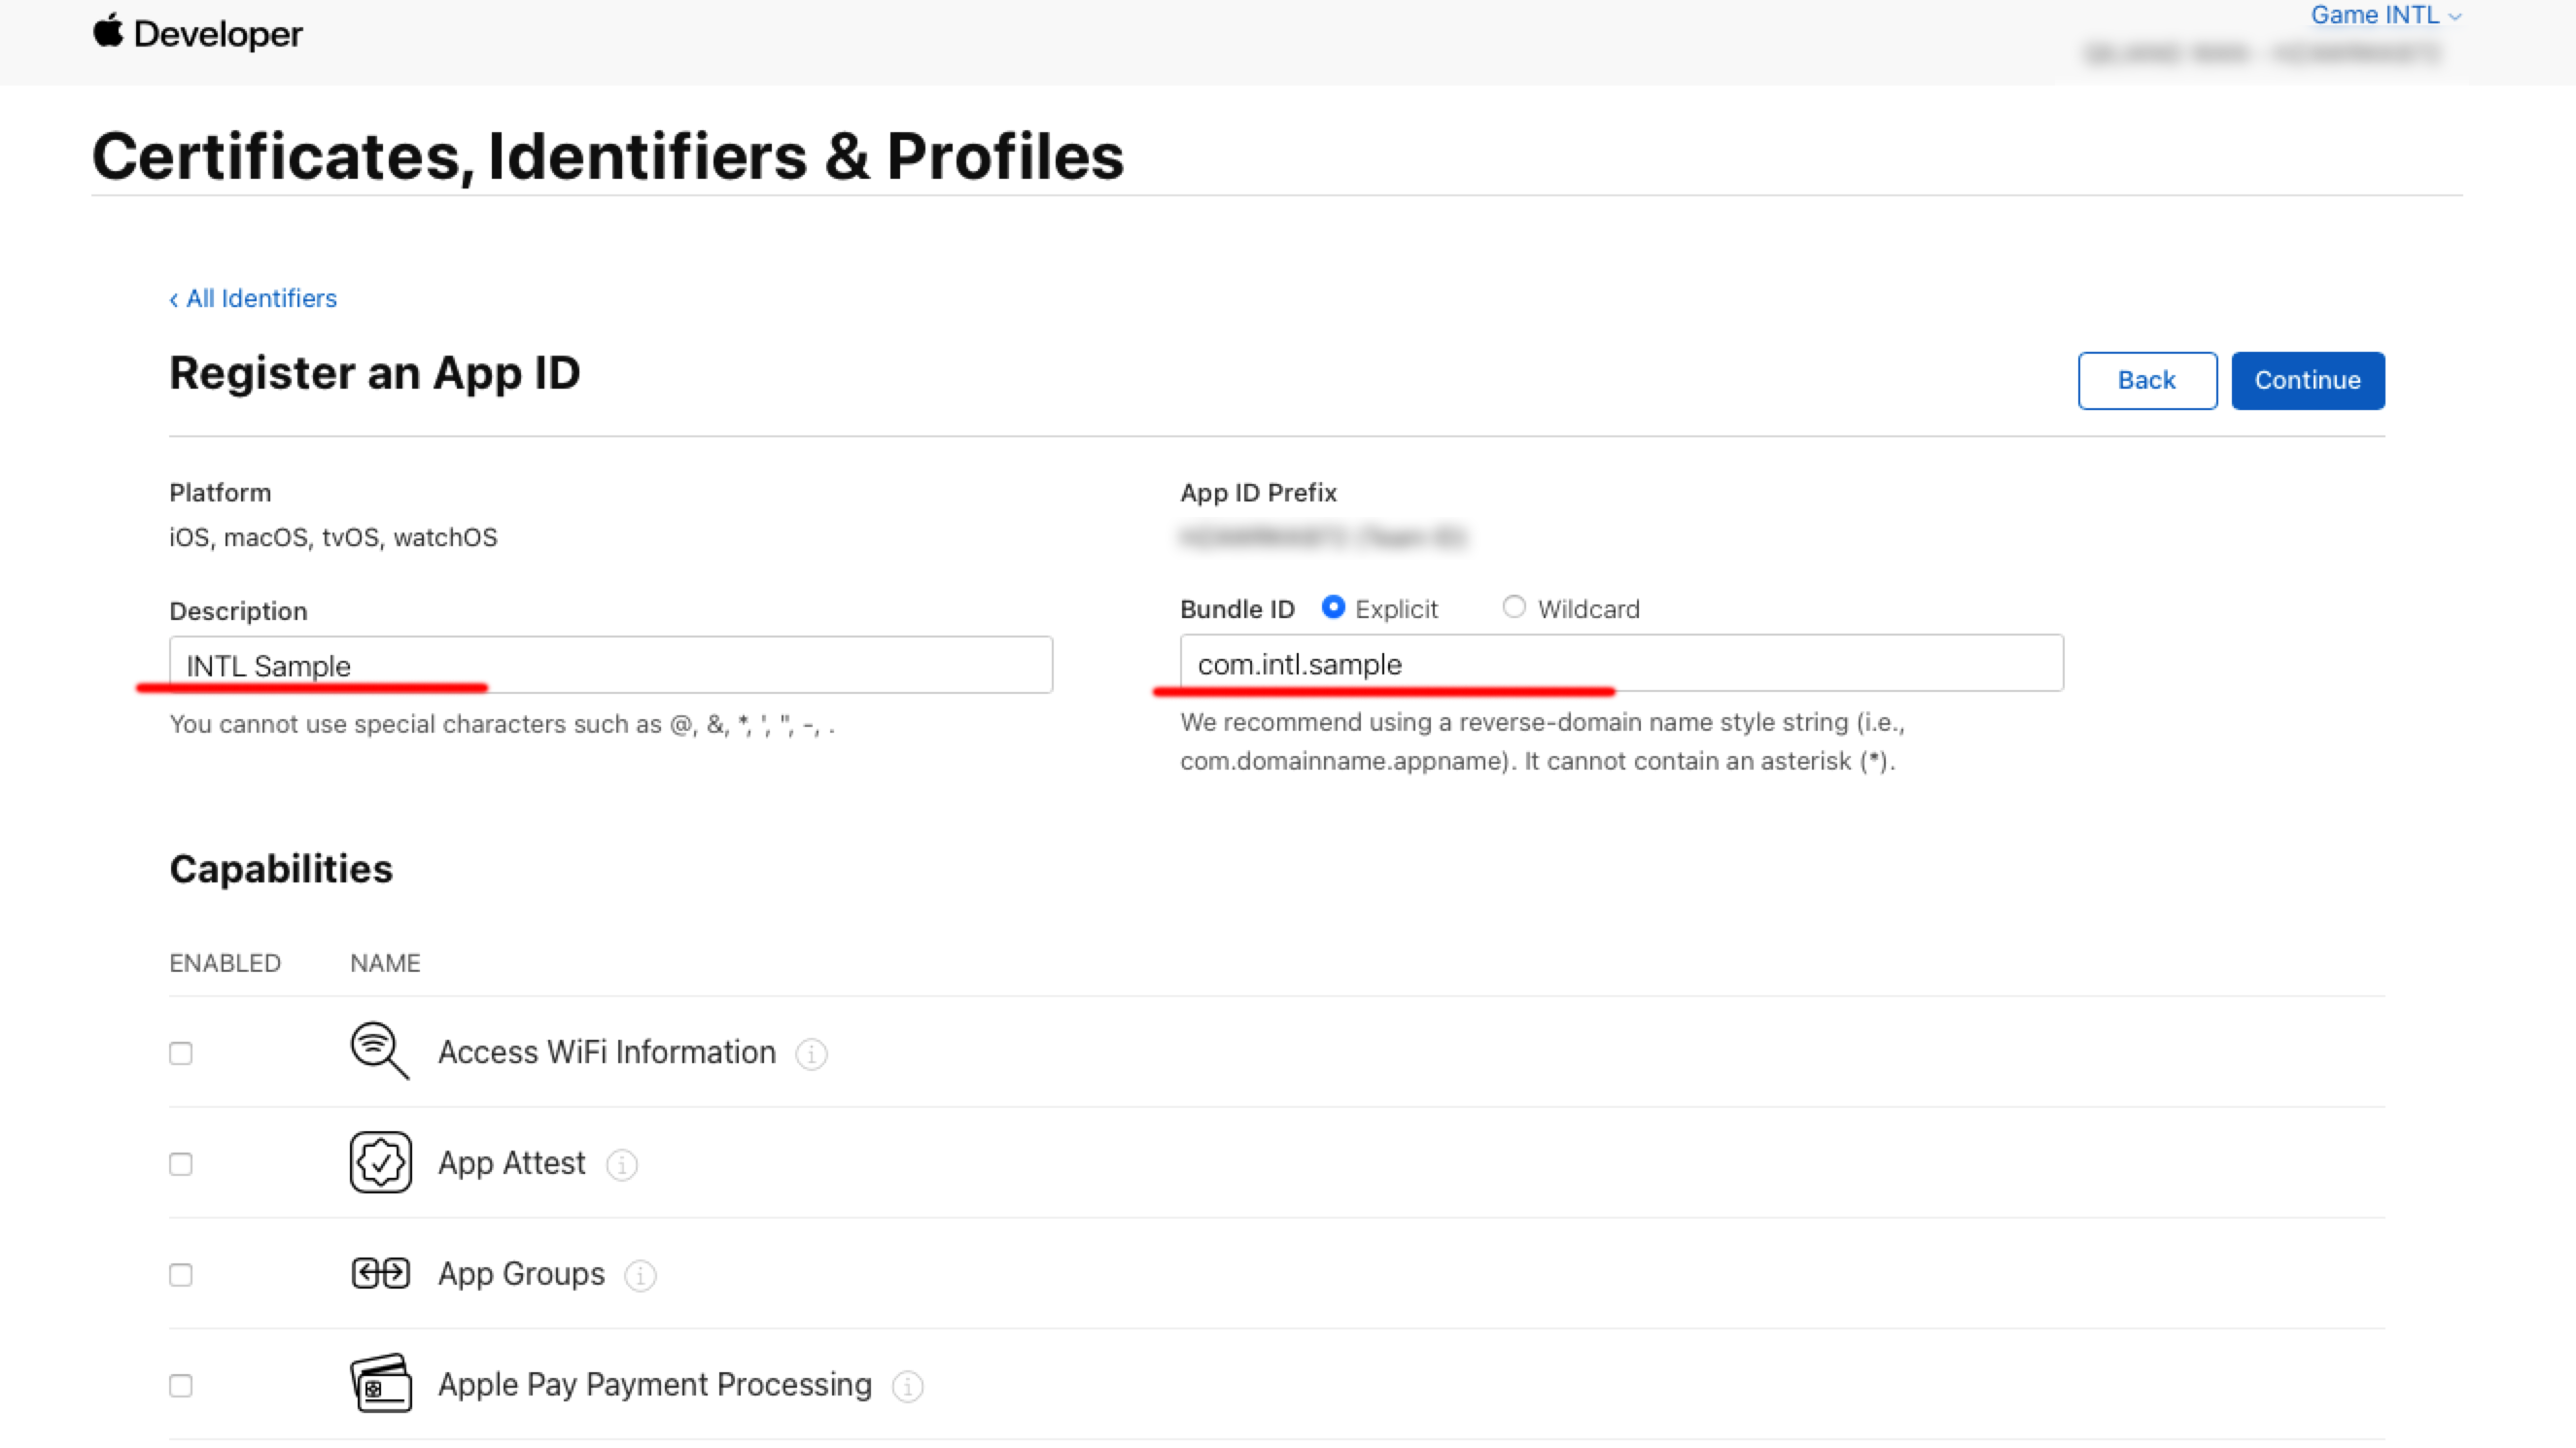
输入 Description 和 Bundle ID。
- Description:游戏应用的名称或描述。
- Bundle ID:游戏应用的唯一标识符,包含在 App ID 中。
-
在 Capabilities 下打开 Sign in with Apple 选项。
-
点击 Continue > Register,创建 App ID。
2. 创建用于访问服务的密钥
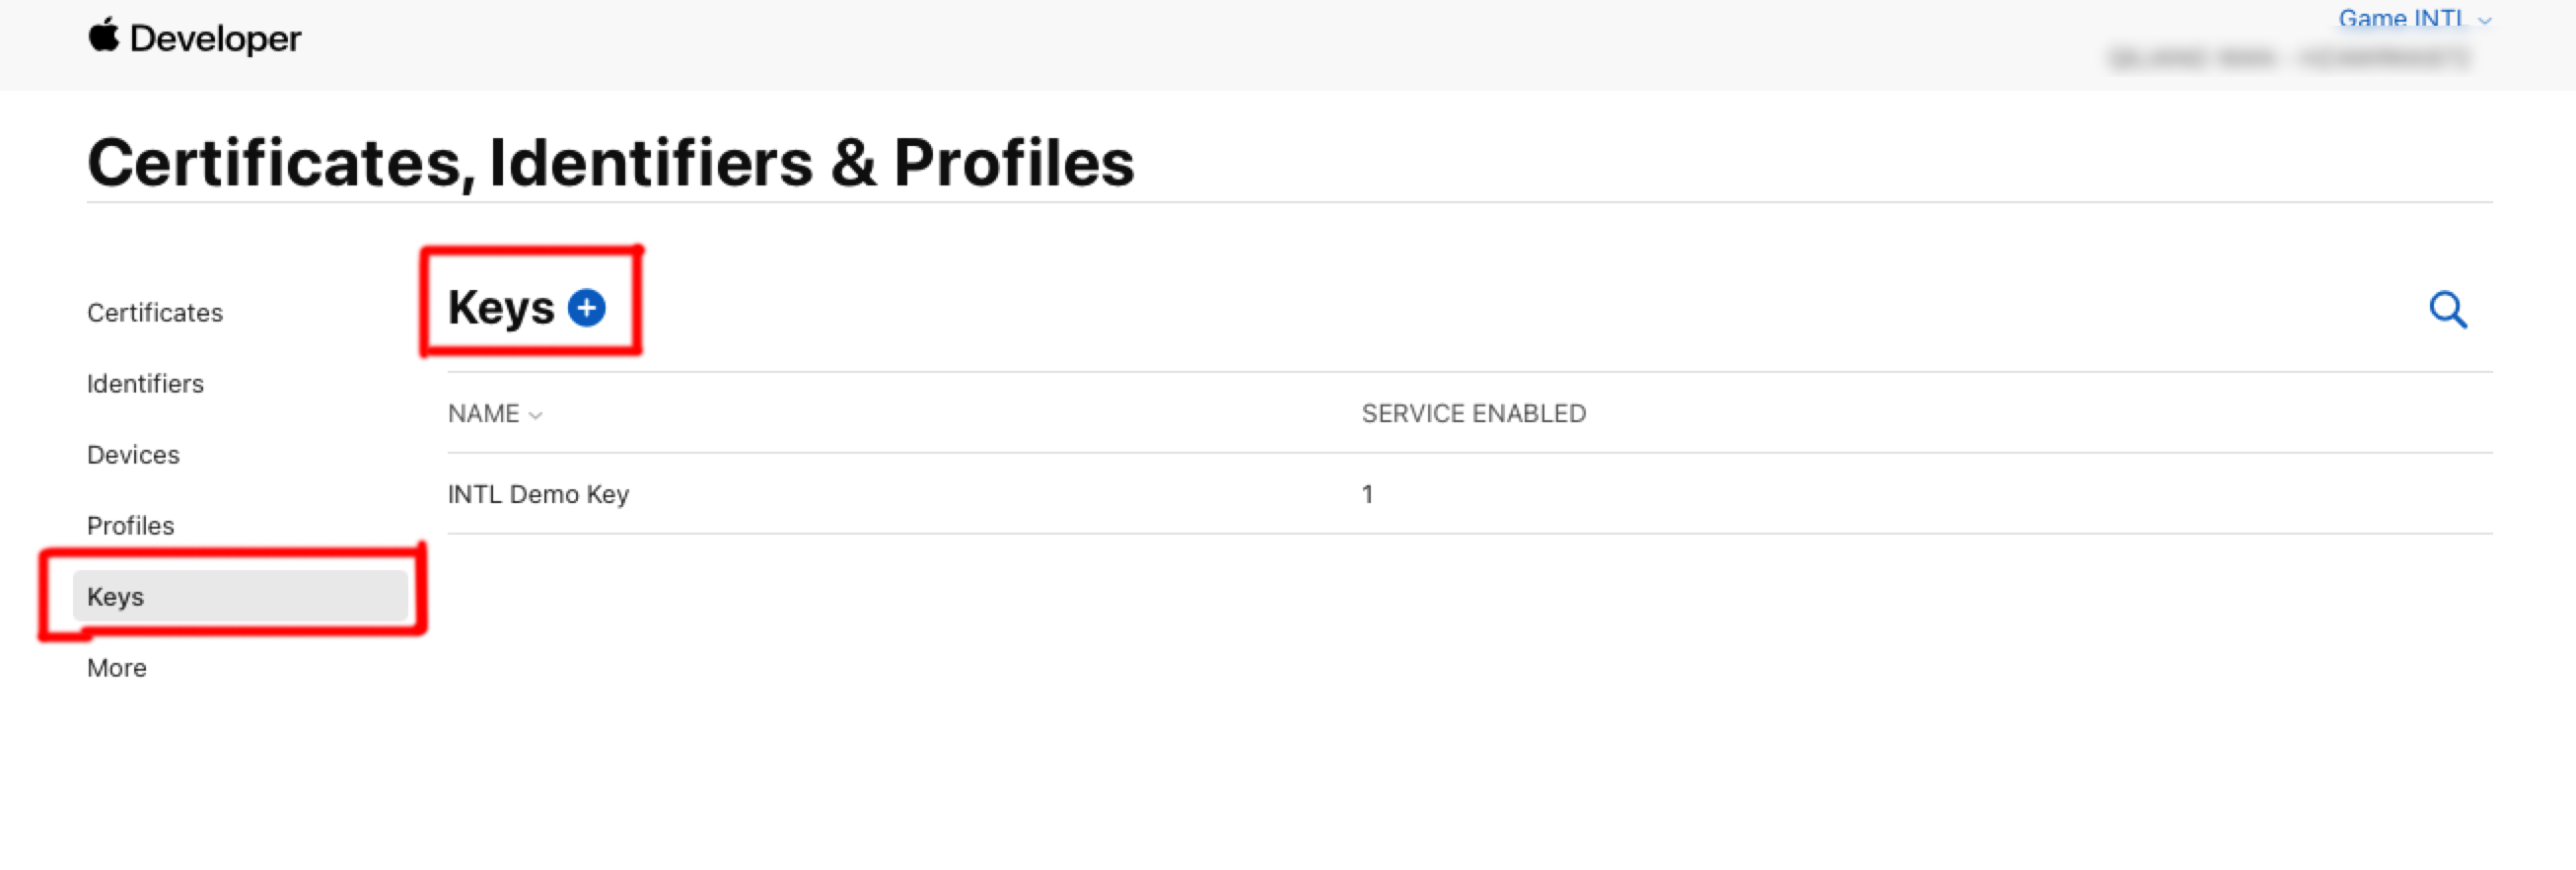
创建用于计算 client_secret 的密钥和相应的 Key ID。
-
在 Certificates, Identifiers & Profiles 侧边栏中,点击 Keys。
-
点击蓝色添加图标(+)。
-
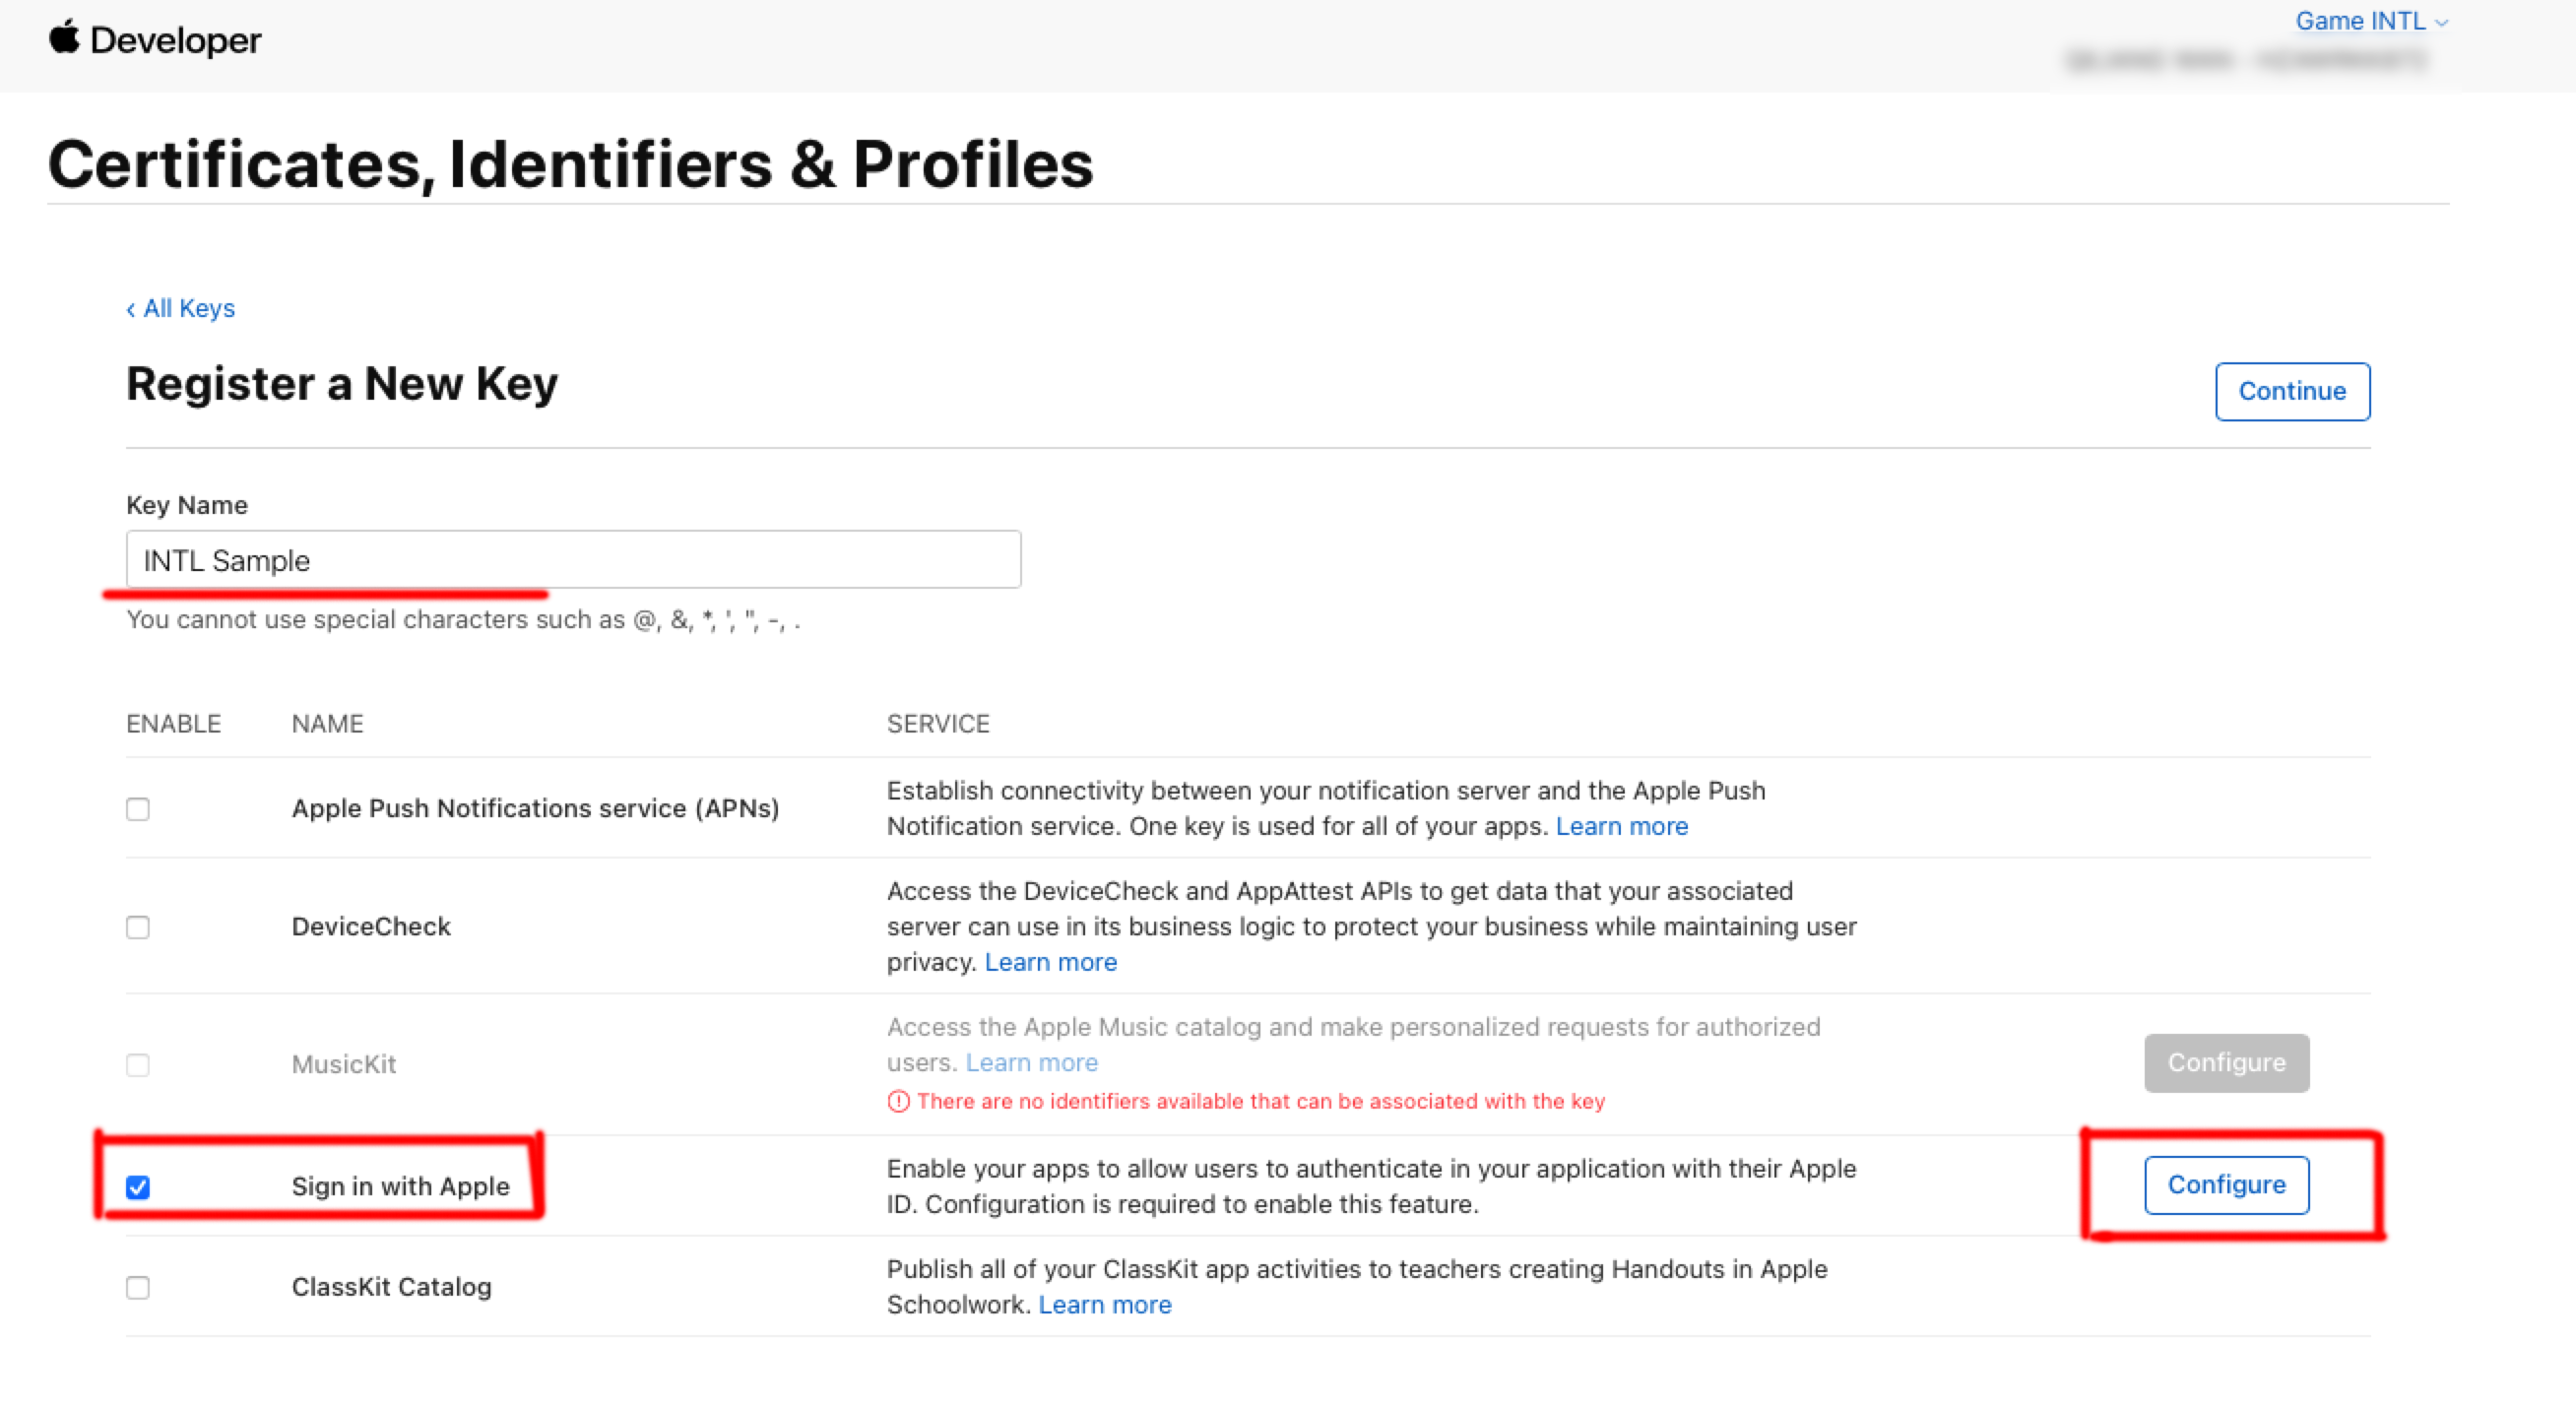
在 Key Name 下,输入密钥的唯一名称。
-
选择 Sign in with Apple 旁边的复选框,然后点击 Configure。
-
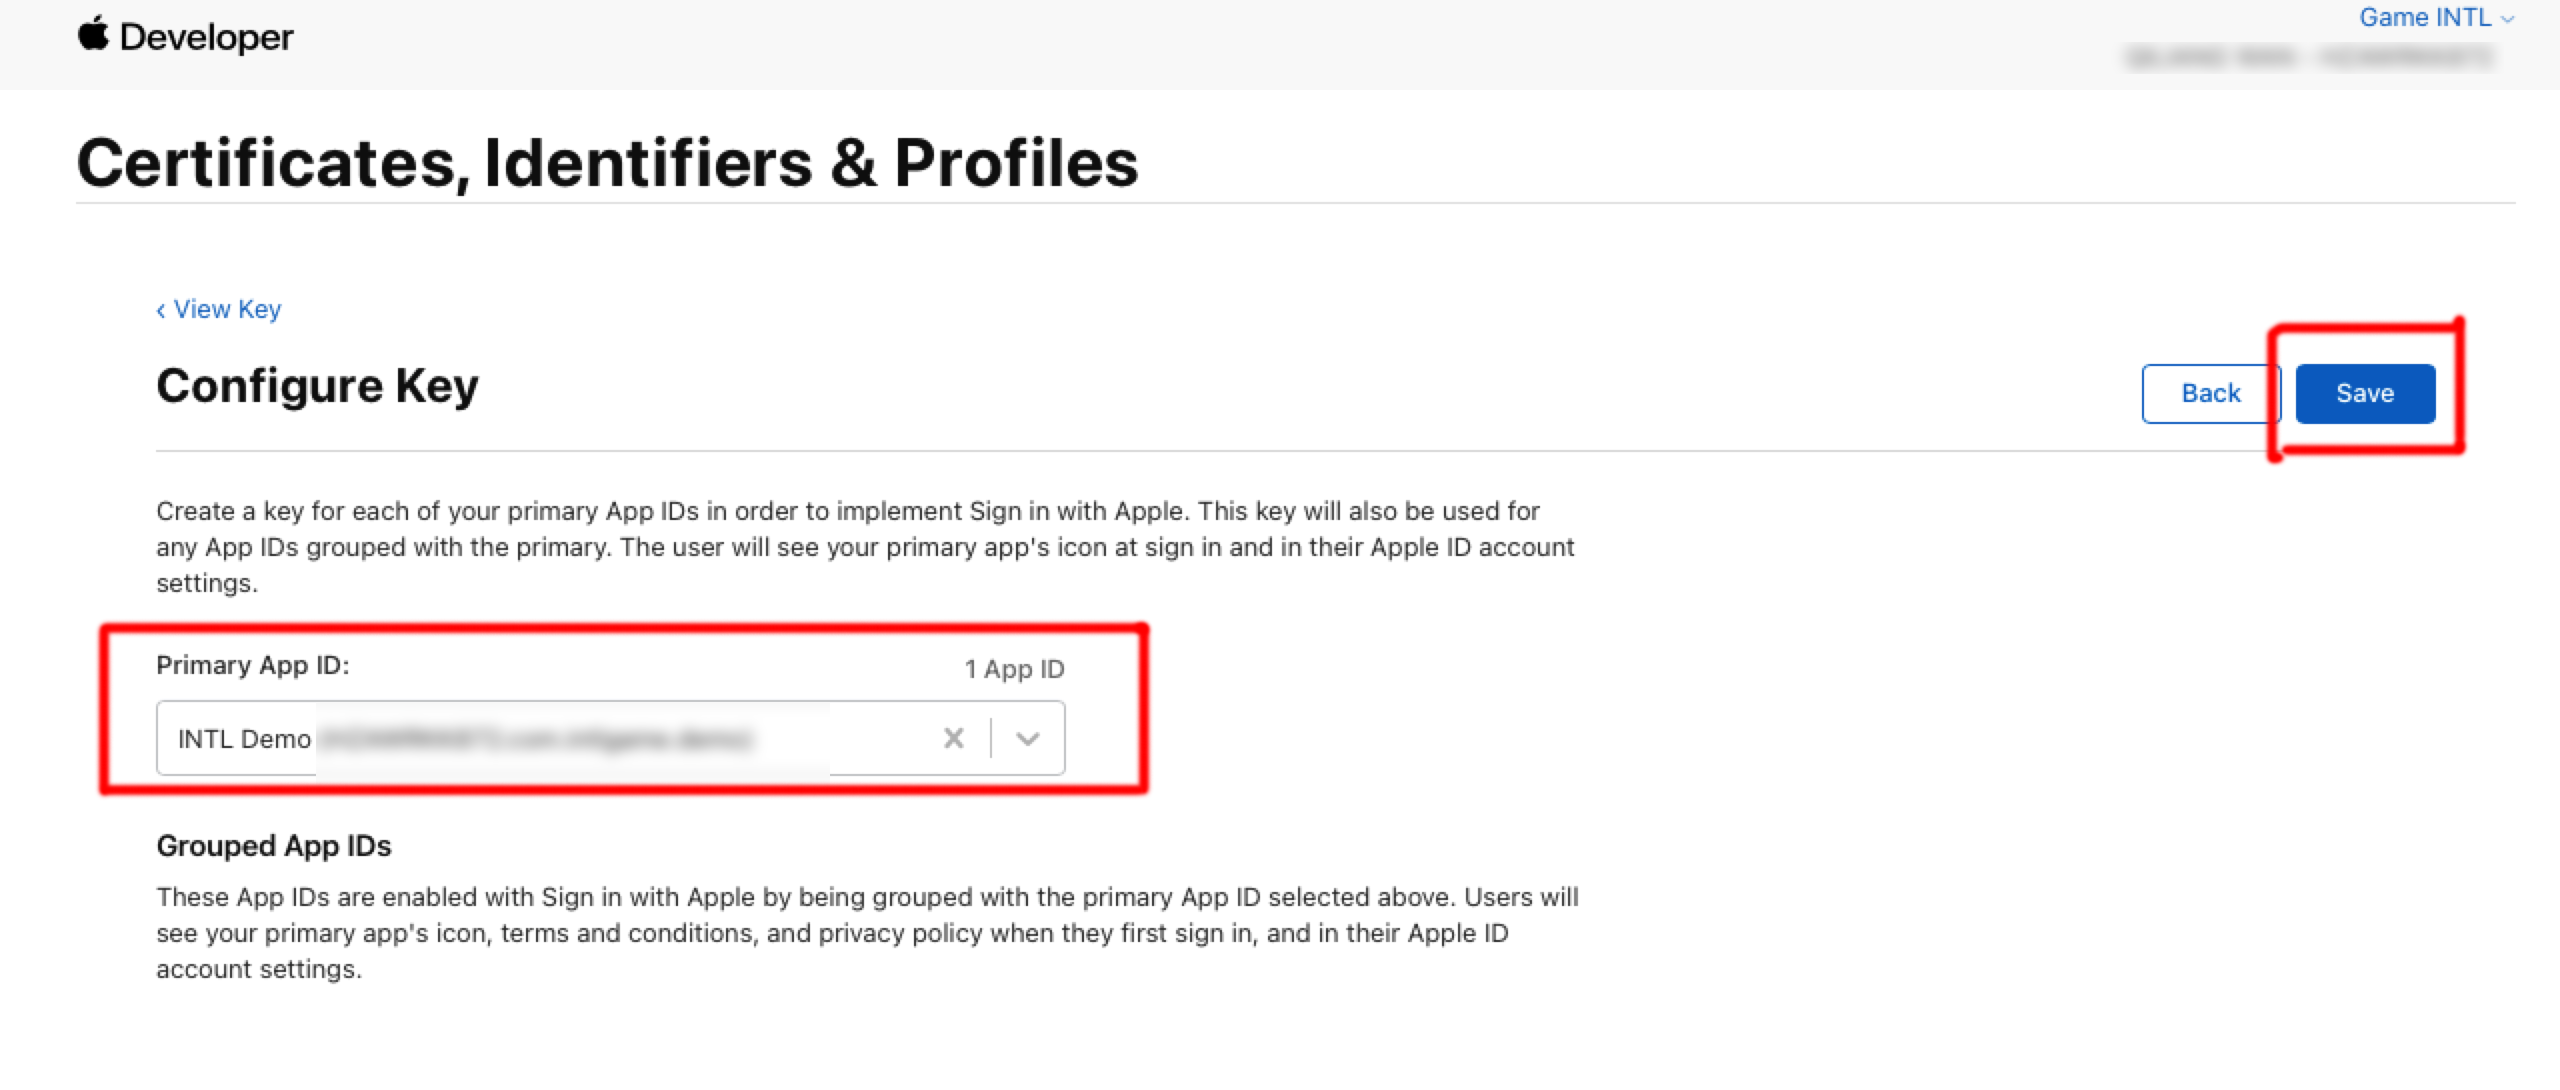
在 Primary App ID 下,选择在 上一步 中创建的 App ID,然后点击 保存。
-
点击 Continue。
-
点击 Register 生成密钥,并记下 Key ID。
-
点击 Download 下载密钥文件(只能下载一次,切勿丢失),该文件保存为文件后缀 .p8 的文本文件。
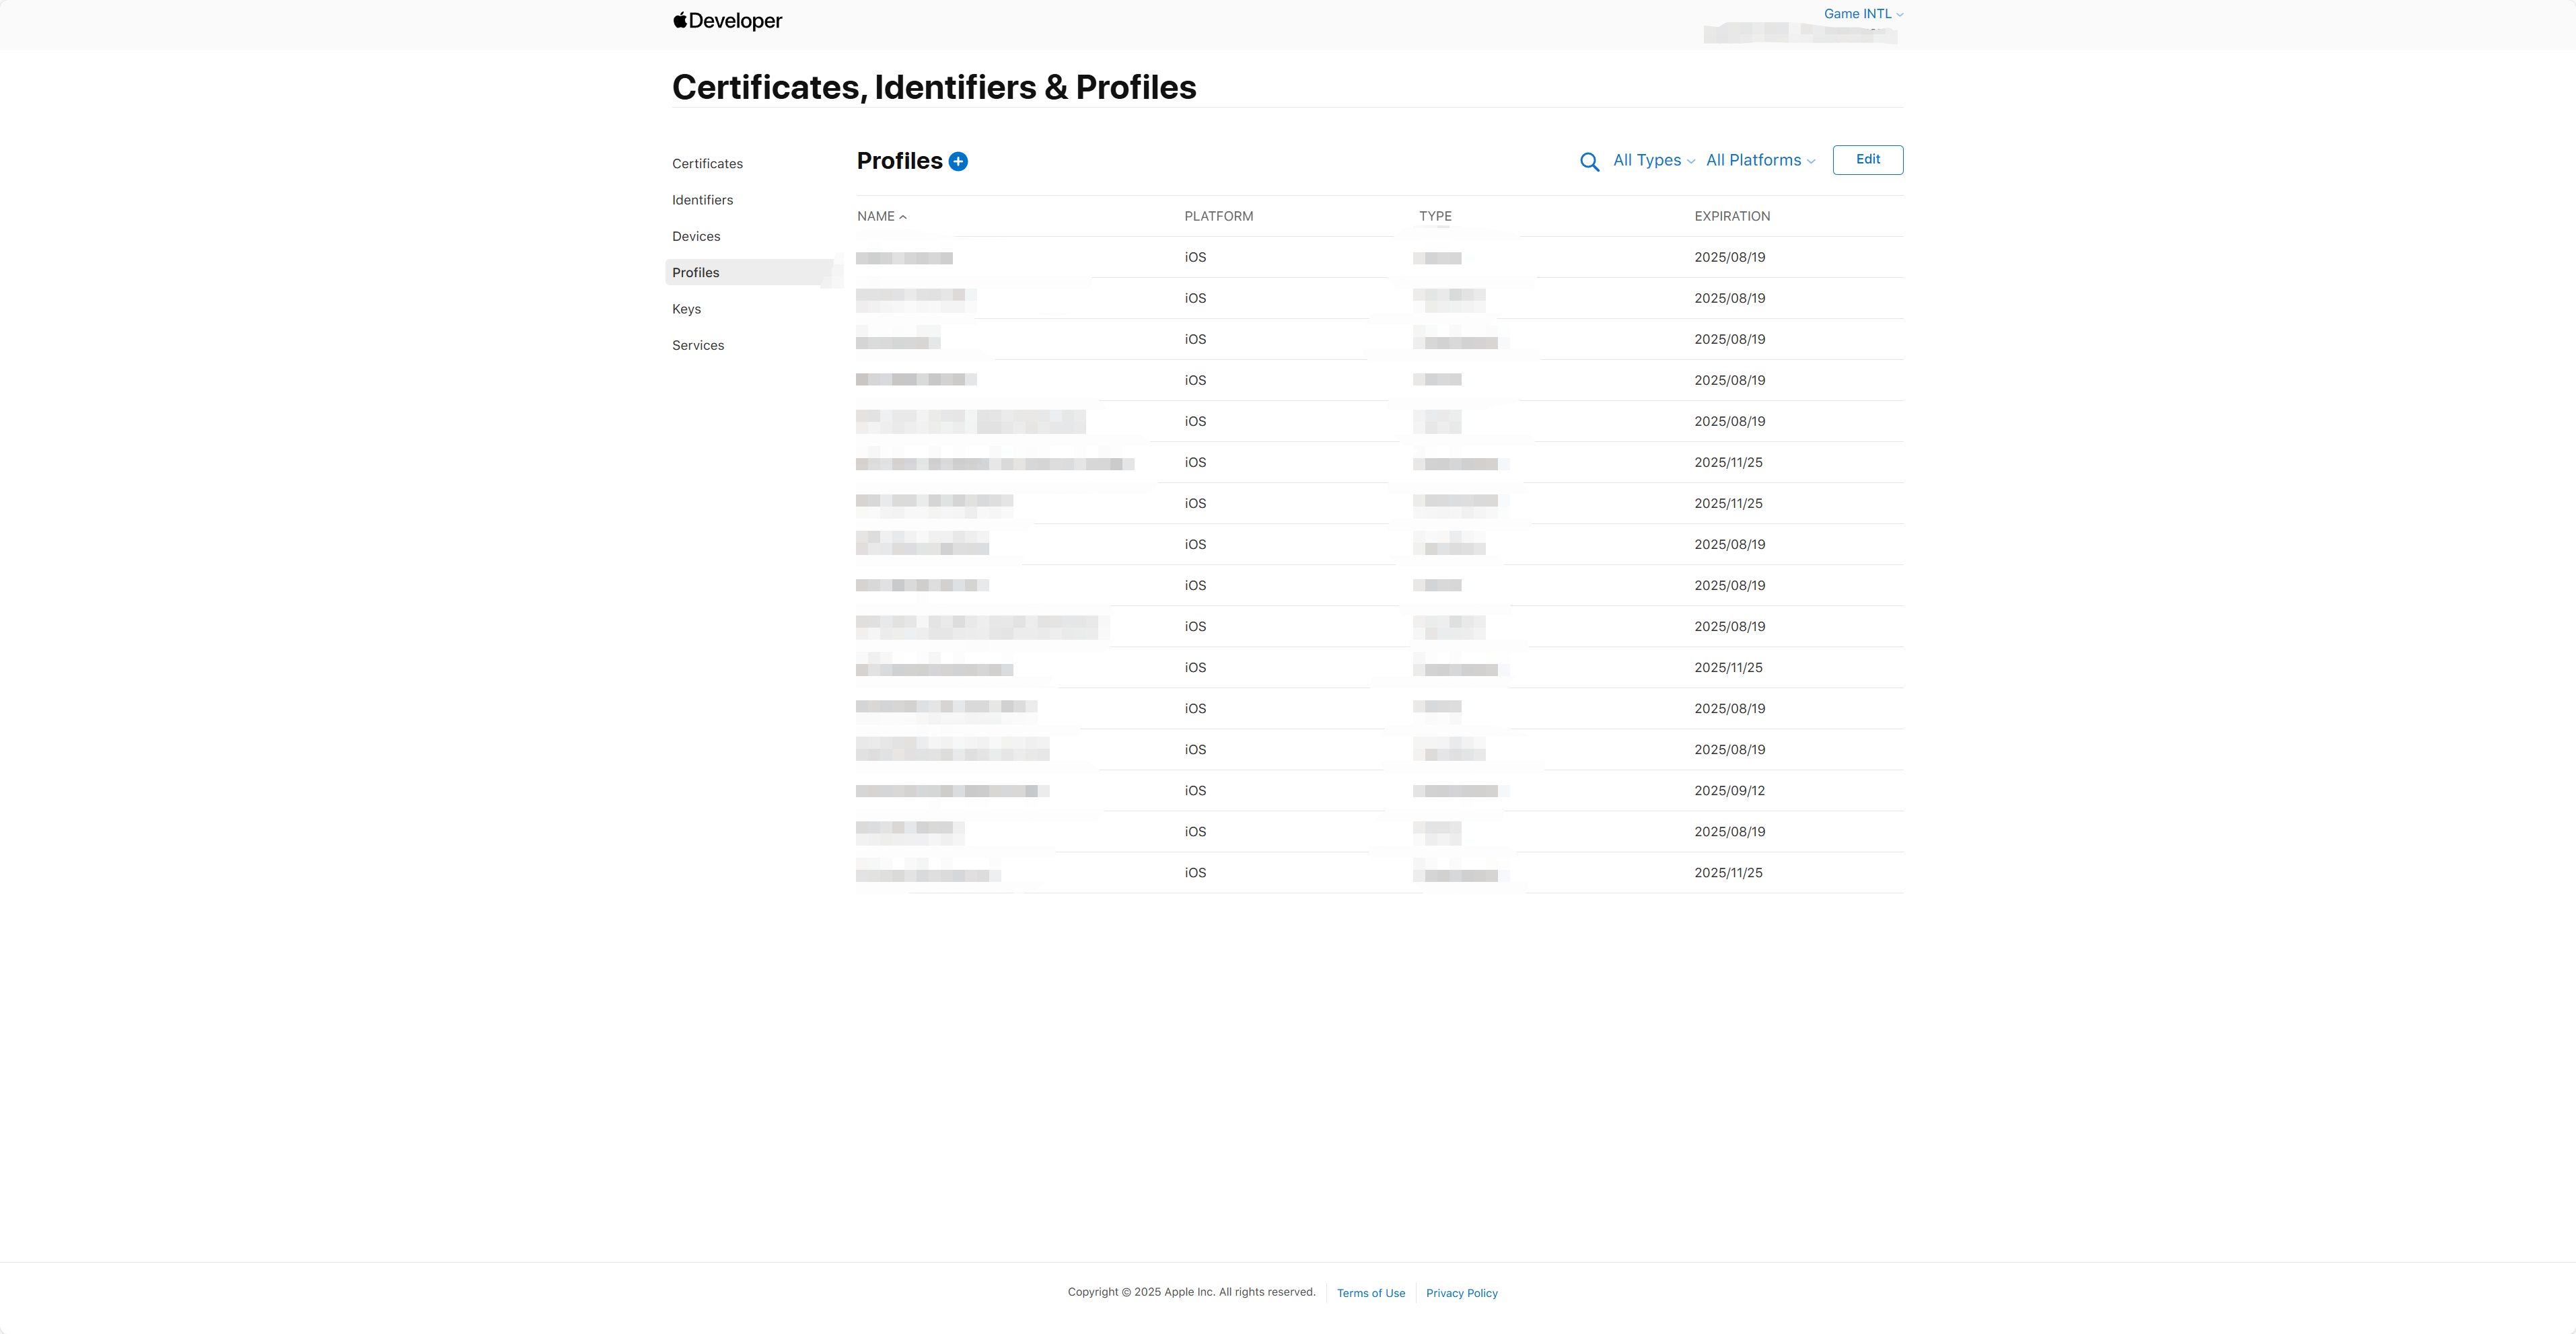
3. 创建预置开发描述文件
-
在 Certificates, Identifiers & Profiles 侧边栏中,点击 Profiles。
-
点击蓝色添加图标(+)。
-
在 Development 下,选择要创建的预置描述文件类型,然后点击 Continue。
-
选择要用于开发的 App ID 后,点击 Continue。
-
选择一个或多个开发证书 后,点击 Continue。
-
选择一台或多台设备 后,点击 Continue。
-
输入描述文件名称 后,点击 Generate。
-
点击 Download。
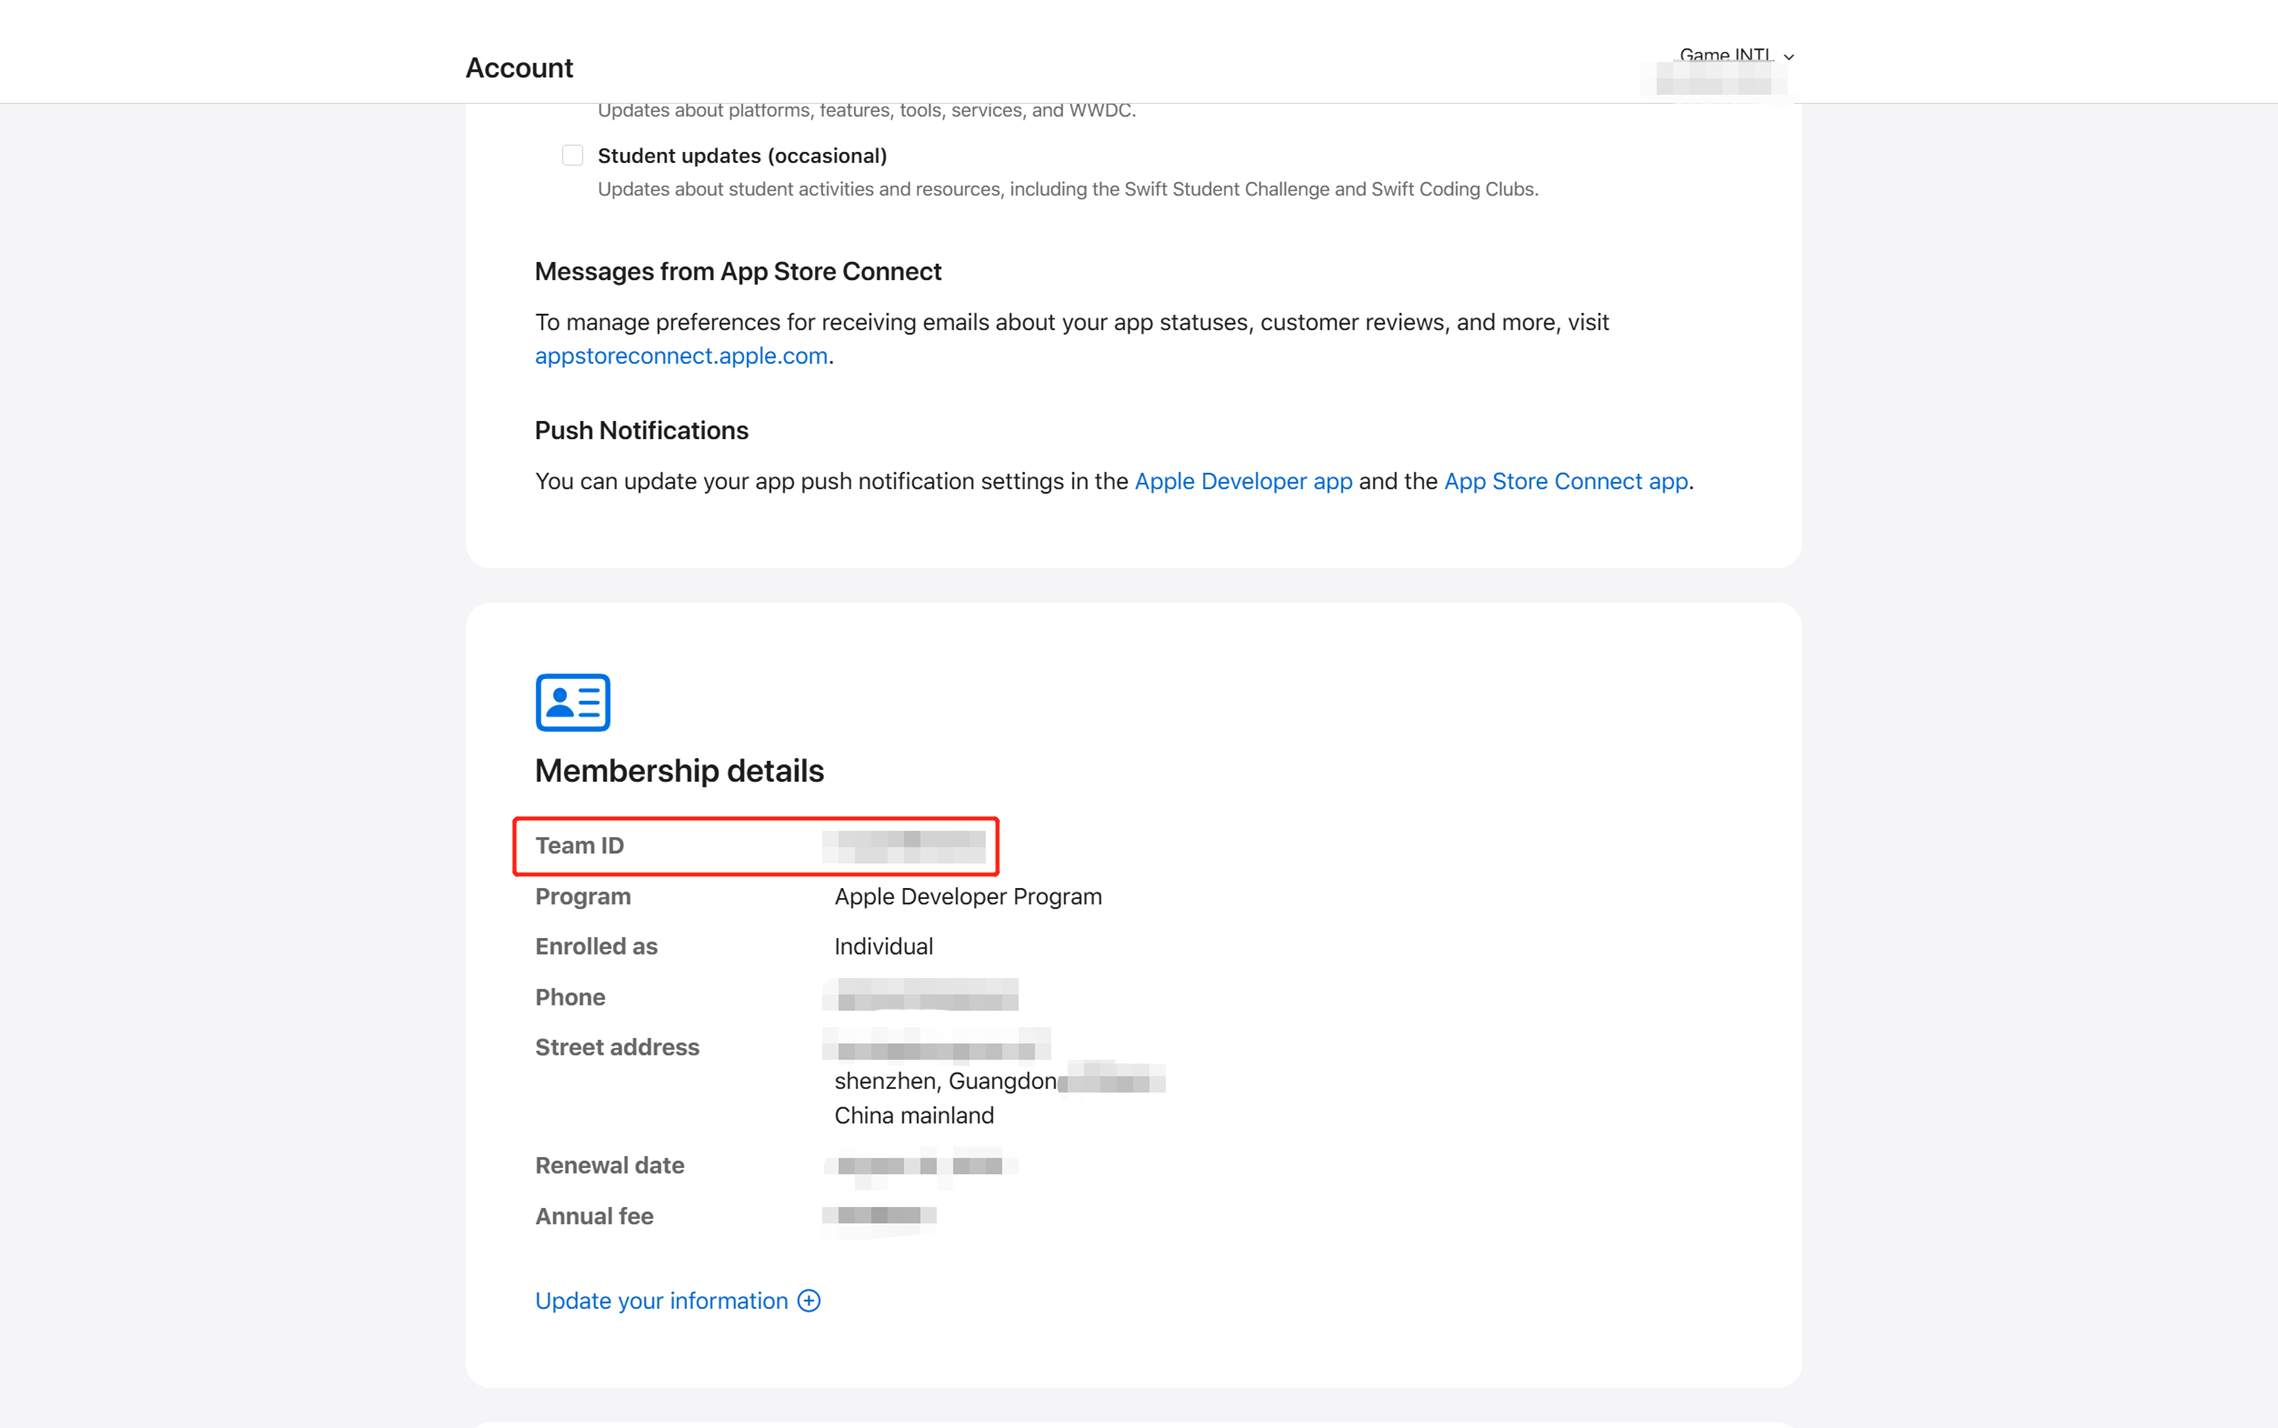
4. 获取 Team ID
-
登录 Apple Developer。
-
在开发者账户的顶部导航栏中,点击Account下滑找到Membership details以查看Team ID。
有关 Apple Developer配置的更多信息,请参见 What the Heck is Sign In with Apple?。
- 获取 Player Network 控制台登录账号。
- 为游戏创建新项目,或加入已有项目。
- 下载 SDK。
- 接入 SDK。
- 在 Player Network 控制台添加 Apple 为业务的登录鉴权方式。
步骤1:为 Apple 登录配置 SDK
iOS 12.0 及更高版本
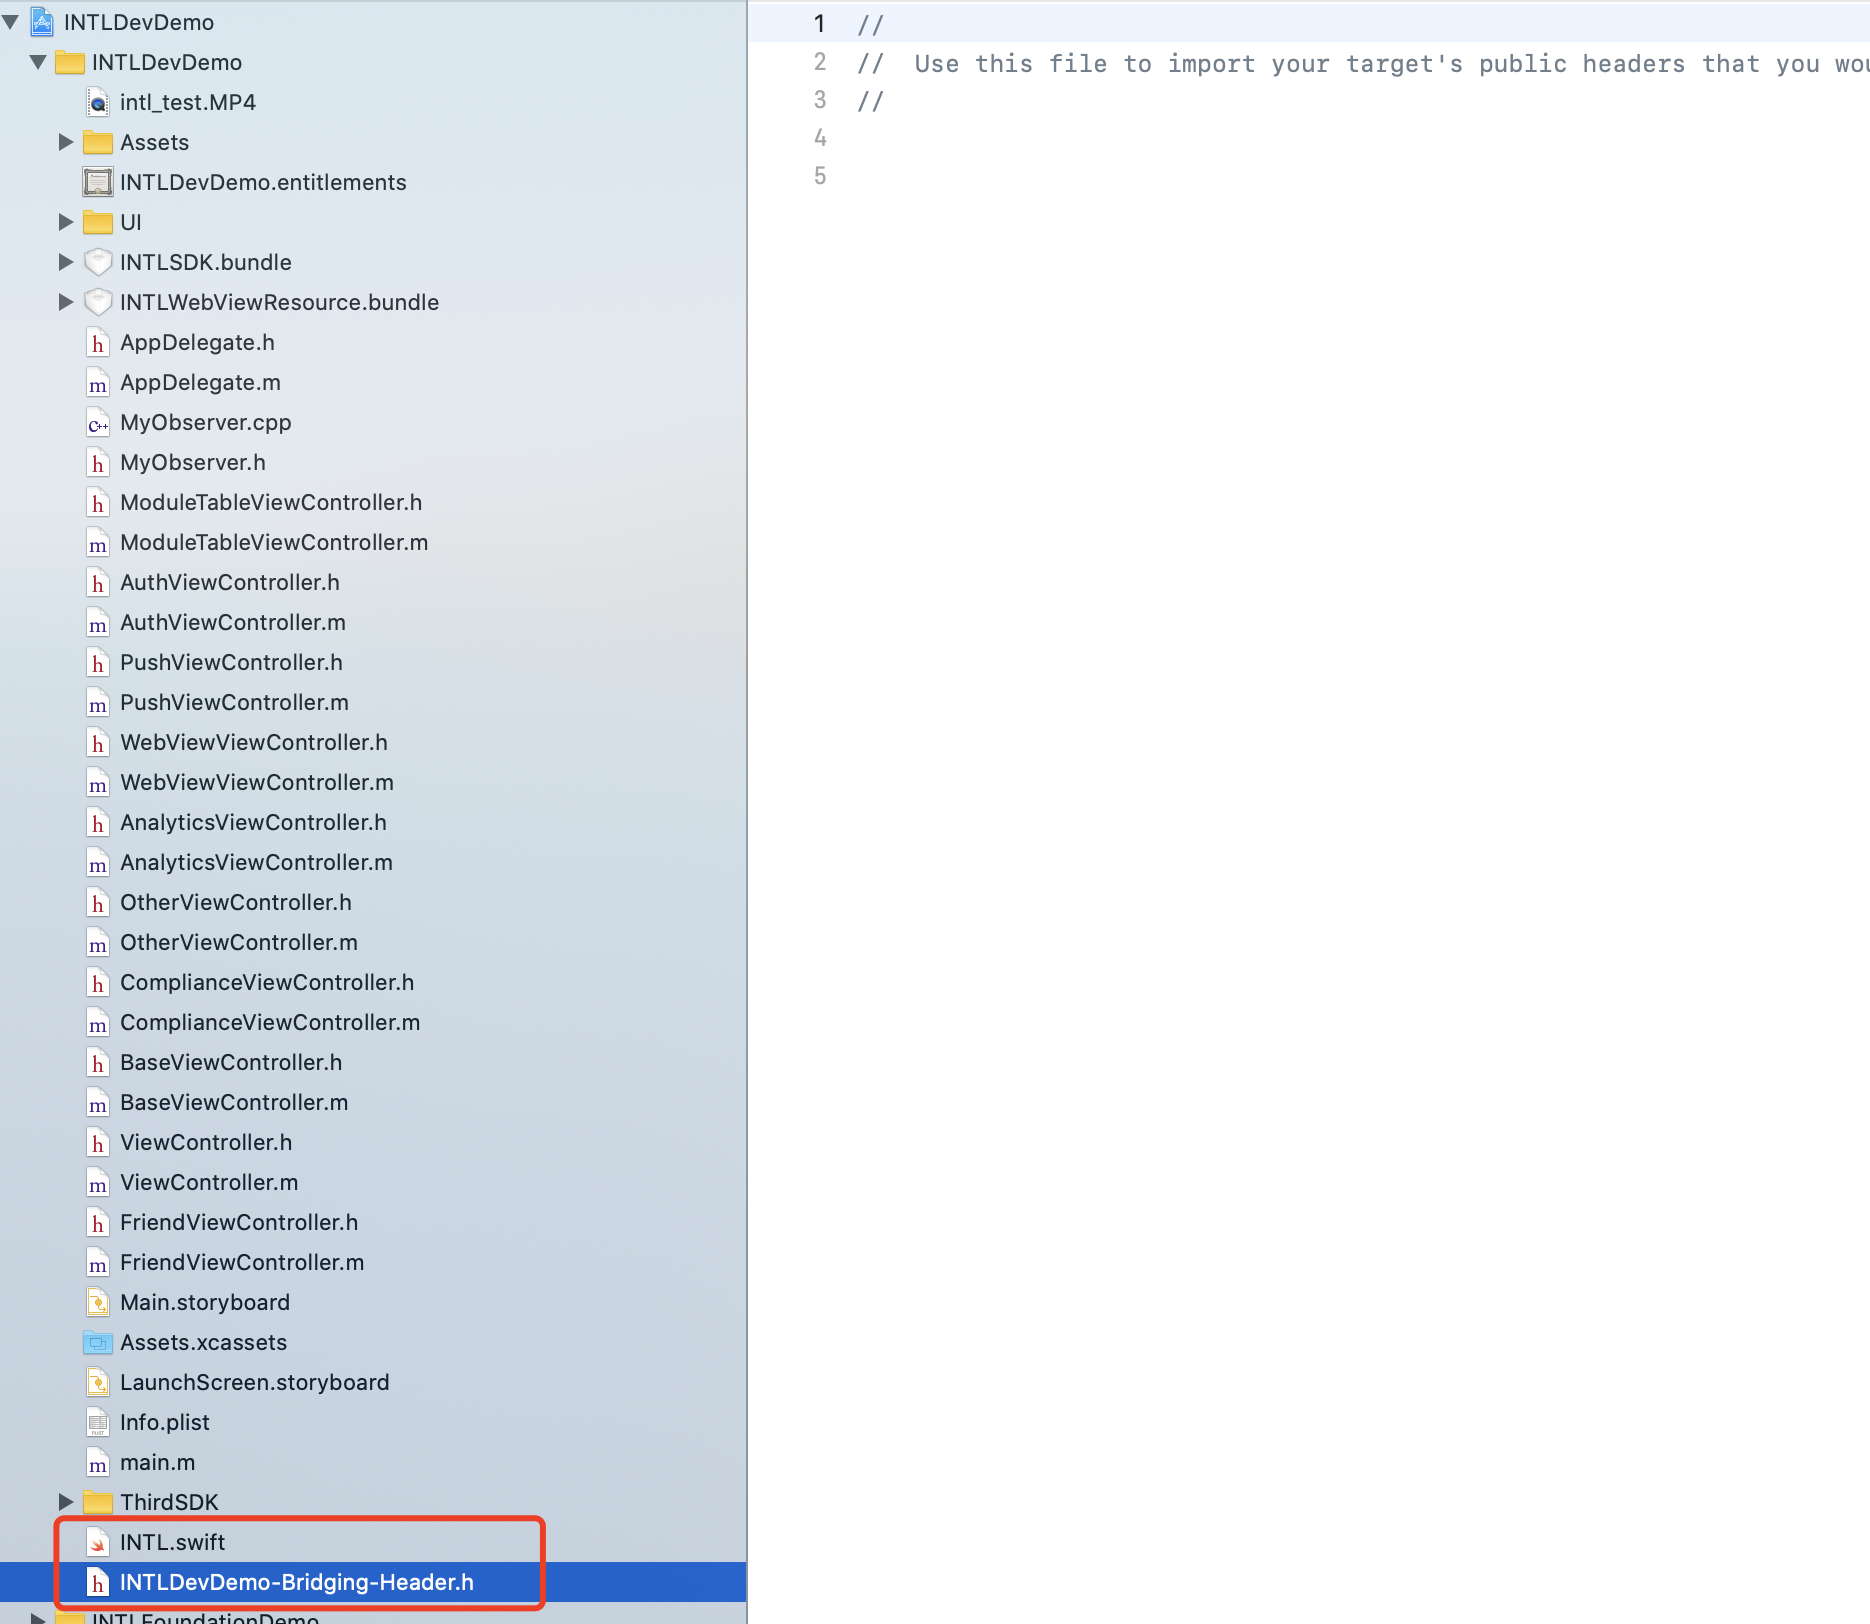
1. Swift SDK 的桥接
如果模块使用到的是 Swift 版本的 SDK,这里会涉及到 iOS 的 Swift 和 Objective-C 的混编问题。 Xcode 为了兼容混编需要有一个 bridge 的桥接层对齐两种语言的类名等,需要如下操作。
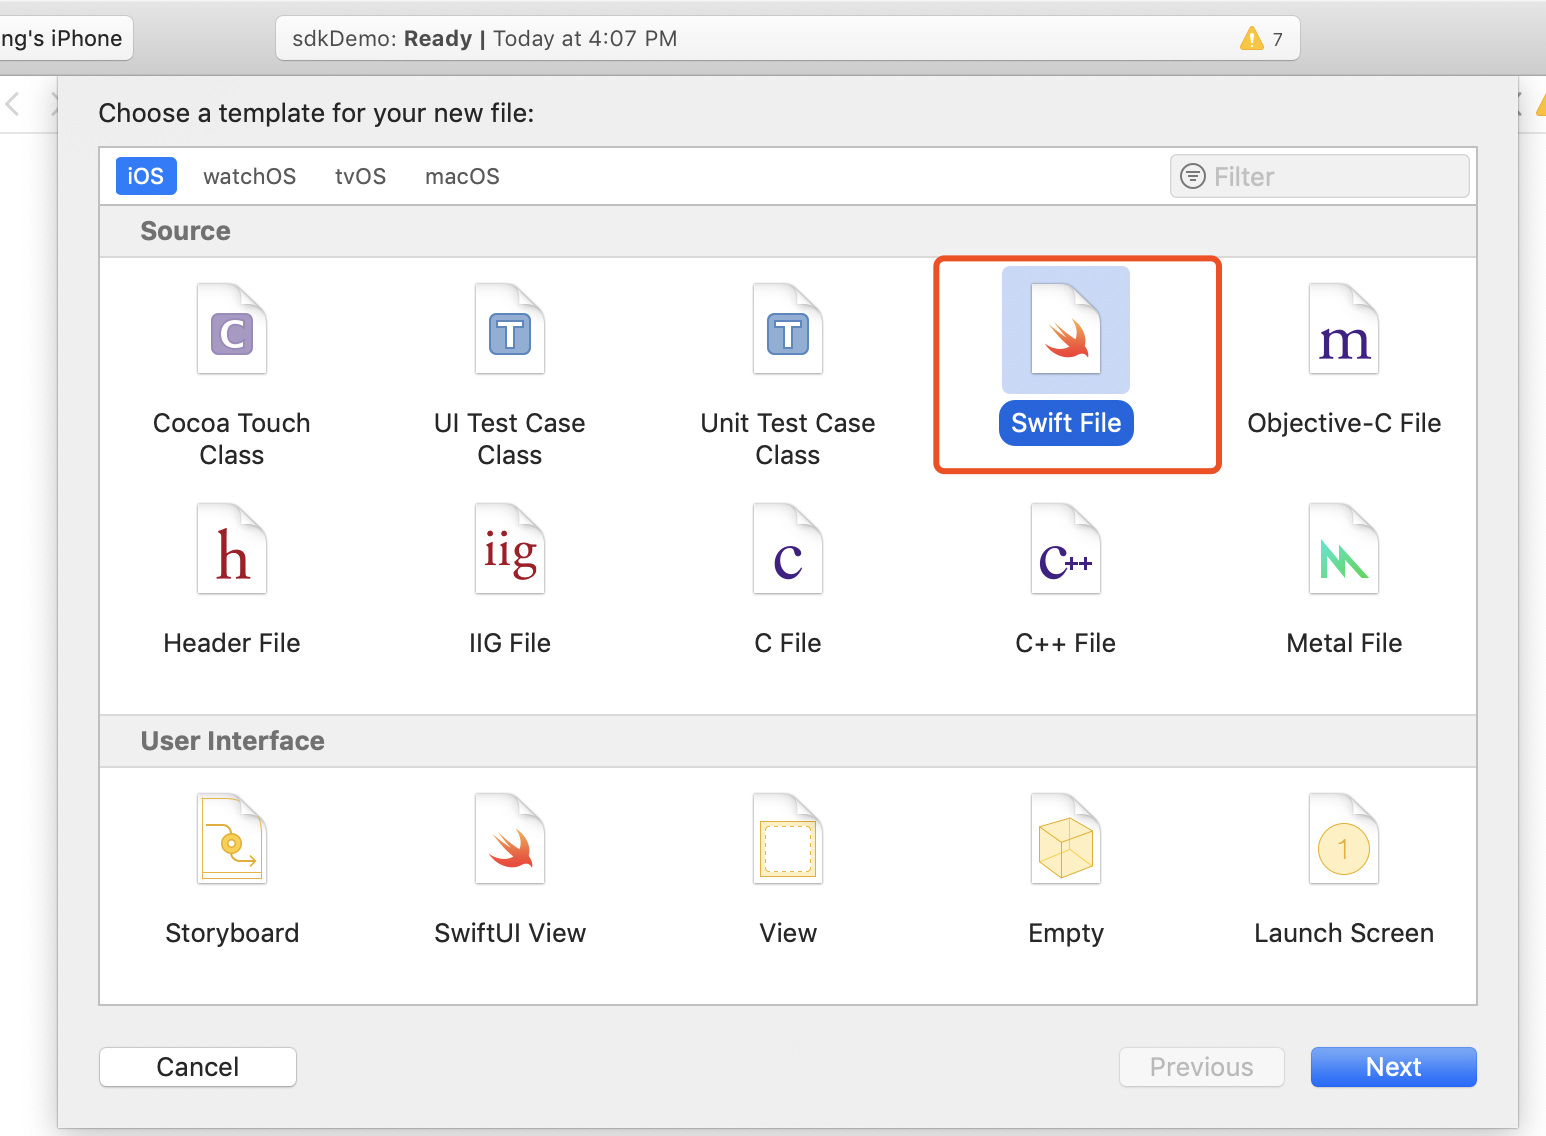
-
新建文件,选择 Swift File 类型。
-
按照需求命名并确保文件后缀��是 .swift,然后点击 Create。

-
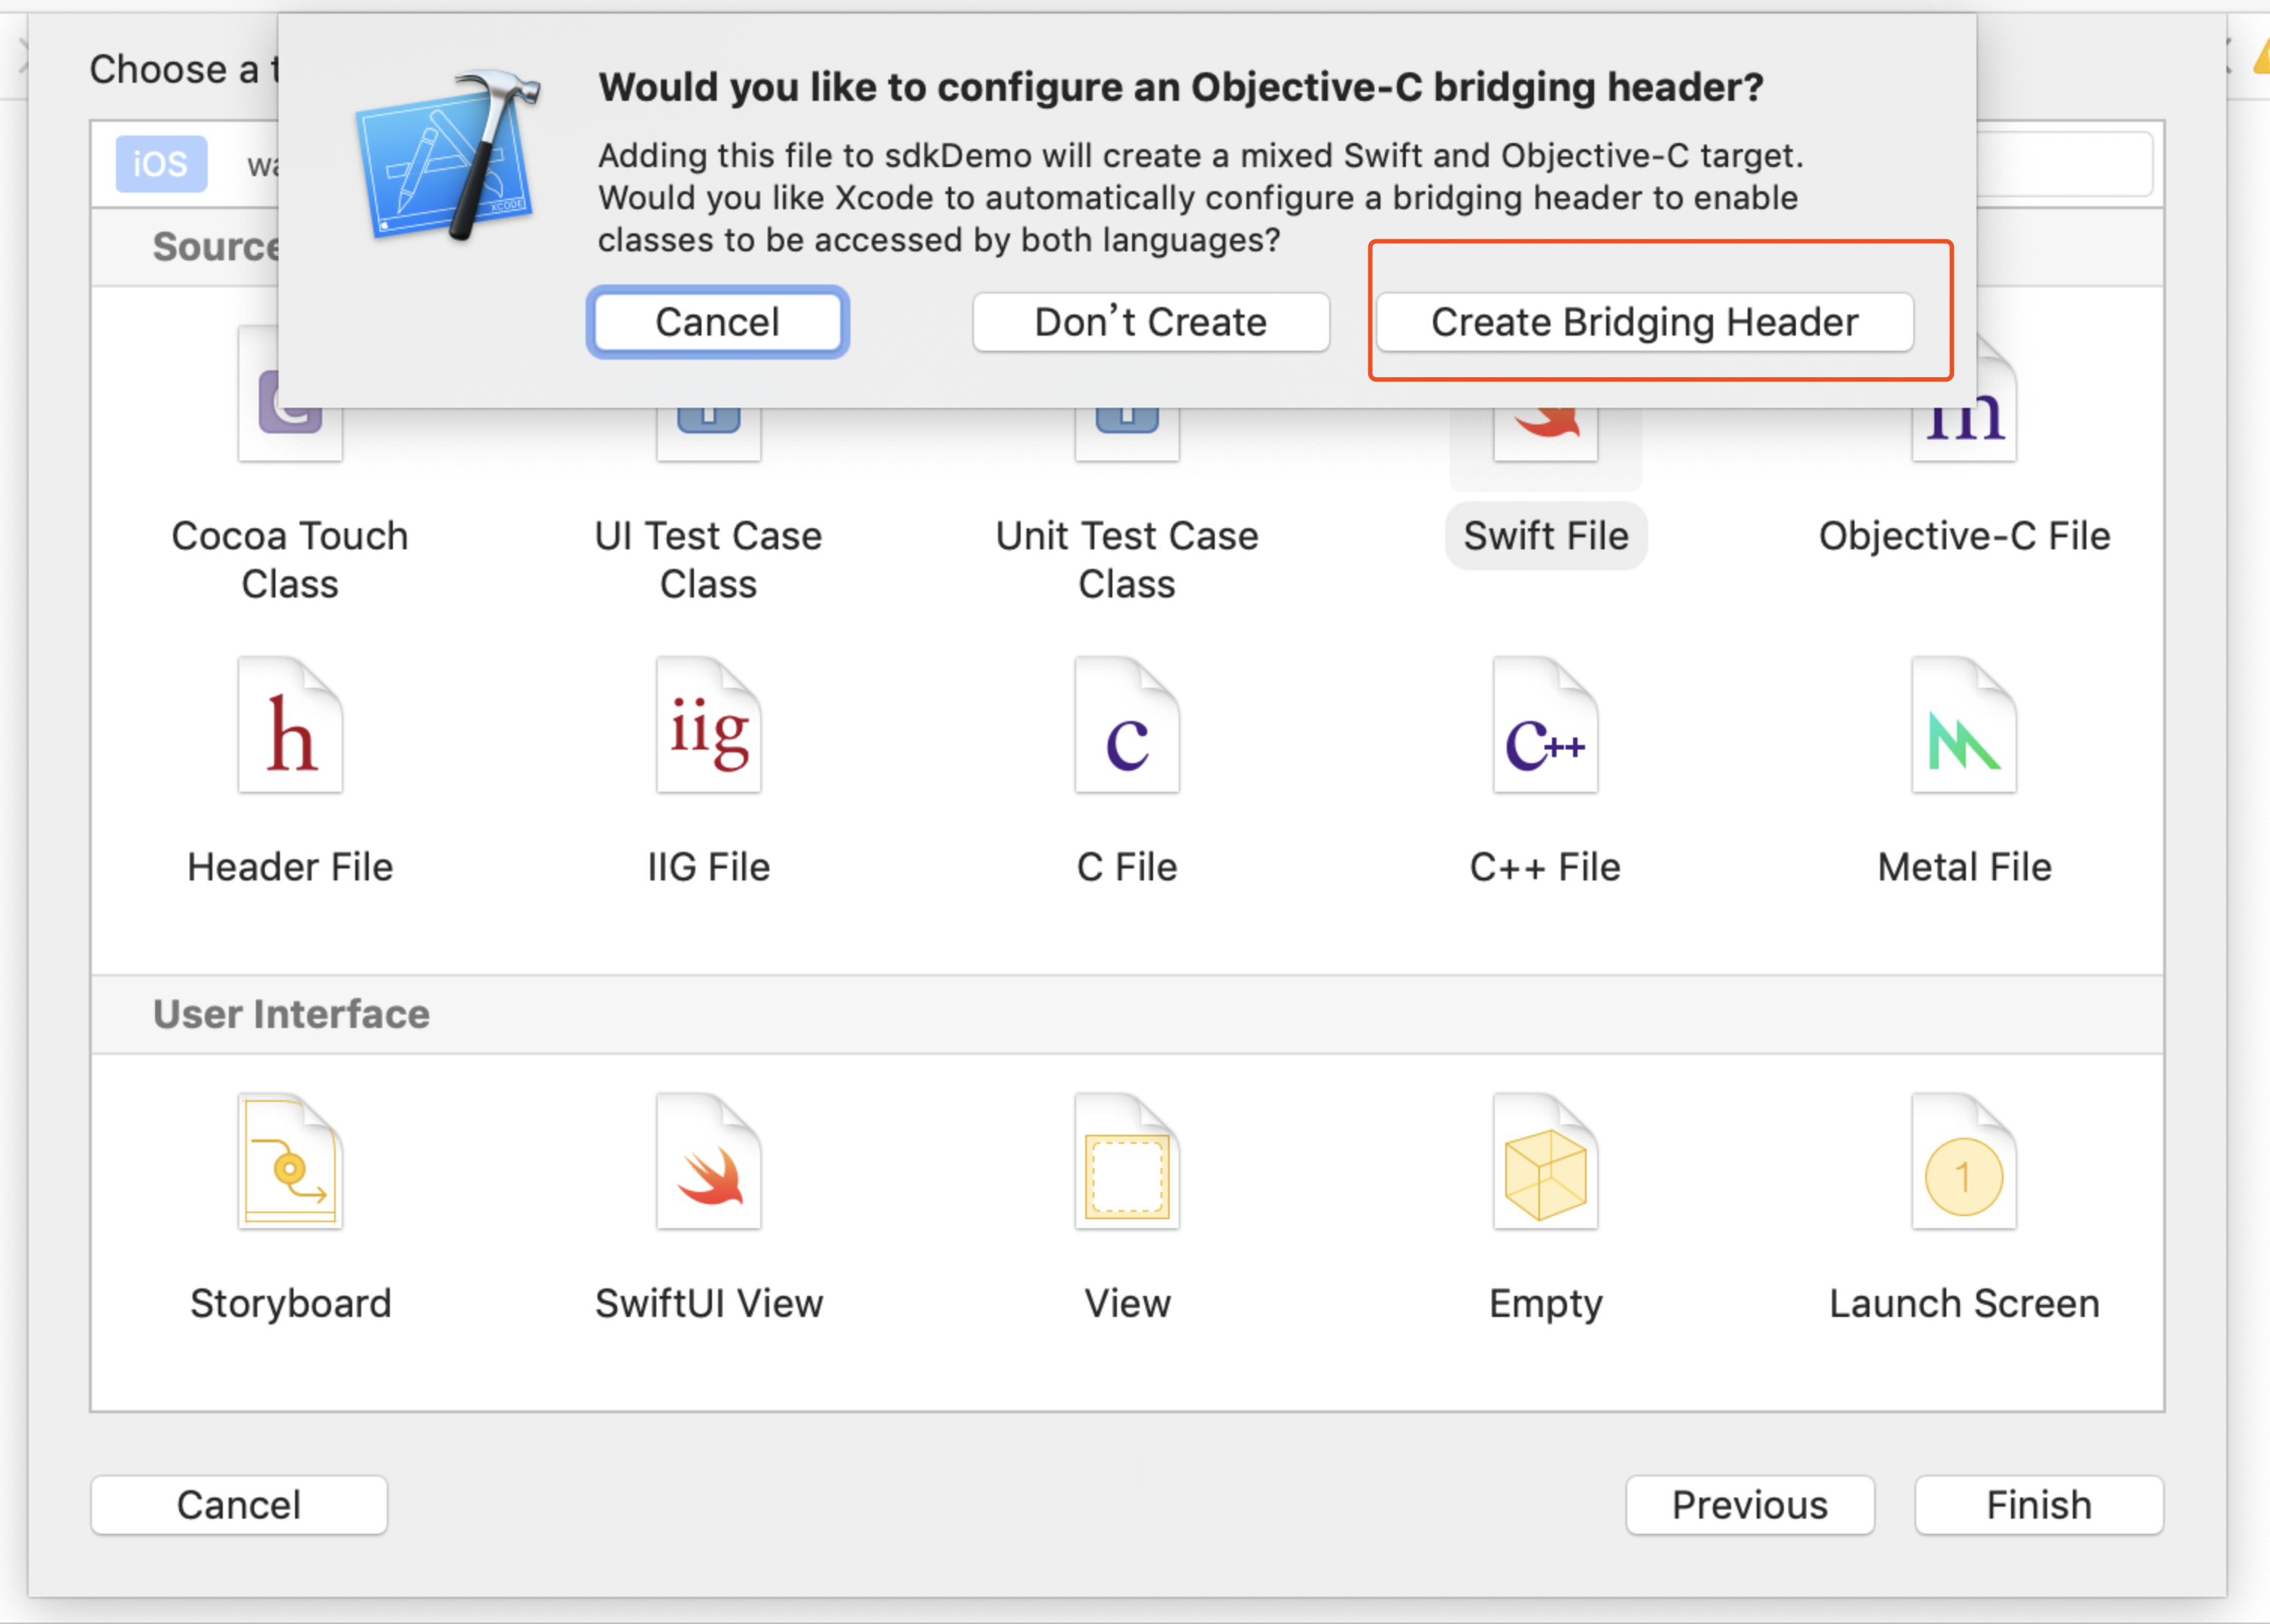
点击 Create Bridging Header。
请确保选择 Create Bridging Header。否则,Xcode 将不会创建桥接层文件。
- 确保 Xcode 工程中创建了两个文件(一份为第二步创建的 .swift 文件,另一份为自动创建的 project_name-Bridging-Header.h 文件)。
文件内容无需更改。
- Unity
- Unreal Engine
不适用。
Unreal Engine 中无法直接增加 iOS 端 Swift 模块,需要修改引擎配置。
-
使用 Xcode 12 及以上版本时,需要在
/Plugins/INTLSDK/Source/INTLCore/INTLCore.Build.cs中添加以下的代码。PublicSystemLibraryPaths.Add("/Applications/Xcode.app/Contents/Developer/Toolchains/XcodeDefault.xctoolchain/usr/lib/swift/iphoneos");
PublicSystemLibraryPaths.Add("/Applications/Xcode.app/Contents/Developer/Toolchains/XcodeDefault.xctoolchain/usr/lib/swift-5.0/iphoneos");注意由于 Player Network SDK 已经提前进行了以下配置,使用其他版本的 Xcode 时可以省略这个步骤。

由于使用 Xcode 12 及以上版本的 Swift lib 在编译 Unreal Engine 时会报以下错误,只有使用 Xcode 12 及以上版本时需要这个步骤解决问题。

-
修改本地 Unreal Engine 的源代码。
在 /Your_UE_Installation_Path/Engine/Source/Programs/UnrealBuildTool/ProjectFiles/Xcode/XcodeProject.cs 的
private void AppendProjectBuildConfiguration(StringBuilder Content, string ConfigName, string ConfigGuid)函数中添加下面的代码。// Enable Swift
Content.Append("\t\t\t\tCLANG_ENABLE_MODULES = YES;" + ProjectFileGenerator.NewLine);
Content.Append("\t\t\t\tSWIFT_VERSION = 5.0;" + ProjectFileGenerator.NewLine);
Content.Append("\t\t\t\tLIBRARY_SEARCH_PATHS = \"$(TOOLCHAIN_DIR)/usr/lib/swift/$(PLATFORM_NAME)\";" + ProjectFileGenerator.NewLine);
if (ConfigName == "Debug")
{
Content.Append("\t\t\t\tSWIFT_OPTIMIZATION_LEVEL = \"-Onone\";" + ProjectFileGenerator.NewLine);
}
Content.Append("\t\t\t\tALWAYS_EMBED_SWIFT_STANDARD_LIBRARIES = YES;" + ProjectFileGenerator.NewLine);
Content.Append("\t\t\t\tEMBEDDED_CONTENT_CONTAINS_SWIFT = YES;" + ProjectFileGenerator.NewLine);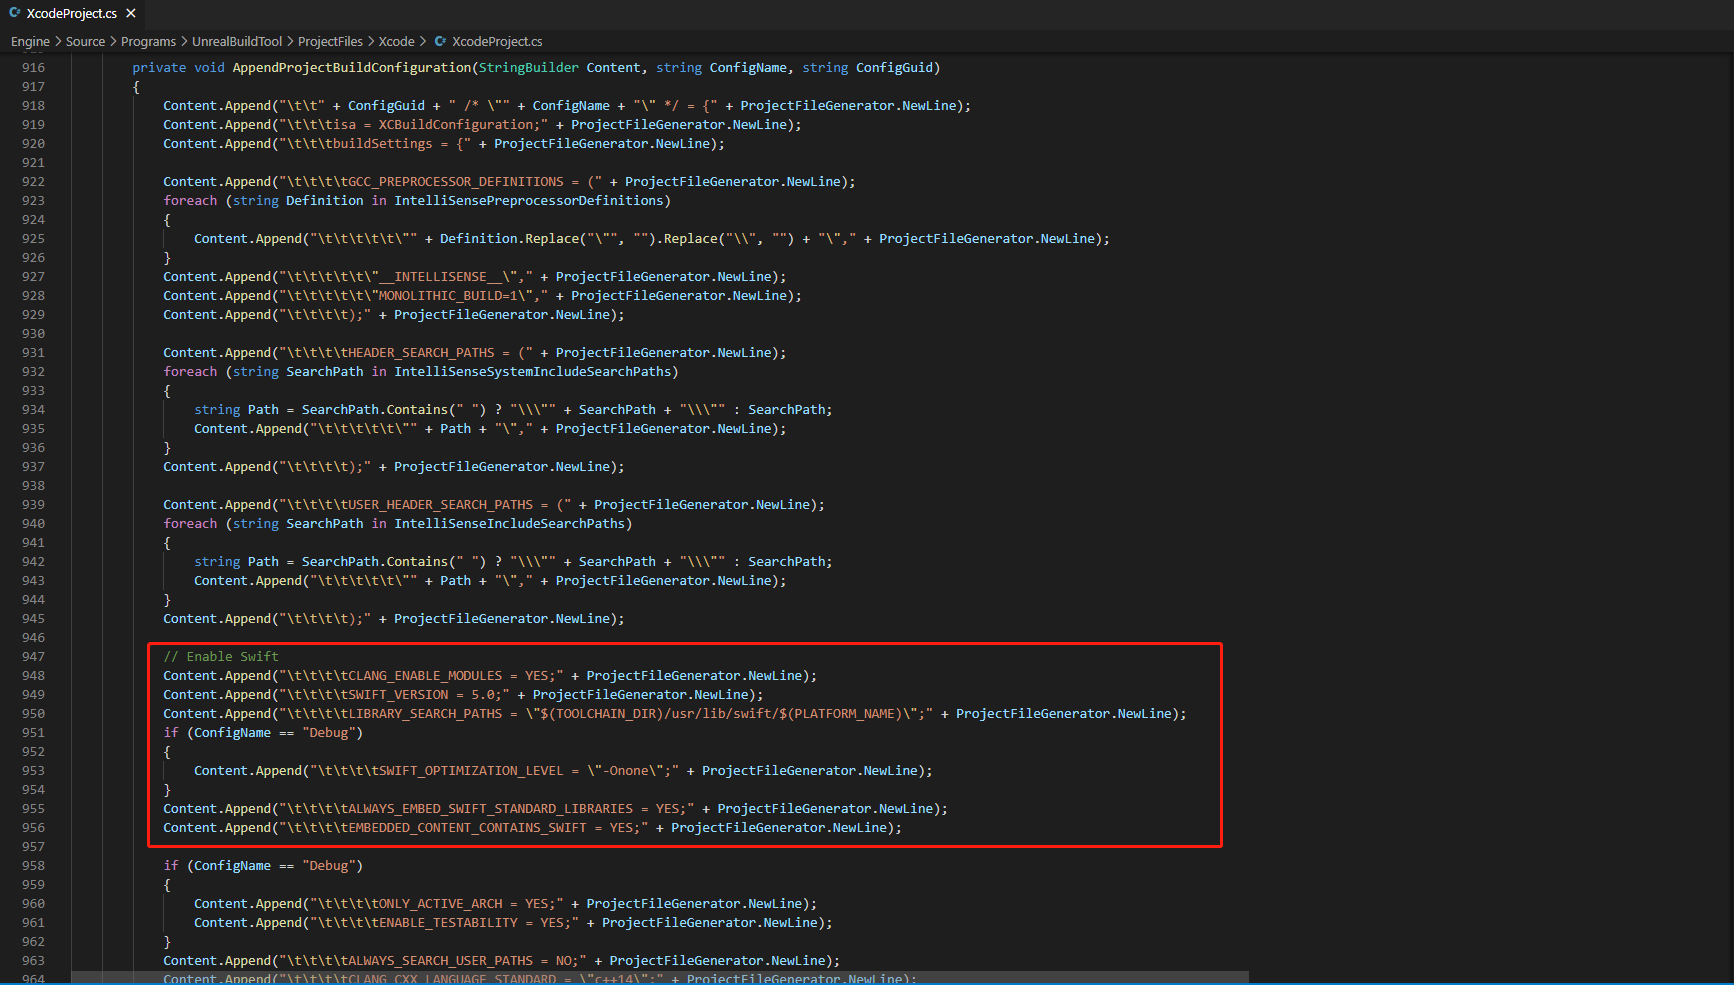
-
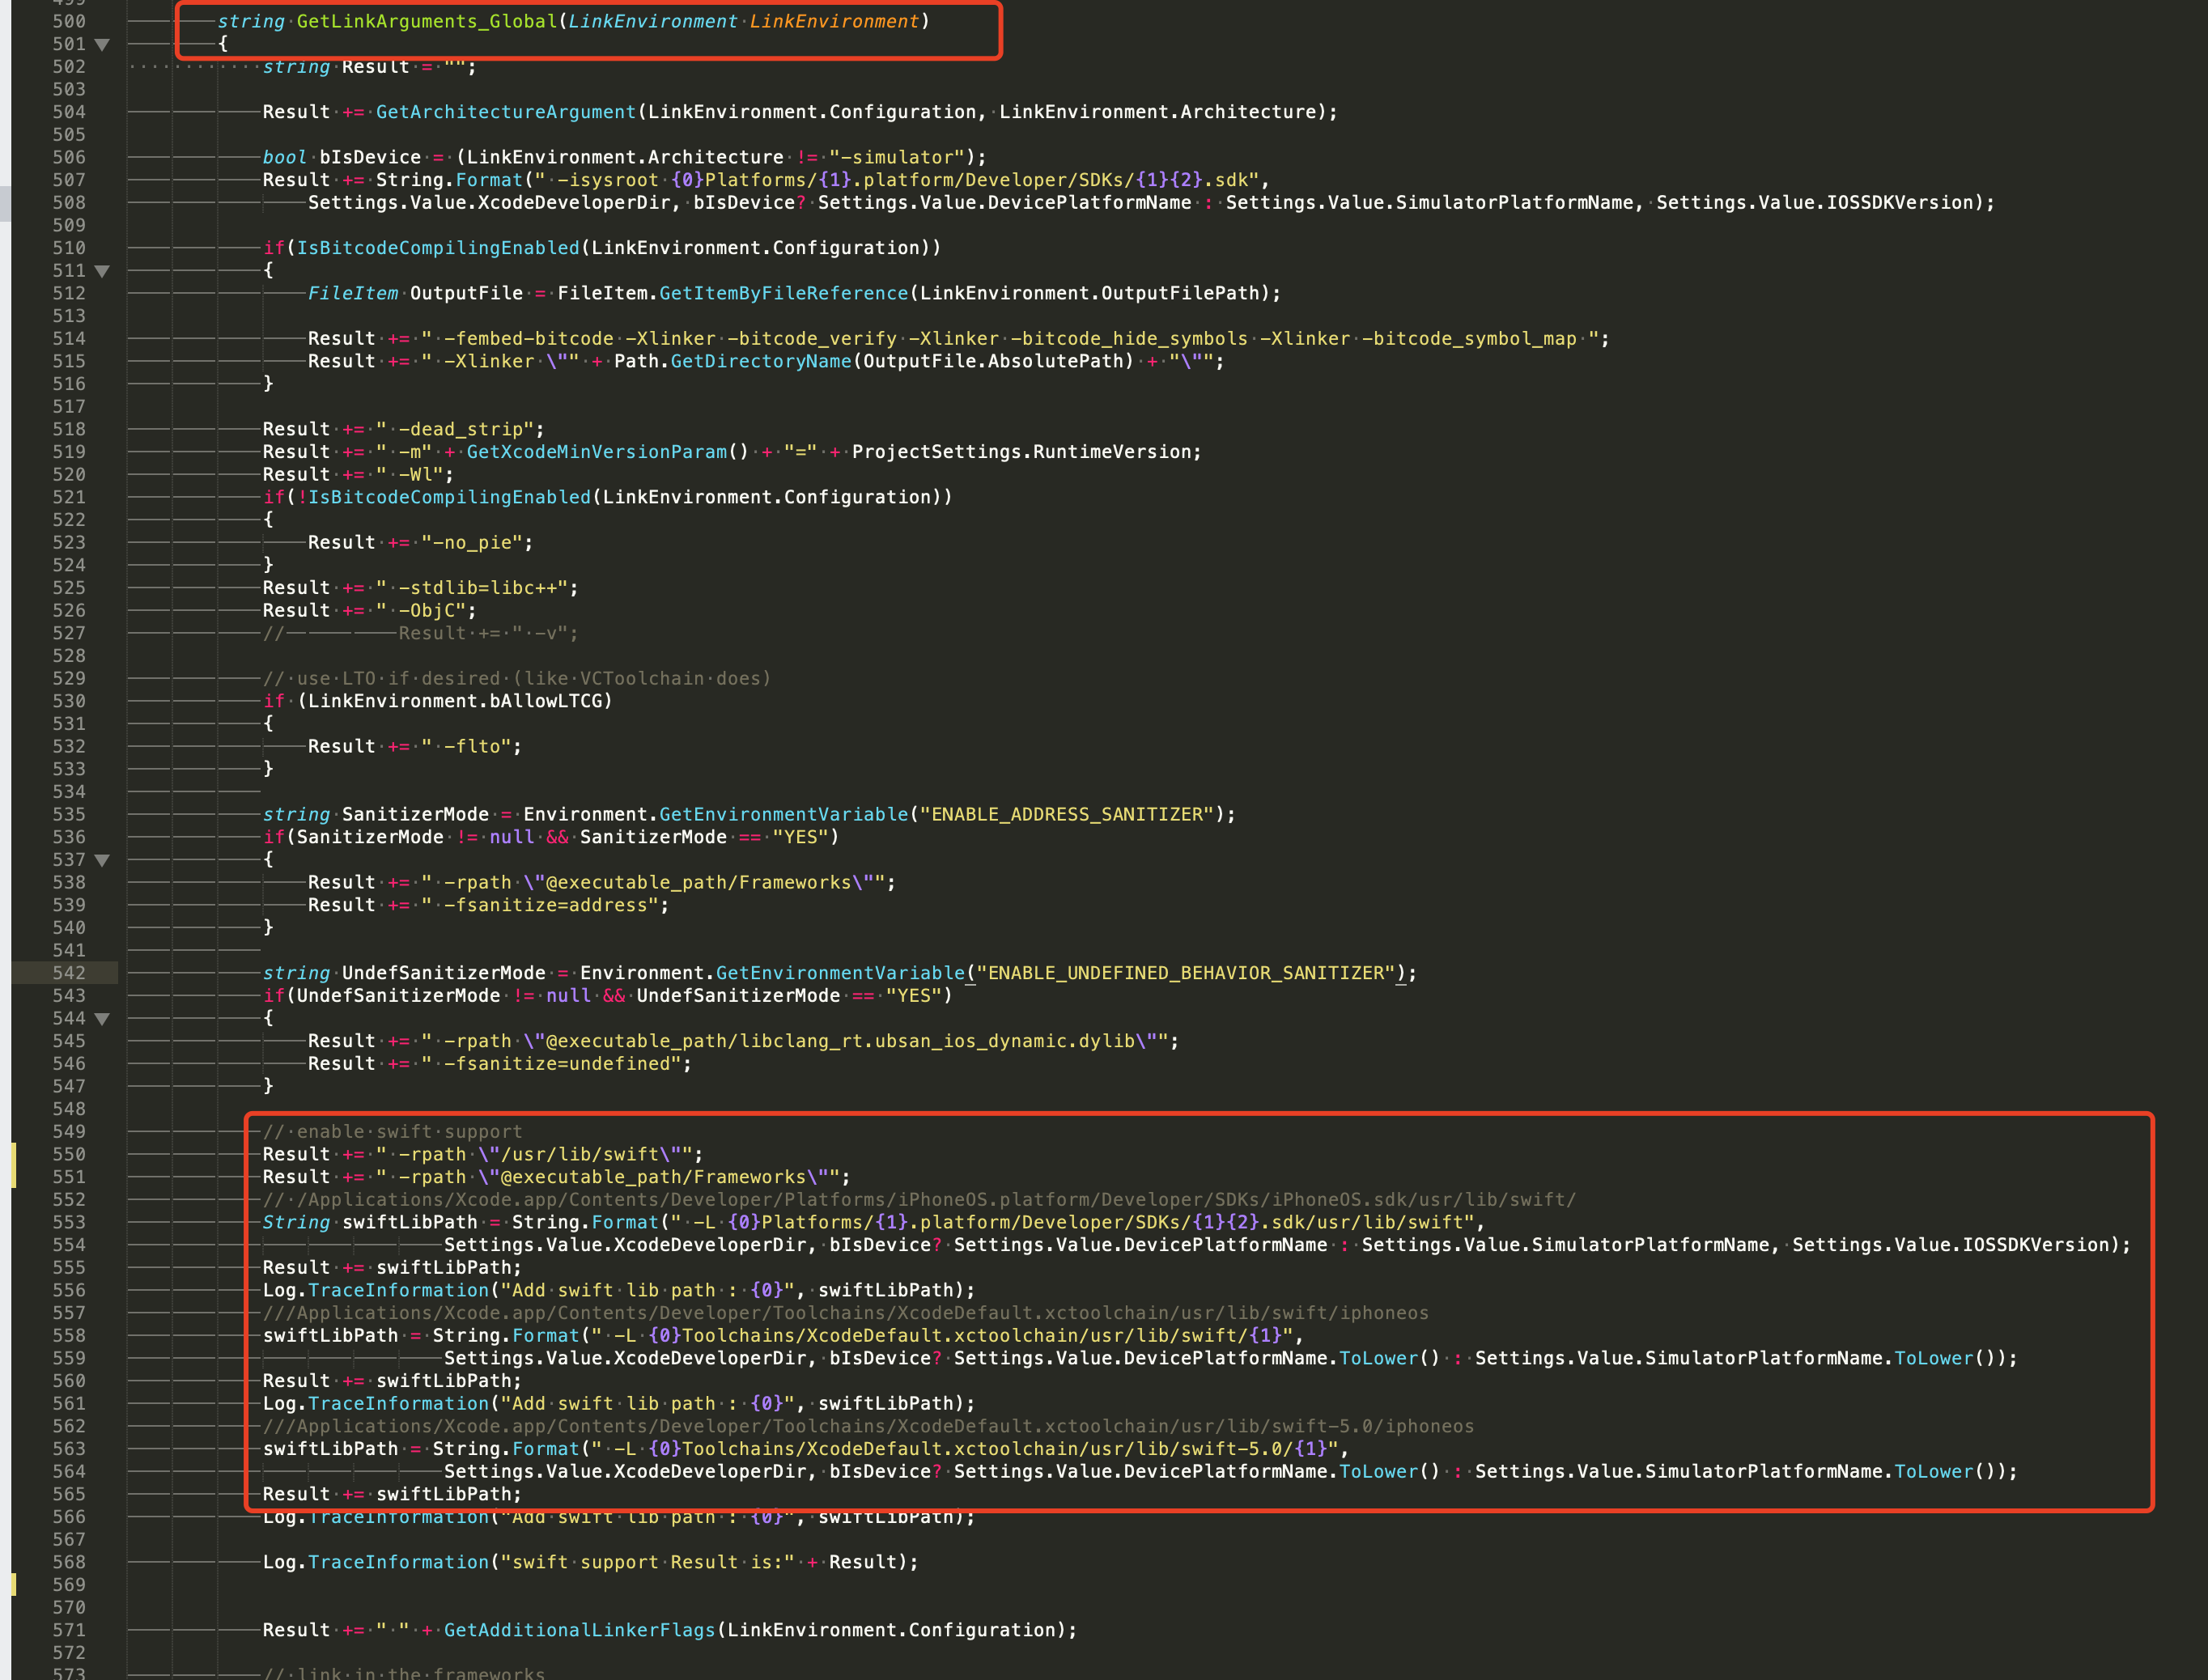
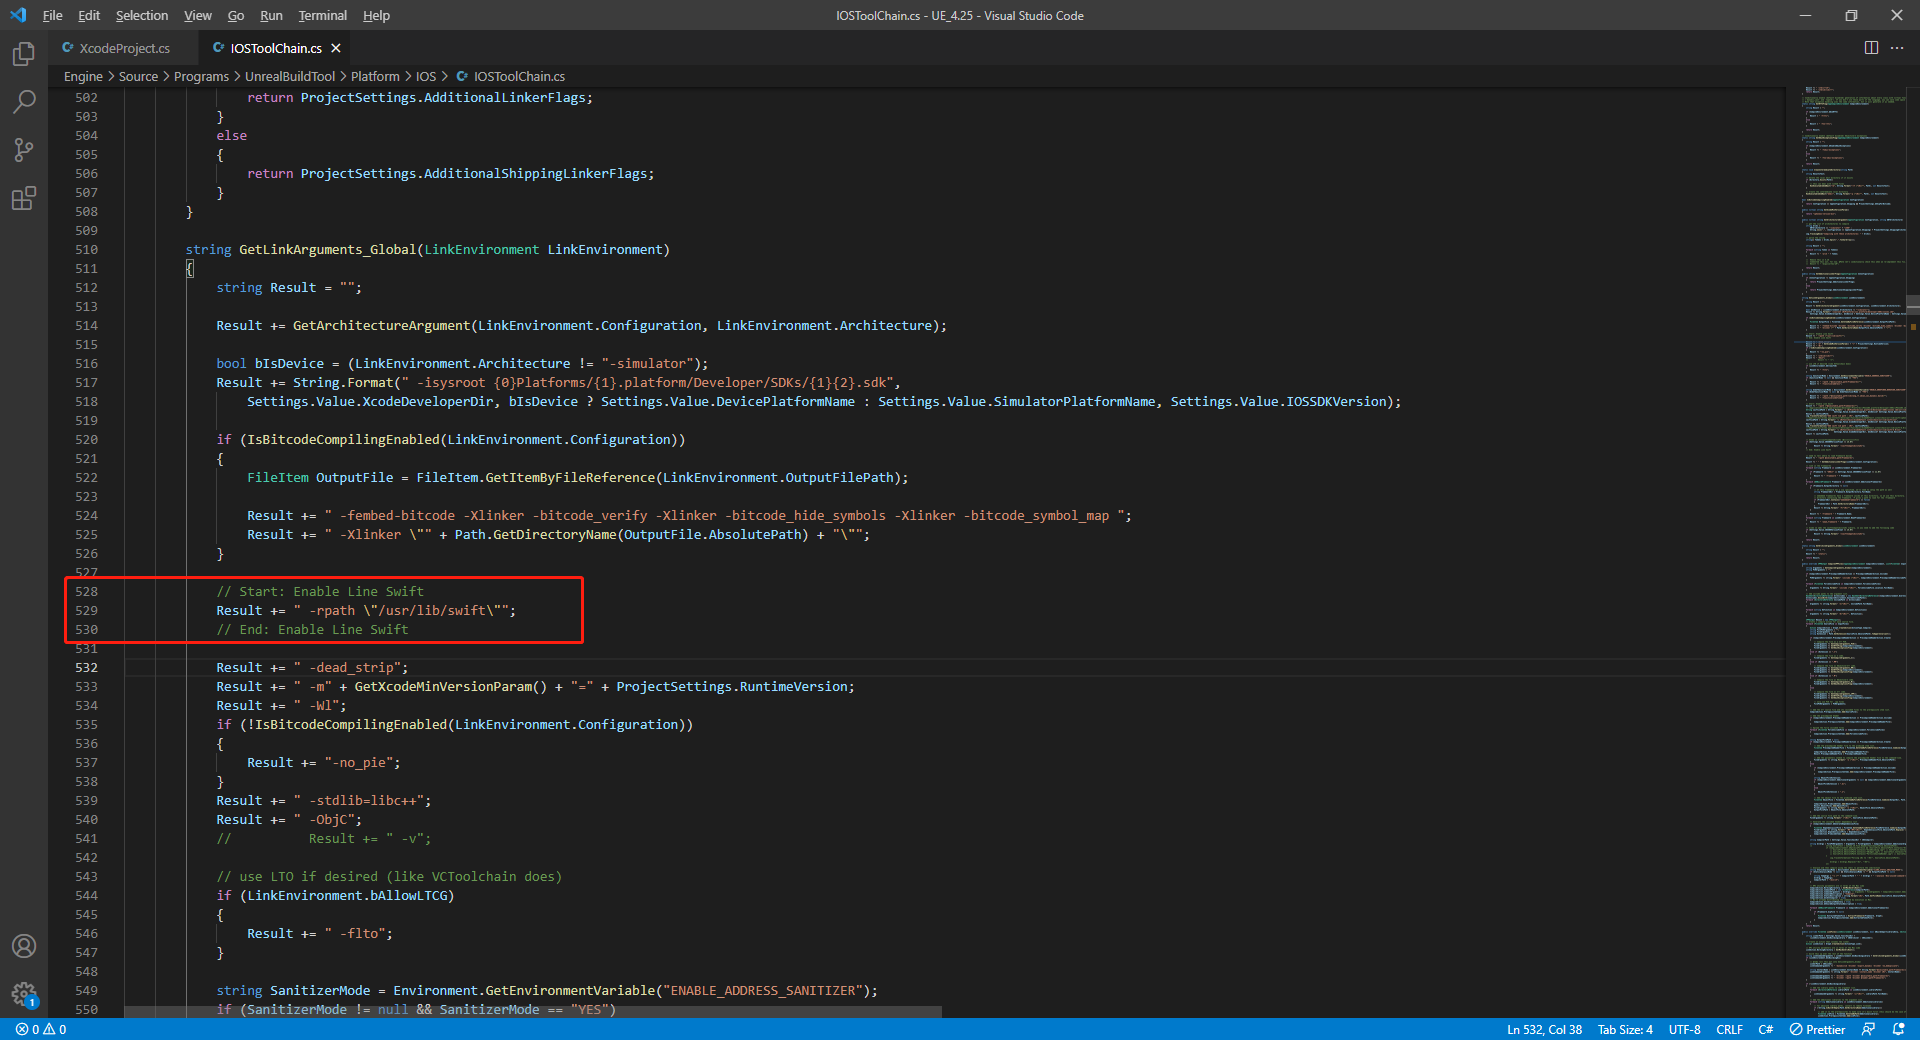
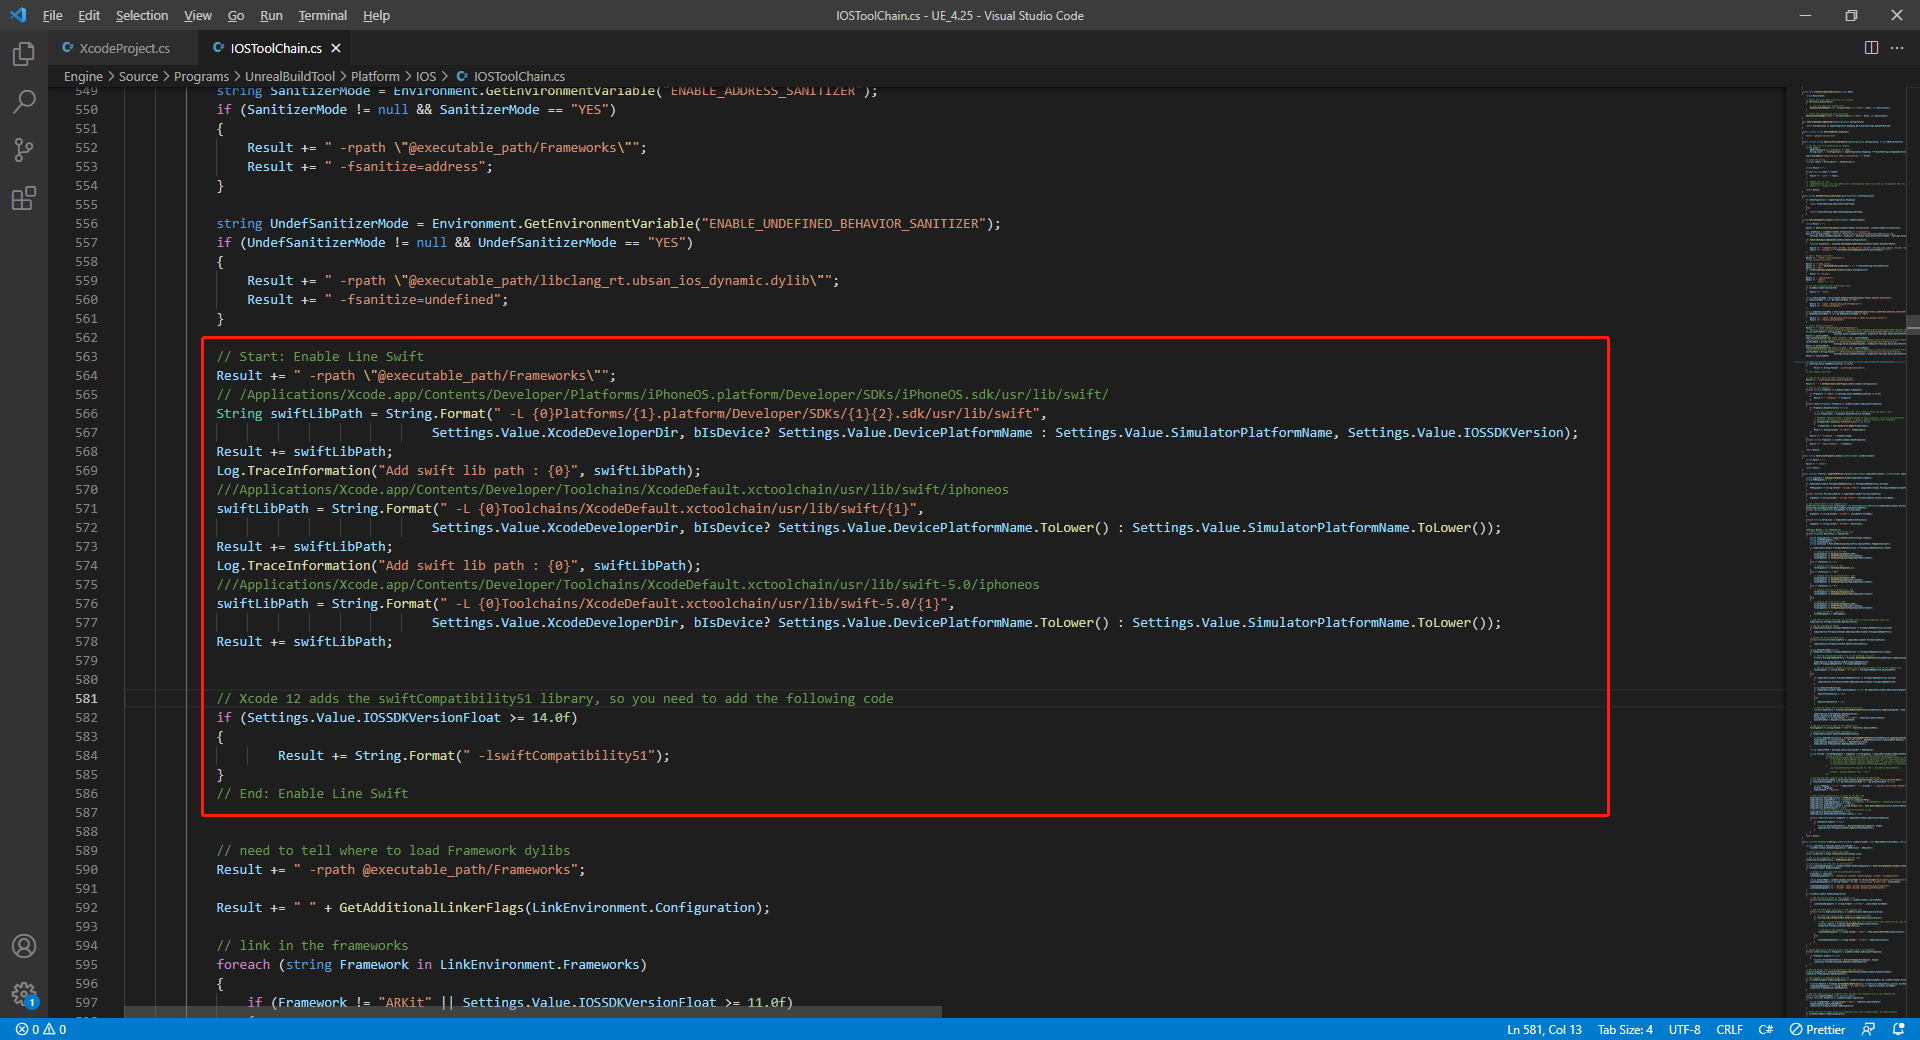
在 /Your_UE_Installation_Path/Engine/Source/Programs/UnrealBuildTool/Platform/IOS/IOSToolChain.cs 的
string GetLinkArguments_Global(LinkEnvironment LinkEnvironment)函数中添加下面的代码。
- Before XCode 12
- XCode 12 and later
// enable swift support
Result += " -rpath \"/usr/lib/swift\"";
Result += " -rpath \"@executable_path/Frameworks\"";
// /Applications/Xcode.app/Contents/Developer/Platforms/iPhoneOS.platform/Developer/SDKs/iPhoneOS.sdk/usr/lib/swift/
String swiftLibPath = String.Format(" -L {0}Platforms/{1}.platform/Developer/SDKs/{1}{2}.sdk/usr/lib/swift",
                            Settings.Value.XcodeDeveloperDir, bIsDevice? Settings.Value.DevicePlatformName : Settings.Value.SimulatorPlatformName, Settings.Value.IOSSDKVersion);
Result += swiftLibPath;
Log.TraceInformation("Add swift lib path : {0}", swiftLibPath);
///Applications/Xcode.app/Contents/Developer/Toolchains/XcodeDefault.xctoolchain/usr/lib/swift/iphoneos
swiftLibPath = String.Format(" -L {0}Toolchains/XcodeDefault.xctoolchain/usr/lib/swift/{1}",
                            Settings.Value.XcodeDeveloperDir, bIsDevice? Settings.Value.DevicePlatformName.ToLower() : Settings.Value.SimulatorPlatformName.ToLower());
Result += swiftLibPath;
Log.TraceInformation("Add swift lib path : {0}", swiftLibPath);
///Applications/Xcode.app/Contents/Developer/Toolchains/XcodeDefault.xctoolchain/usr/lib/swift-5.0/iphoneos
swiftLibPath = String.Format(" -L {0}Toolchains/XcodeDefault.xctoolchain/usr/lib/swift-5.0/{1}",
                            Settings.Value.XcodeDeveloperDir, bIsDevice? Settings.Value.DevicePlatformName.ToLower() : Settings.Value.SimulatorPlatformName.ToLower());
Result += swiftLibPath;
// 该行代码需要前置(前置的代码位置见下面示例图片)
// enable swift support, make sure '/usr/lib/swift' goes before '@executable_path/Frameworks'
Result += " -rpath \"/usr/lib/swift\"";
// enable swift support
Result += " -rpath \"@executable_path/Frameworks\"";
// /Applications/Xcode.app/Contents/Developer/Platforms/iPhoneOS.platform/Developer/SDKs/iPhoneOS.sdk/usr/lib/swift/
String swiftLibPath = String.Format(" -L {0}Platforms/{1}.platform/Developer/SDKs/{1}{2}.sdk/usr/lib/swift",
                            Settings.Value.XcodeDeveloperDir, bIsDevice? Settings.Value.DevicePlatformName : Settings.Value.SimulatorPlatformName, Settings.Value.IOSSDKVersion);
Result += swiftLibPath;
Log.TraceInformation("Add swift lib path : {0}", swiftLibPath);
///Applications/Xcode.app/Contents/Developer/Toolchains/XcodeDefault.xctoolchain/usr/lib/swift/iphoneos
swiftLibPath = String.Format(" -L {0}Toolchains/XcodeDefault.xctoolchain/usr/lib/swift/{1}",
                            Settings.Value.XcodeDeveloperDir, bIsDevice? Settings.Value.DevicePlatformName.ToLower() : Settings.Value.SimulatorPlatformName.ToLower());
Result += swiftLibPath;
Log.TraceInformation("Add swift lib path : {0}", swiftLibPath);
///Applications/Xcode.app/Contents/Developer/Toolchains/XcodeDefault.xctoolchain/usr/lib/swift-5.0/iphoneos
swiftLibPath = String.Format(" -L {0}Toolchains/XcodeDefault.xctoolchain/usr/lib/swift-5.0/{1}",
                            Settings.Value.XcodeDeveloperDir, bIsDevice? Settings.Value.DevicePlatformName.ToLower() : Settings.Value.SimulatorPlatformName.ToLower());
Result += swiftLibPath;

// Xcode 12 adds the swiftCompatibility51 library, so you need to add the following code
if (Settings.Value.IOSSDKVersionFloat >= 14.0f)
{
        Result += String.Format(" -lswiftCompatibility51");
}
- 打开解决方案重新编译
/Users/intl/UE4/UE_4.25/Engine/Source/Programs/UnrealBuildTool/UnrealBuildTool.sln。
2. 在 Xcode 中添加功能
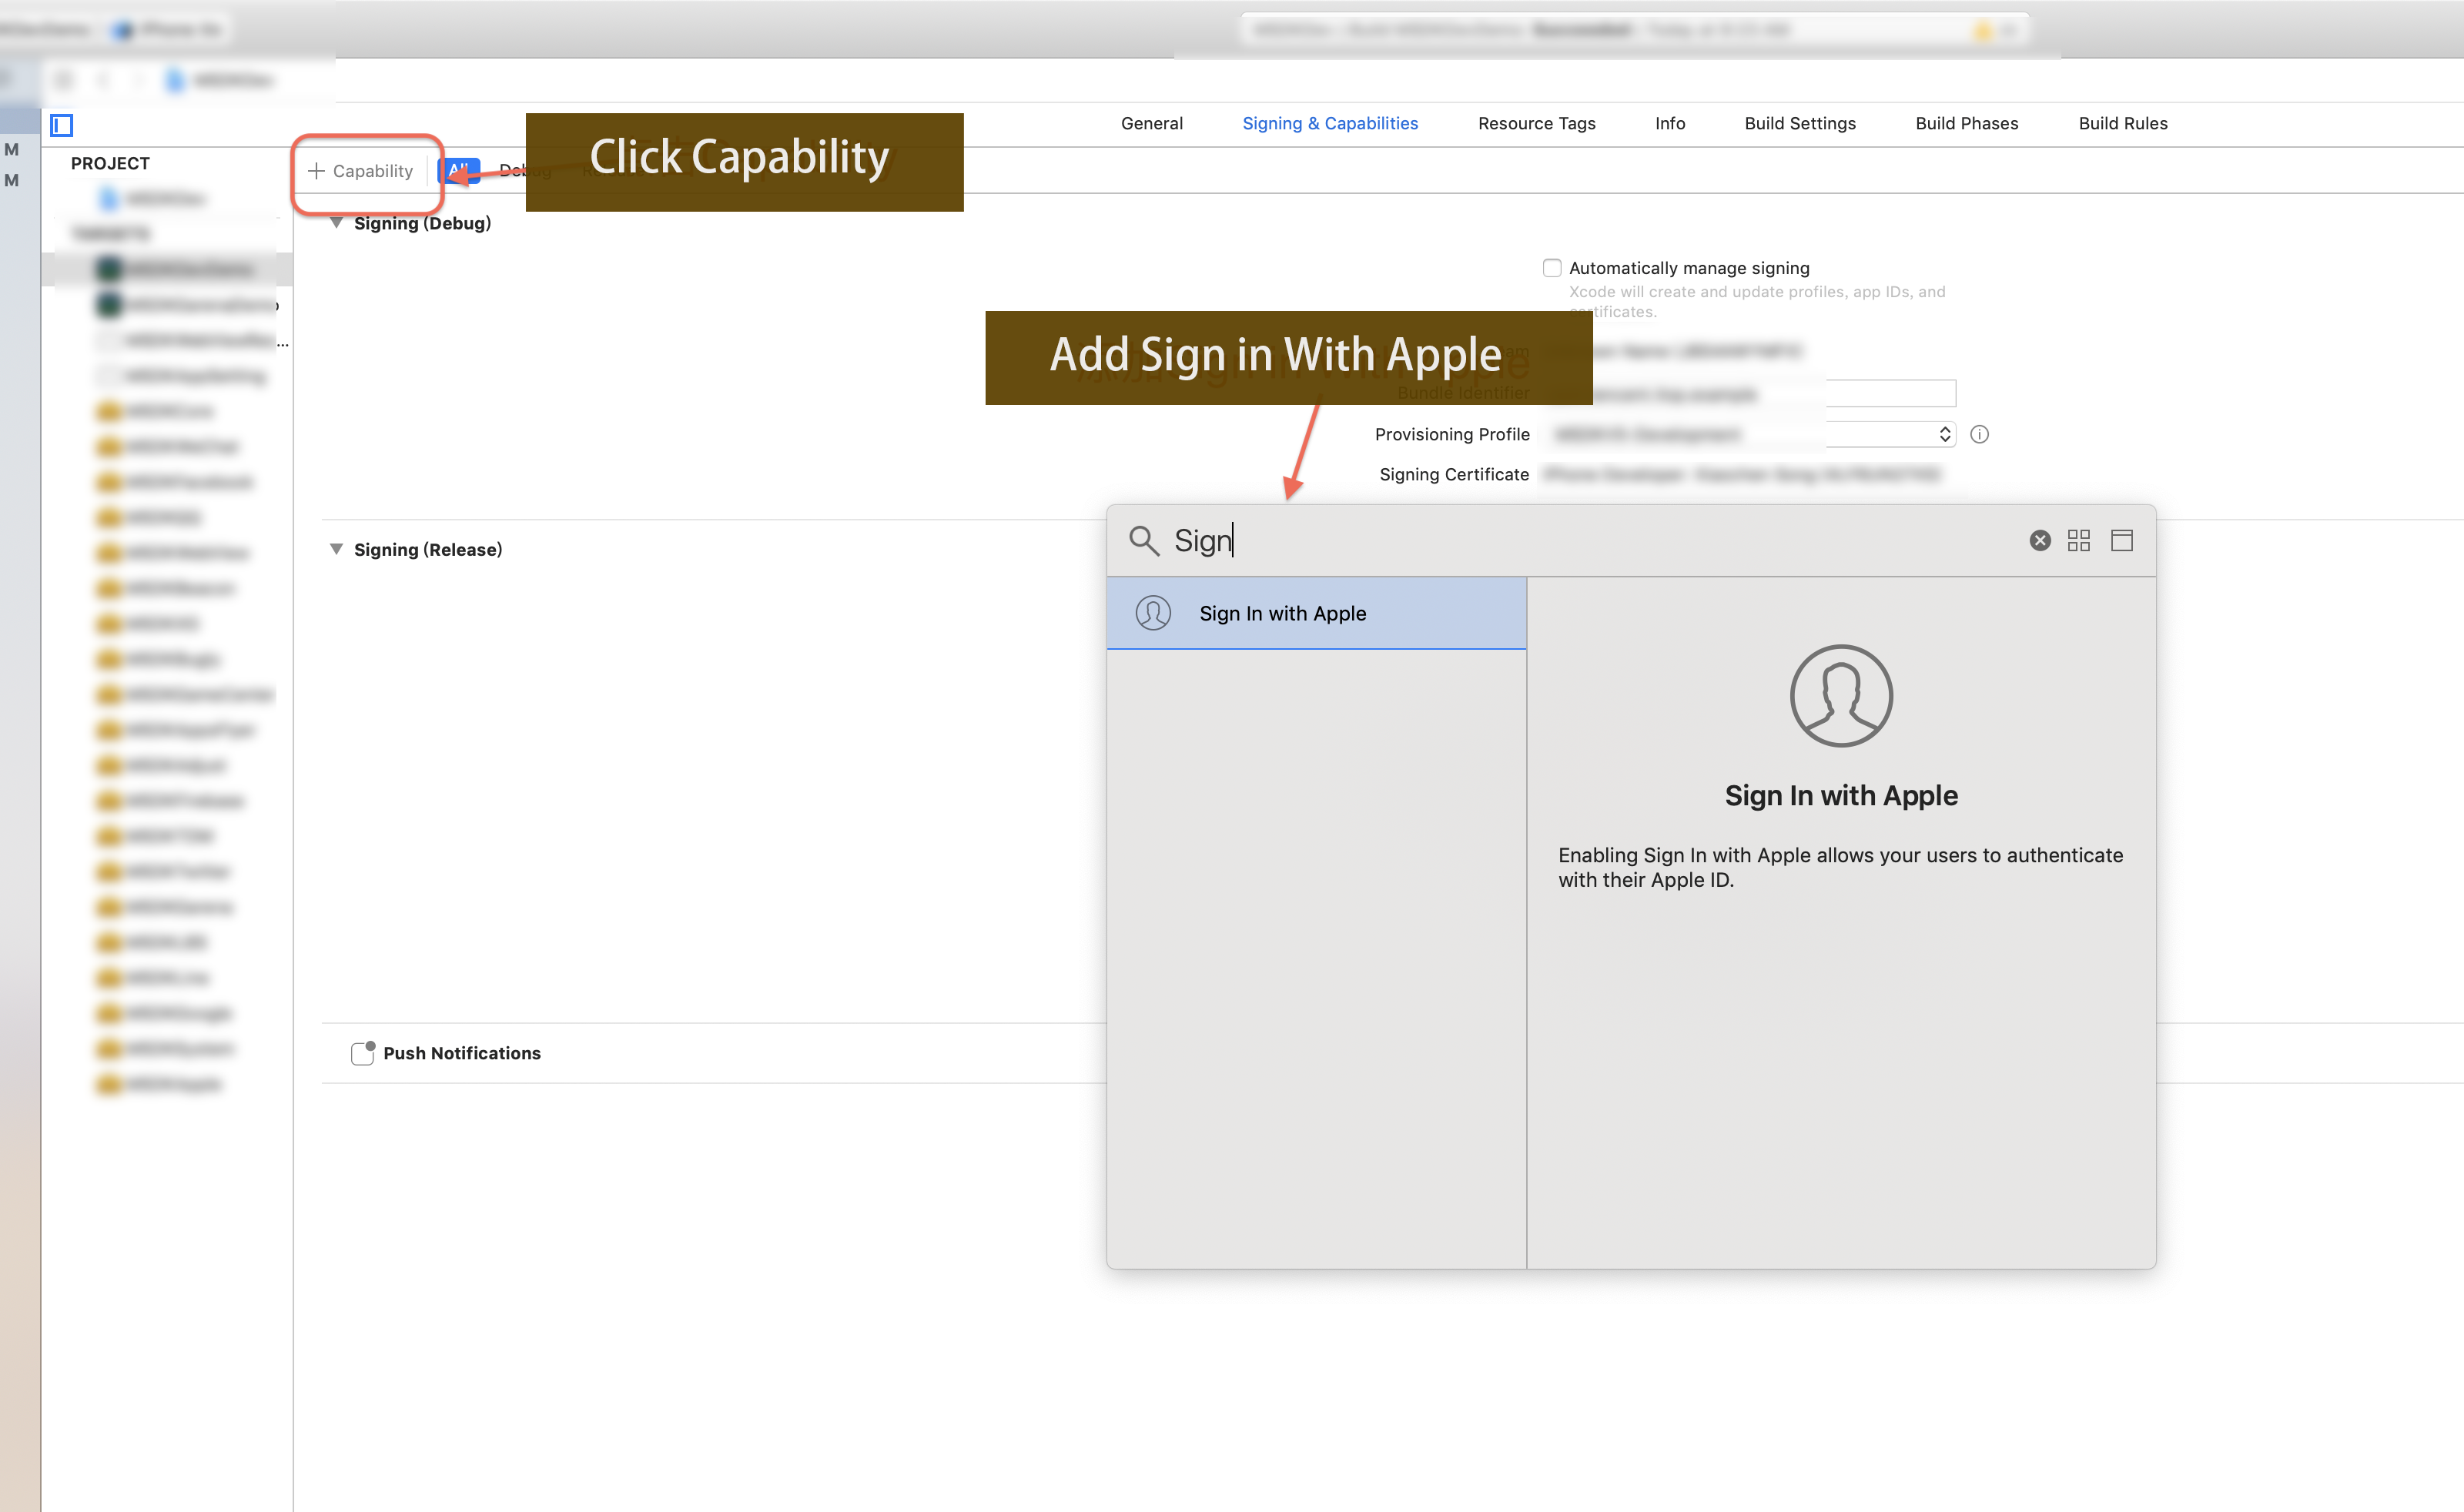
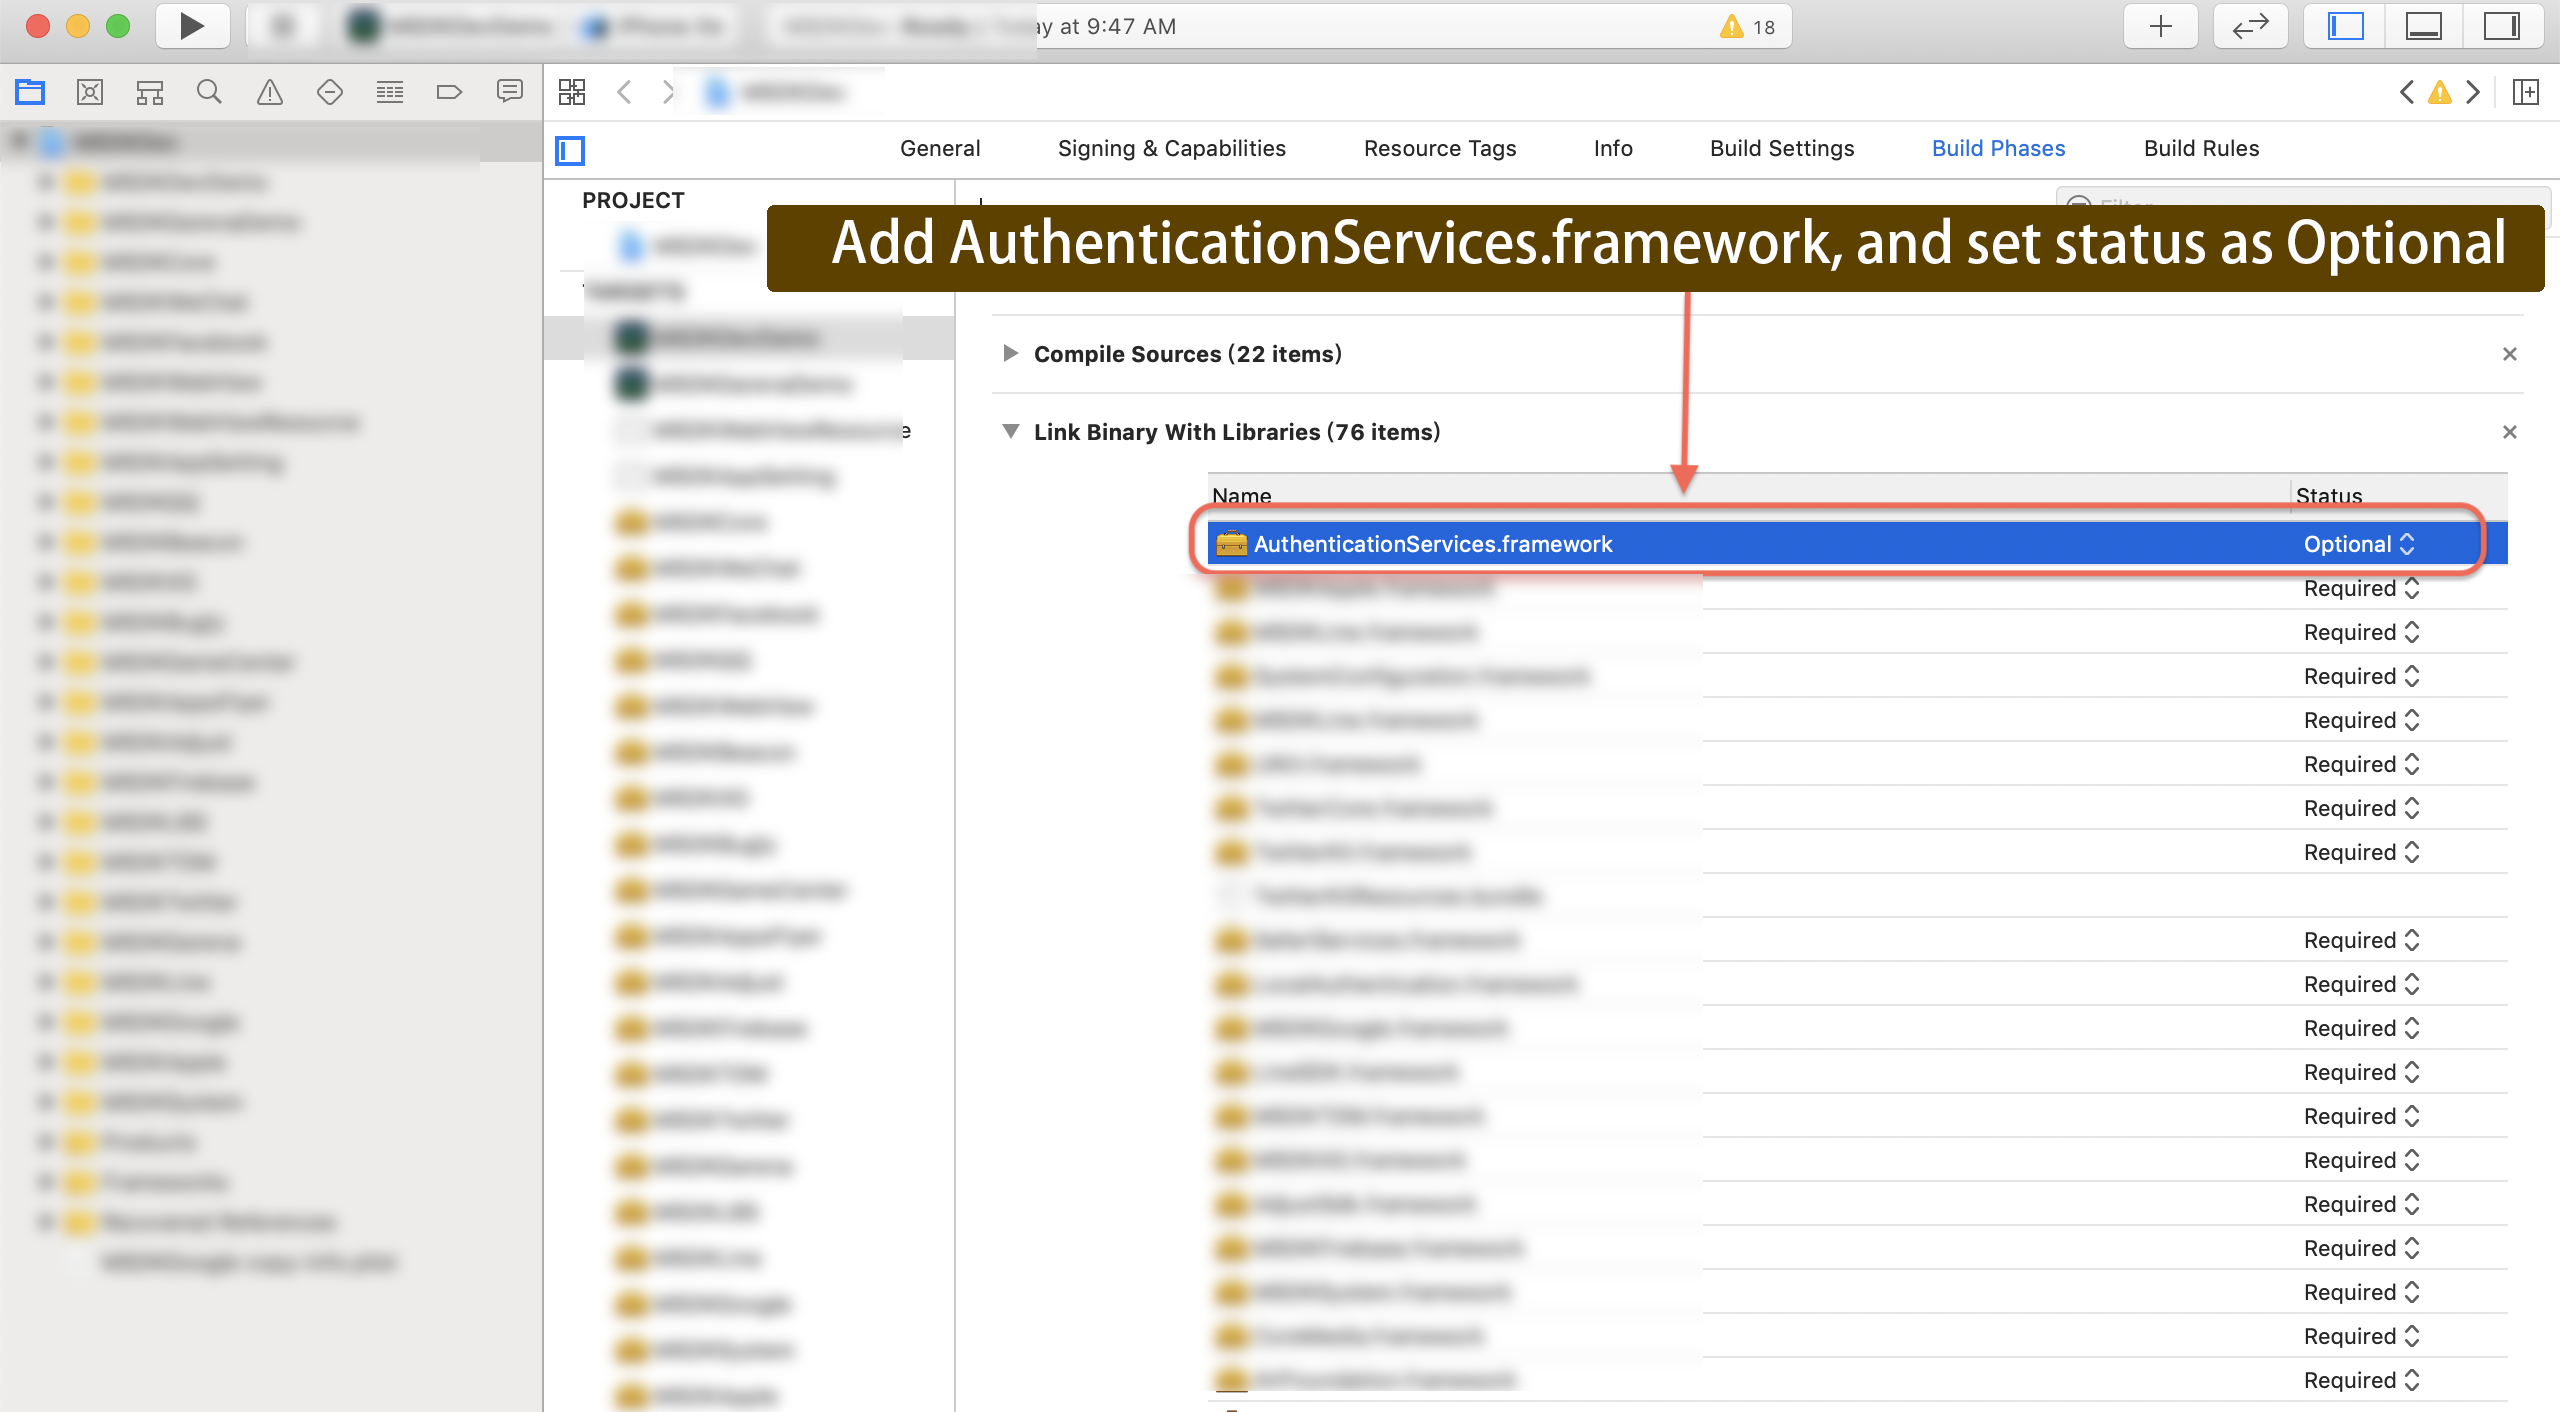
3. 在 Xcode BuildPhases 中添加 AuthenticationServices.framework 并将 Status 设置为可选。
Unity 的其他配置
-
Check the configurations written in
INTLCoreKit.projmods.{
"group": "INTL",
"libs": [],
"frameworks": ["AuthenticationServices.framework:weak"],
"files": [],
"folders": [],
"excludes": [],
"headerpaths":[],
"build_settings": {},
"system_capabilities": {},
"Info.plist":{}
} -
添加 entitlement 文件。
要为 Unity 添加 entitlement 文件,请参见 Unity 论坛 上的解决方案。Sample:
INTLDevDemo.entitlements<?xml version="1.0" encoding="UTF-8"?>
<!DOCTYPE plist PUBLIC "-//Apple//DTD PLIST 1.0//EN" "http://www.apple.com/DTDs/PropertyList-1.0.dtd">
<plist version="1.0">
<dict>
<key>com.apple.developer.applesignin</key>
<array>
<string>Default</string>
</array>
</dict>
</plist>
步骤2:添加 Apple 登录
- Apple 登录是无法在重签包测试的,建议使用 TestFlight 或者 Dev 的打包。
- Apple 登录不提供
PictureUrl(用户头像 URL)。更多信息,请参见 Unity 引擎的 INTLAuthResult 或 Unreal Engine 的 FINTLAuthResult。
Login 接口的登录权限参数传入 email 和 fullName:
- 在首次登录的界面中有编辑用户名和隐藏邮箱的选项(Fig 2)。在回调中可以获取
email和fullName。- 玩家选择隐藏邮箱,获取的邮箱为随机邮箱地址
- 玩家选择共享邮箱,获取到用户的真实邮箱地址
- 后续登录不会获取到
email和fullName,登录界面(Fig 2),没有编辑用户名和隐藏邮箱选项。 - 如果玩家停止 app 使用 Apple ID 后再次登录,会显示 Fig 1 所示选项。
玩家可以选择 设置 > [您的用户名] > 密码和安全 > 使用 Apple ID > [应用名称] > 停止使用 Apple ID 来停止让 app 继续使用 Apple ID 登录。
在 Login 接口的登录权限参数传入空字符串时,登录界面没有编辑用户名和隐藏邮箱的选项(Fig 2)。在回调中 email 和 fullName 为空。
Fig 1:
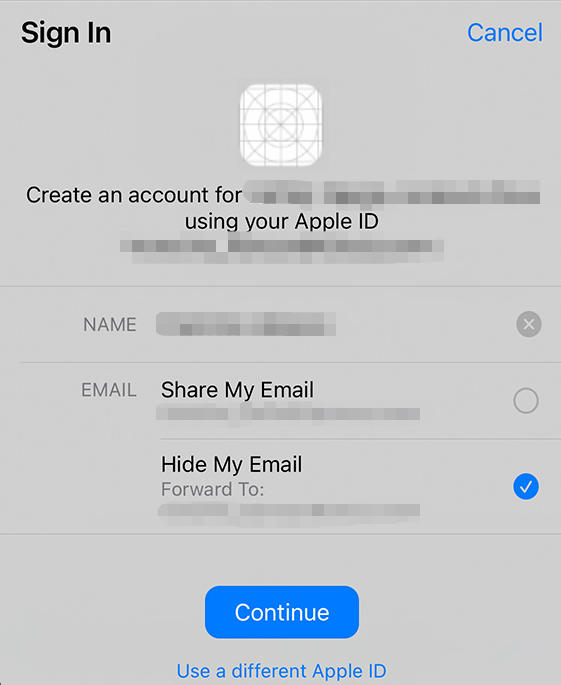
Fig 2: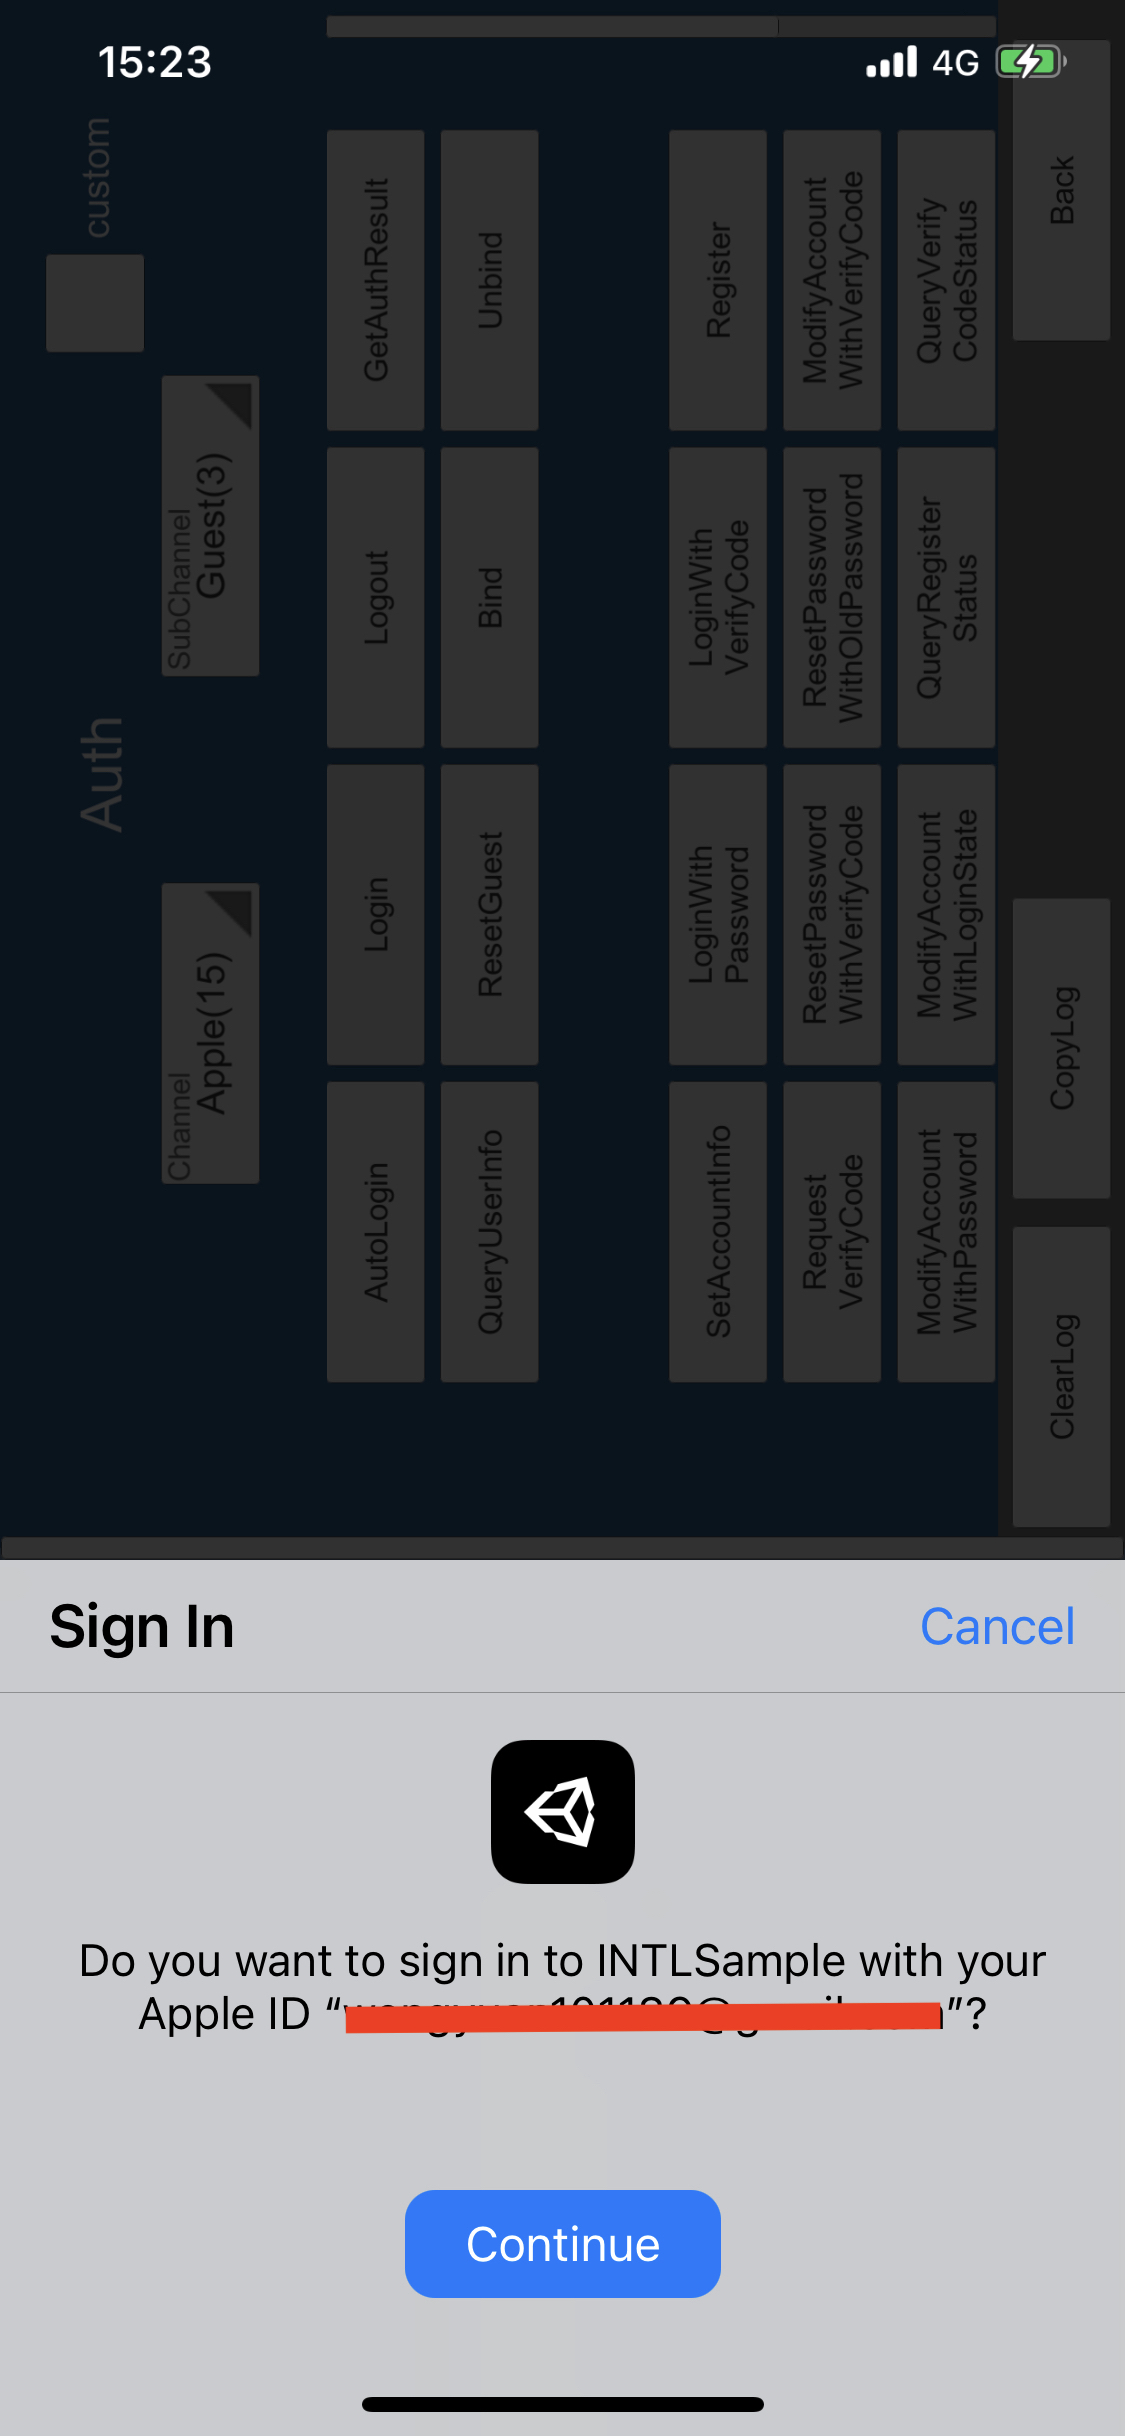
-
注册登录相关回调。
- Unity
- Unreal Engine
// Add callbacks
public void AddAuthObserver()
{
    INTLAPI.AddAuthResultObserver(OnAuthResultEvent);
}

// Remove callbacks
public void RemoveAuthObserver()
{
    INTLAPI.RemoveAuthResultObserver(OnAuthResultEvent);
}

// Process the INTLAuthResult callback
public void OnAuthResultEvent(INTLAuthResult ret)
{
    Debug.Log($"MethodID: {ret.MethodId}");

    string methodTag = "";
    if (authRet.MethodId == (int)INTLMethodID.INTL_AUTH_LOGIN)
    {
        methodTag = "Login";
    }
    else if (authRet.MethodId == (int)INTLMethodID.INTL_AUTH_BIND)
    {
        methodTag = "Bind";
    }
    else if (authRet.MethodId == (int)INTLMethodID.INTL_AUTH_AUTOLOGIN)
    {
        methodTag = "AutoLogin";
    }
    else if (authRet.MethodId == (int)INTLMethodID.INTL_AUTH_QUERY_USER_INFO)
    {
        methodTag = "QueryUserInfo";
    }
    else if (authRet.MethodId == (int)INTLMethodID.INTL_AUTH_GET_AUTH_RESULT)
    {
        methodTag = "GetAuthResult";
    }
}
C++ Event Handling (above v1.15)
//Add callback
FINTLAuthEvent authEvent;
authEvent.AddUObject(this, &OnAuthResult_Implementation);
UINTLSDKAPI::SetAuthResultObserver(authEvent);
// Remove callbacks
UINTLSDKAPI::GetAuthResultObserver().Clear();
void OnAuthResult_Implementation(FINTLAuthResult ret)
{
UE_LOG(LogTemp, Warning, TEXT("MethodID: %d"), ret.MethodId);
}Unreal Event Handling
void OnAuthResult_Implementation(FINTLAuthResult ret)
{
    UE_LOG(LogTemp, Warning, TEXT("MethodID: %d"), ret.MethodId);
} -
调用
AutoLogin接口自动登录。- Unity
- Unreal Engine
INTLAPI.AutoLogin();UINTLSDKAPI::AutoLogin(); -
在自动登录失败时调用
Login接口使玩家手动登录。- Unity
- Unreal Engine
INTLAPI.Login(INTLChannel.Apple);UINTLSDKAPI::Login(EINTLLoginChannel::kChannelApple); -
与游戏后台同步客户端身份验证状态,等待最终验证结果。
[可选] 设置 email 权限
Apple 获取玩家邮箱需要玩家授权,如果玩家拒绝授权将无法获取到玩家邮箱,详见 Login 接口传入 email 和 fullName。
要在 Apple 登录时获取玩家邮箱需先设置对应权限,开启后将在 AuthResult 的 ChannelInfo 中返回 email。
- 基于合规考虑,可针对特定来源对返回的
email做 mask 处理,如有需求请联系 Player Network 助手打开。 - 可在后台流水日志中上报 hash 后的
base64(sha256(email)),如有需求请联系 Player Network 助手打开。 - 可用于验证玩家信息或绑定列表是否包含
email信息,如有需求请联系 Player Network 助手打开。 - 可用于 iOS Firebase 的 Private Set Membership(PSM)功能,详见 Firebase iOS 工程配置。
-
调用 Login 接口时,需要在
permissions参数中添加email权限。 -
在 Player Network 控制台 开启 email 返回功能,将 return_email 设置为 YES,详细步骤请参见 第三方渠道配置。
步骤3:验收登录功能
在 Player Network SDK 日志中搜索关键字 "AuthResult" 确认渠道名称和 OpenID 是否正确返回。如果正确,则表明集成配置成功,登录功能已成功添加。
如果接入过程中遇到问题,请参见 常见问题。