Windows
This article guides you through setting up Google as an identity provider, enabling your Windows game to access Player Network authentication services.
Prerequisites
1. Set up the Google app in Google Play Console
For IEGG projects, contact [miaruan (Ruan Mingjun)] for Google app registration and configuration.
1. Create a Google app
Register an account on Google Play Console following the prompts.
Google charges a fee of 25USD for the service. Please prepare a credit card in advance.
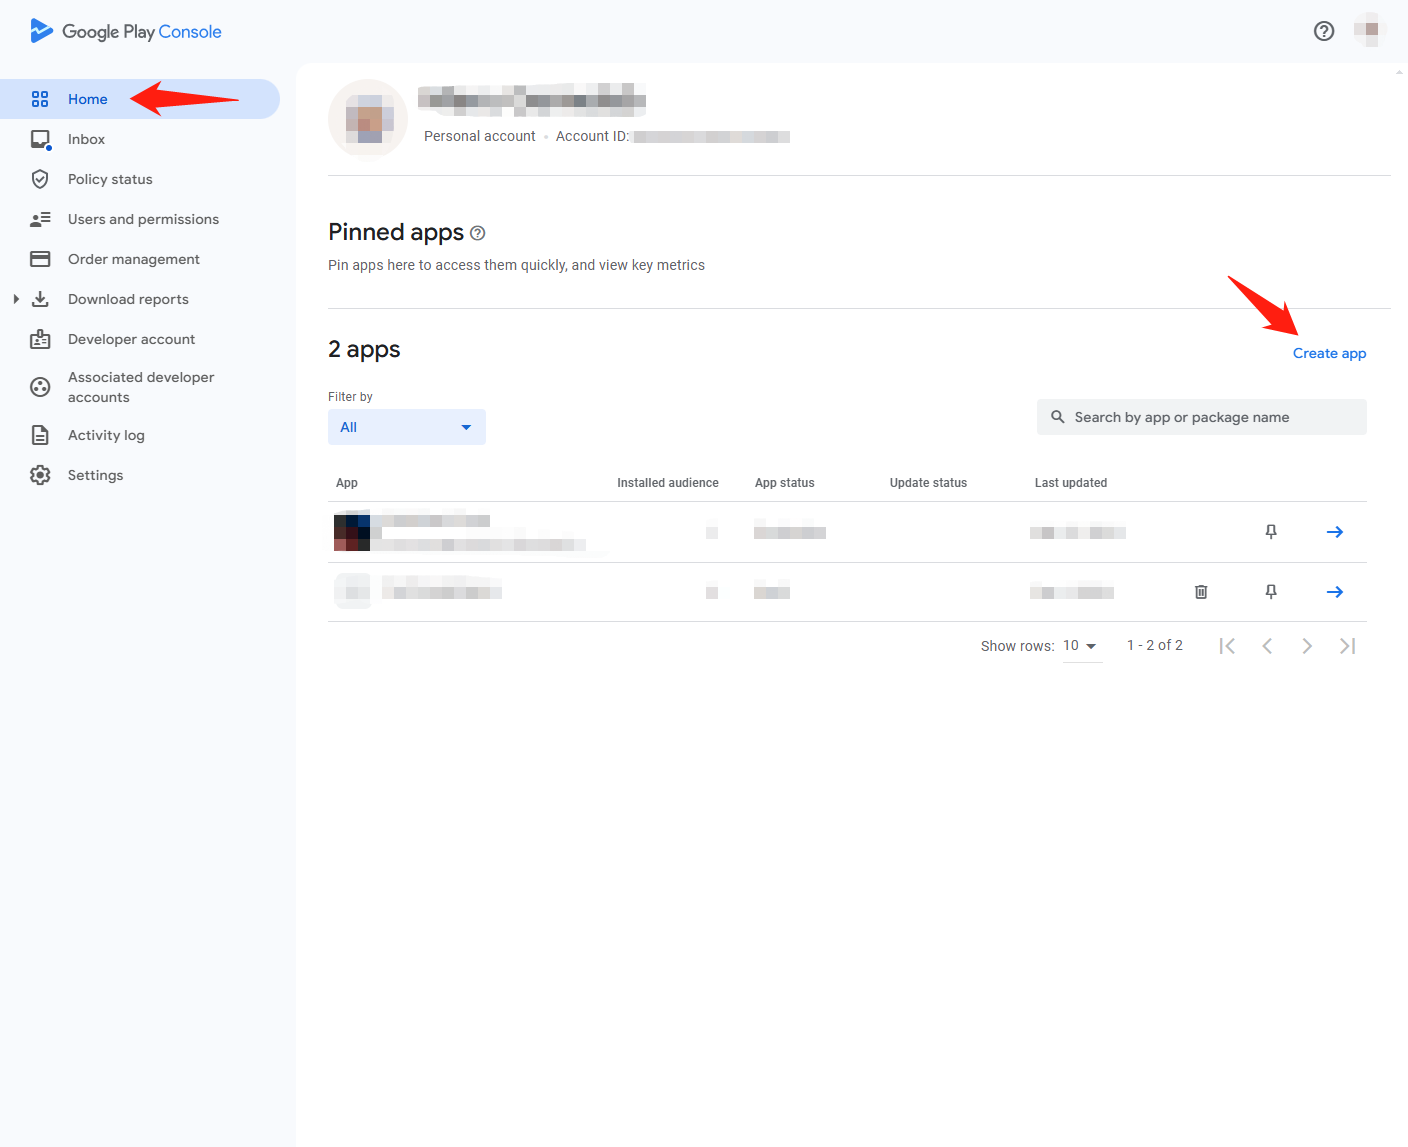
- Go to Google Play Console.
- On the All apps page, click Create app to create a game app.
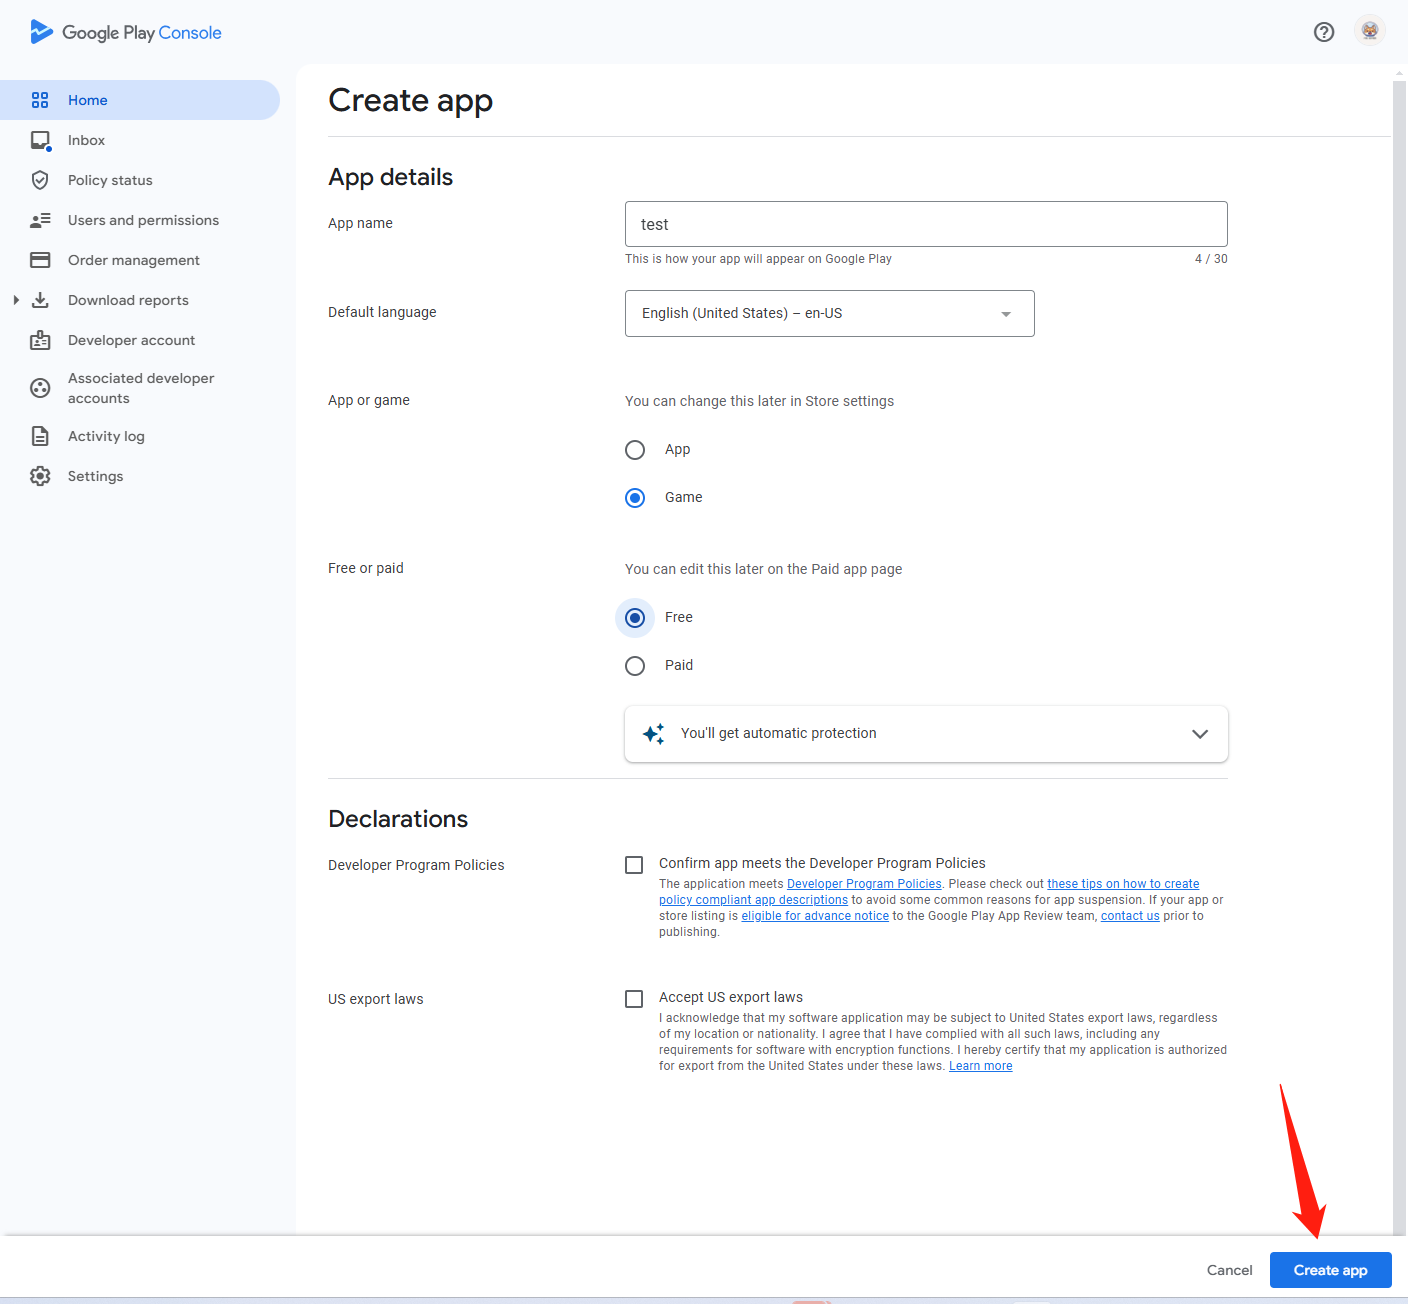
- Enter the app information.
2. Create a Play Games Services game project
Set up Play Games Services to manage game metadata and automate game production and distribution tasks.
- Go to Google Play Console.
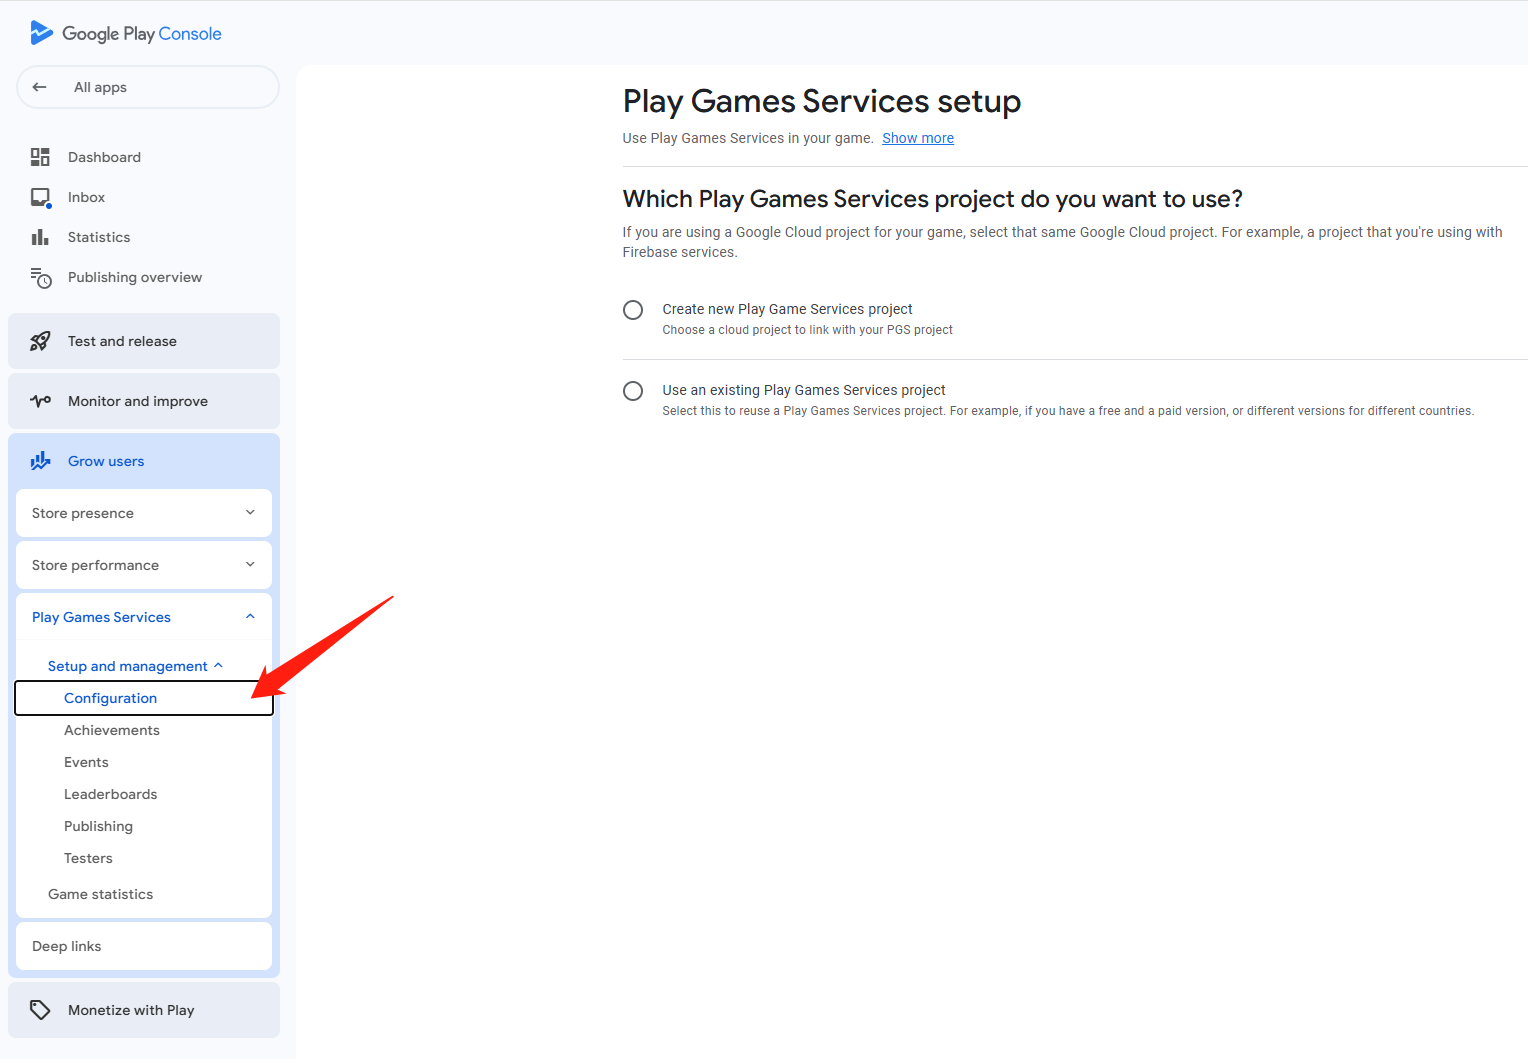
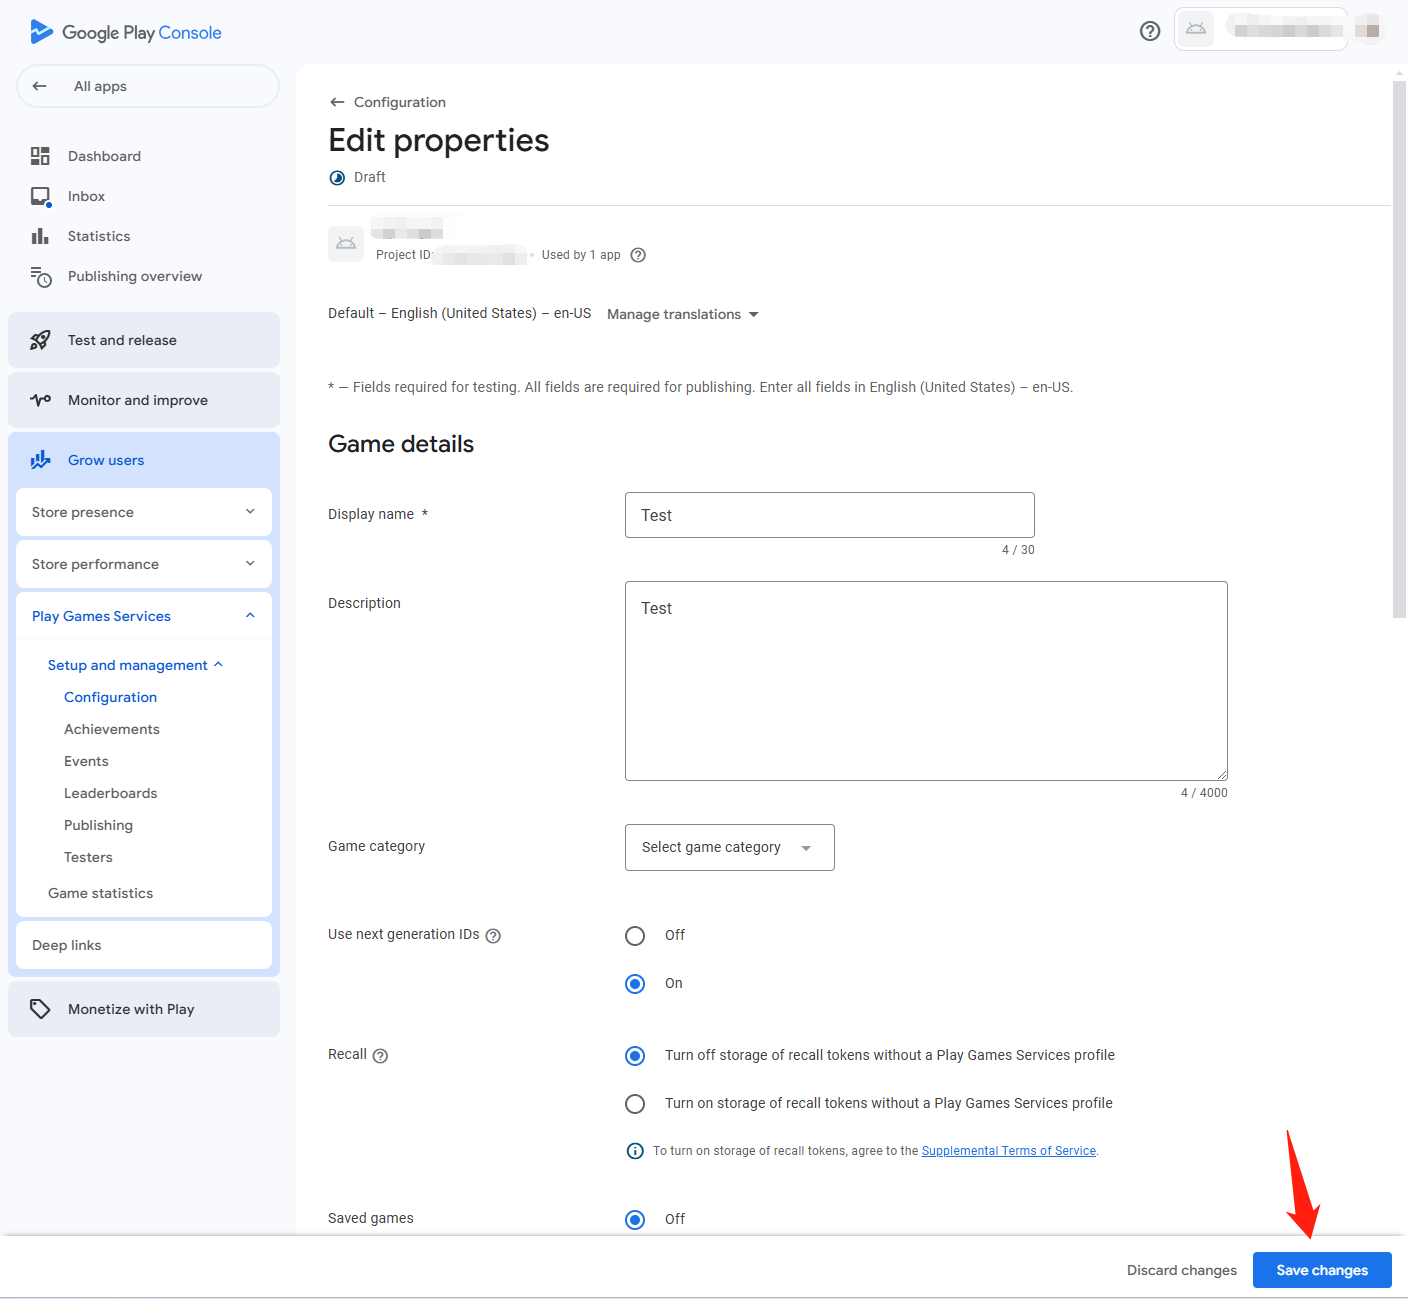
- In the left navigation bar, select Grow users > Play Games Services > Setup and management > Configuration.
- Under Which Play Games Services project do you want to use, select the option to create a Play Games Services project.
- In the Properties section, click Edit Properties.
- Enter basic game information and click Save changes.
3. Add a credential to link the OAuth 2.0 client ID to your game
- Go to Google Cloud Platform.
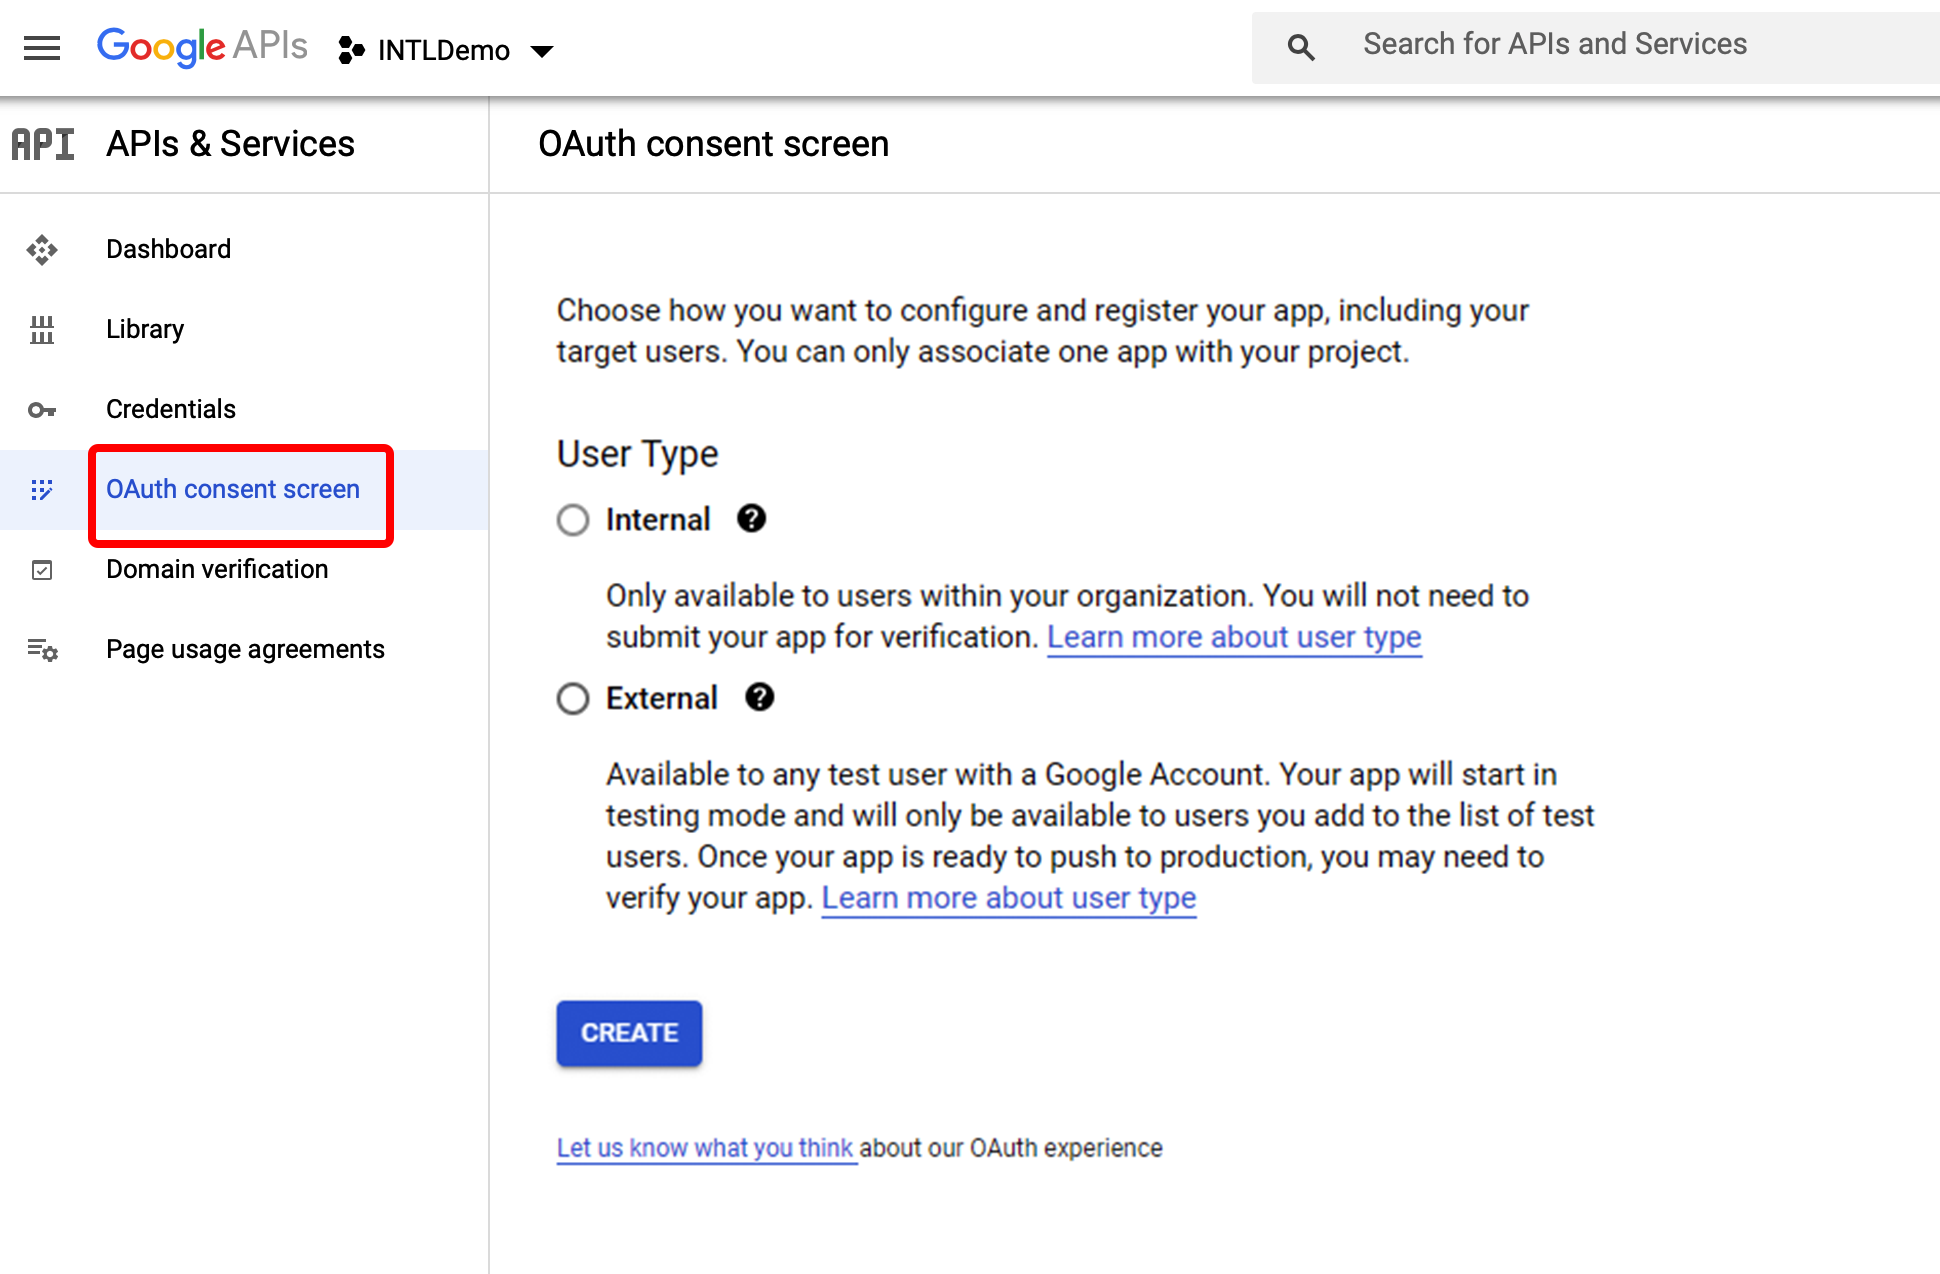
- In the left navigation bar, click OAuth consent screen.
- Follow the instructions to setup the OAuth consent screen.
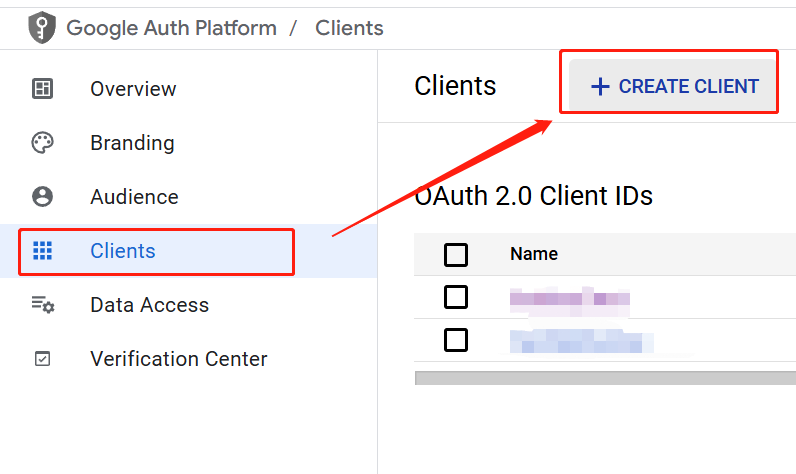
- In the left navigation bar, click Clients.
- On the Clients page, select CREATE CLIENT > Create OAuth Client ID to create an OAuth client ID.
- In the Authentication type list, click Web.
- Enter the required information.
In the Authorized redirect URLs section of the web application details page, addhttps://test-common-web.intlgame.com/jssdk/googlelogincallback.htmlandhttps://common-web.intlgame.com/jssdk/googlelogincallback.html.
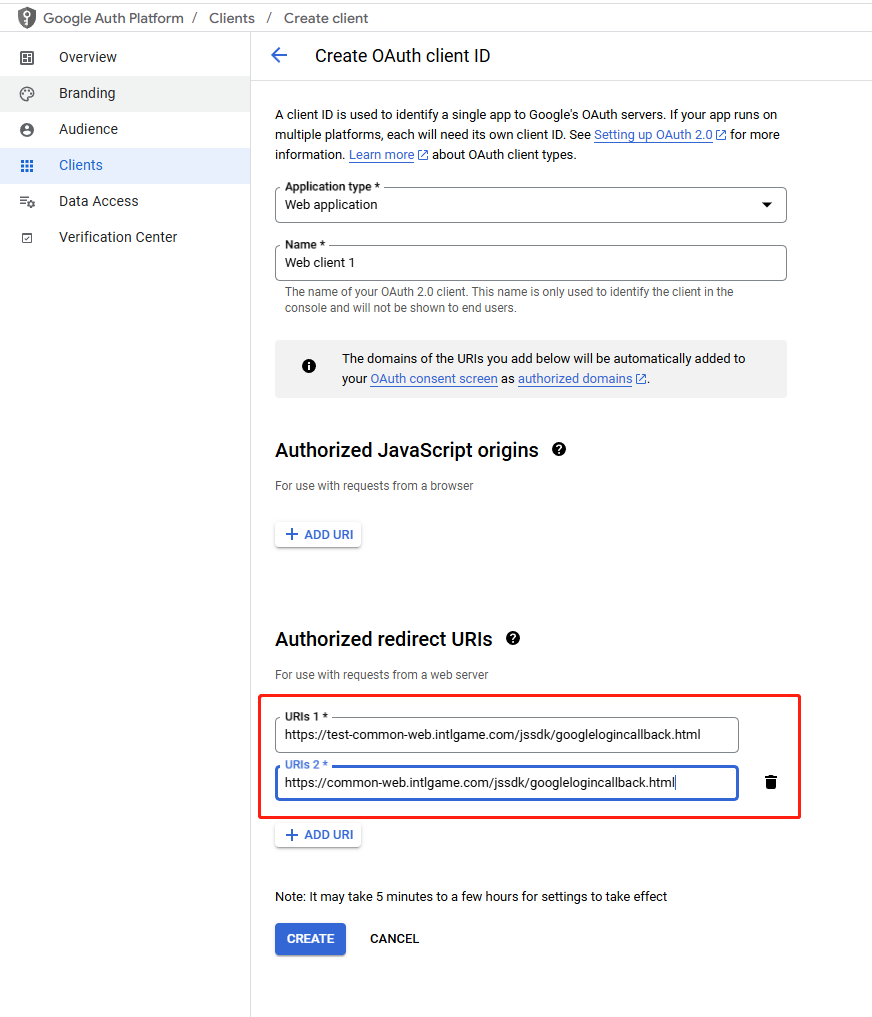
- Click SAVE to complete the configuration.
- Go to the details page of the Web app.

- Find the Client ID and Client Secret, and enter them into the game configuration of the Player Network Console.

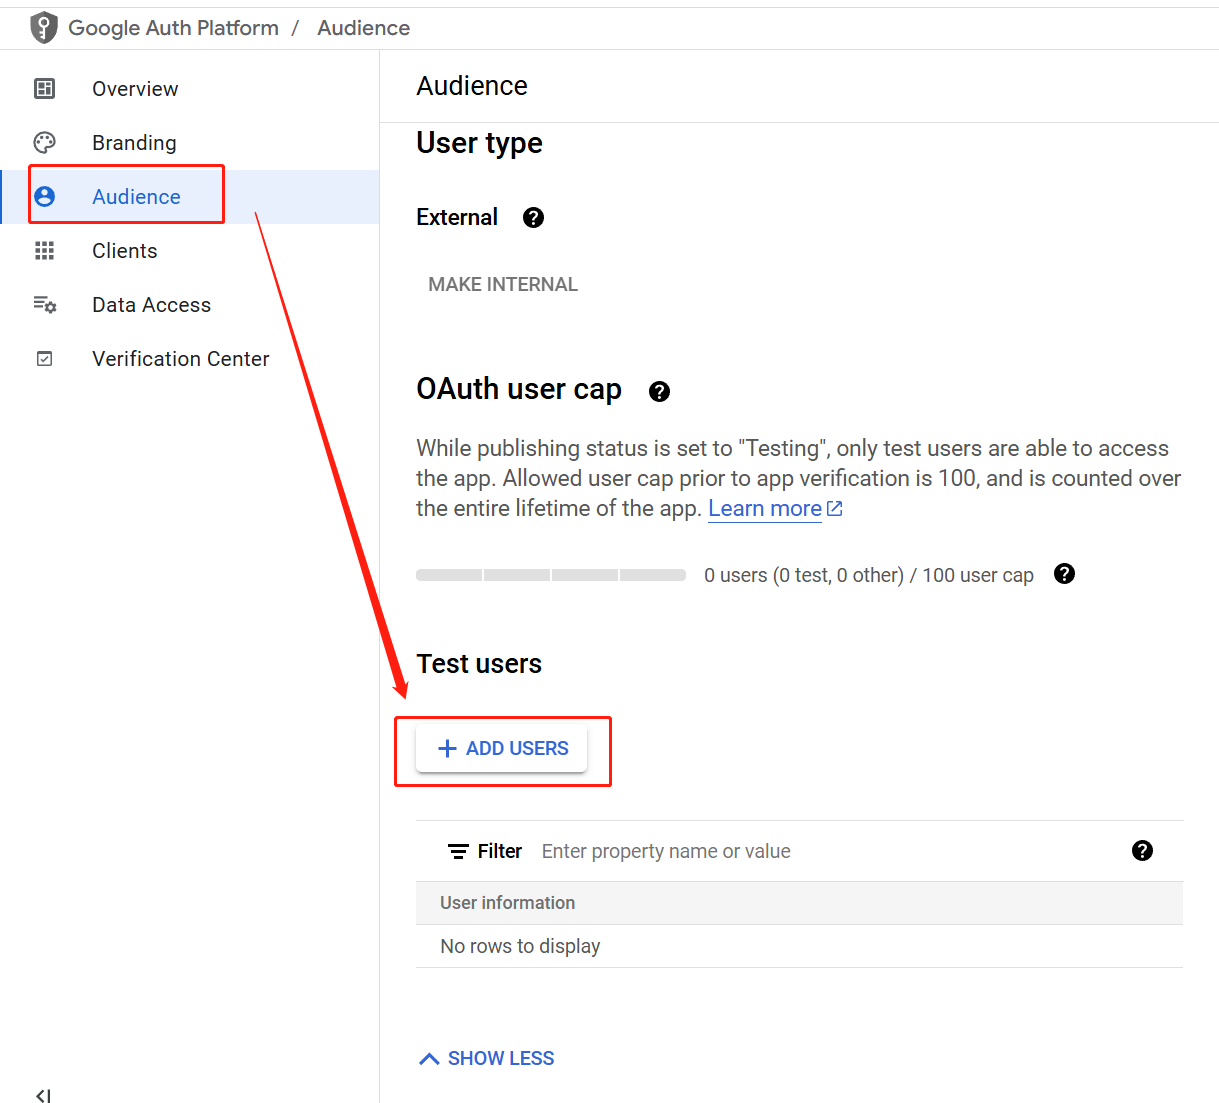
- Click Audience > ADD USERS to add test users for login.
4. Add testers for your game
- Go to Google Play Console.
- In the left navigation bar, select Grow users > Play Games Services > Setup and management > Testers.
- In the Testers tab, click Add testers to add testers for your game.
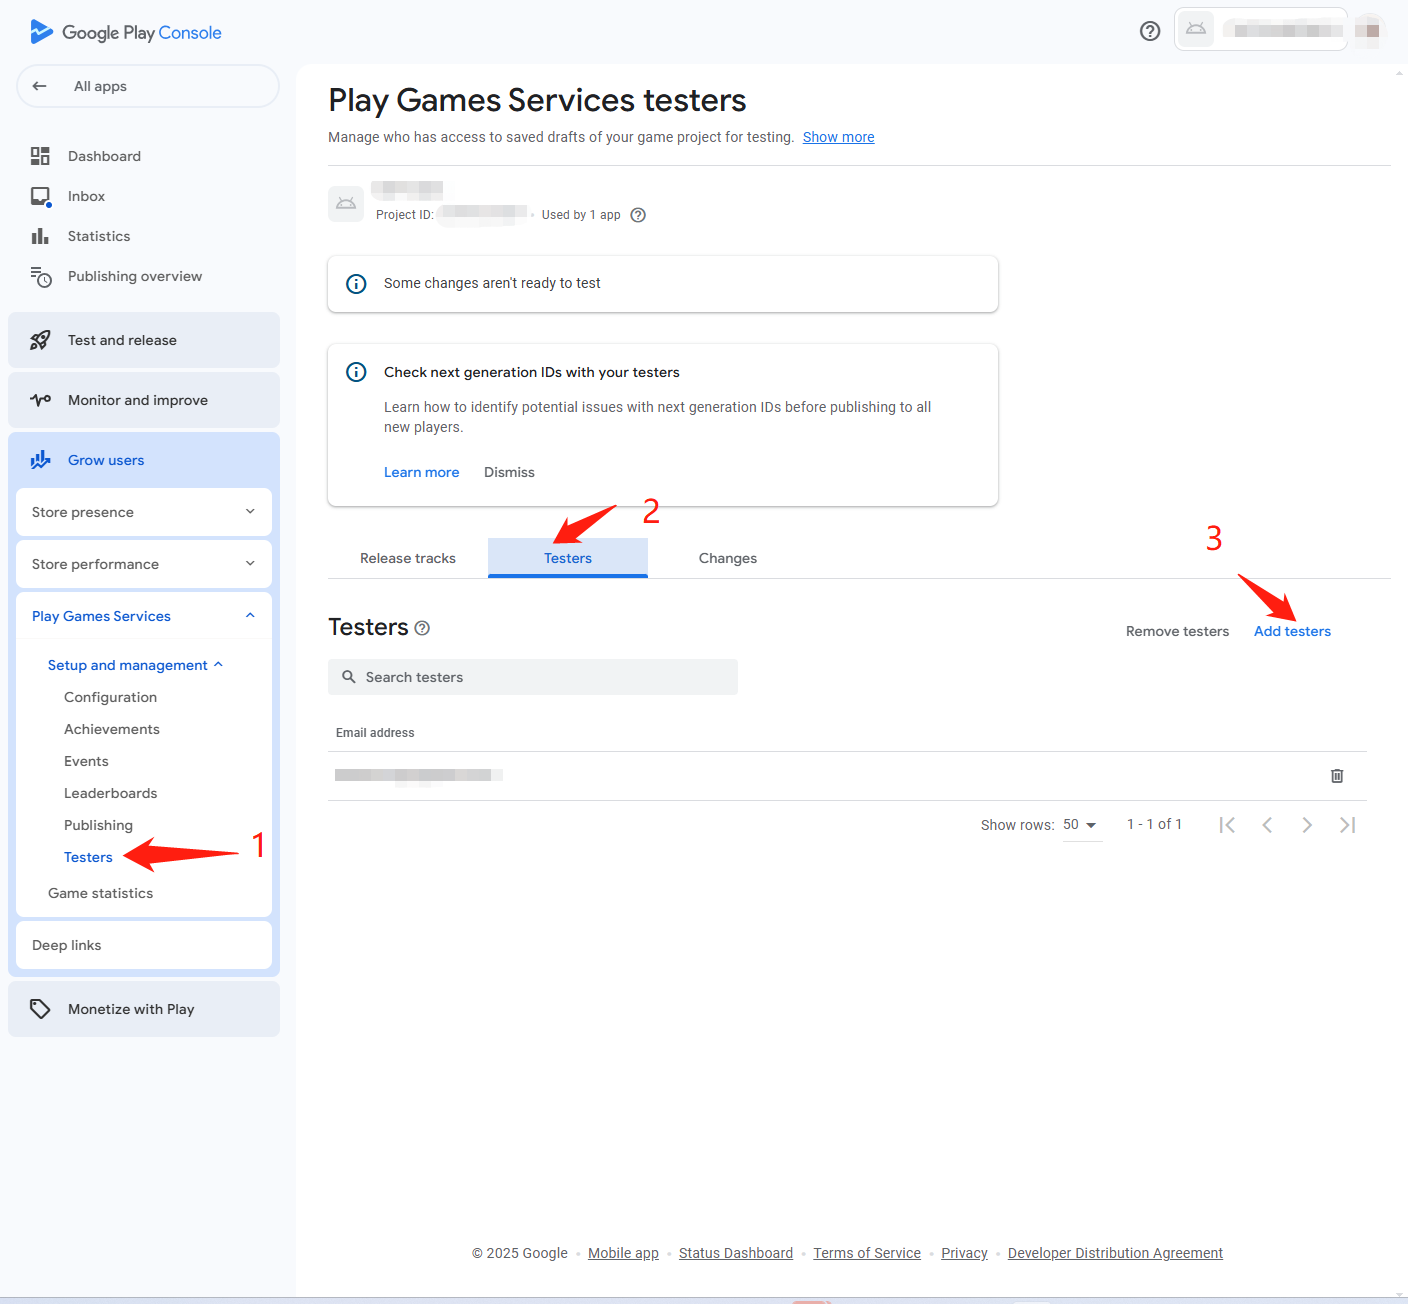
Before the game app is released, only testers can log in. Please make sure that the app is in the testing status.
5. Configure Achievements and Leaderboards
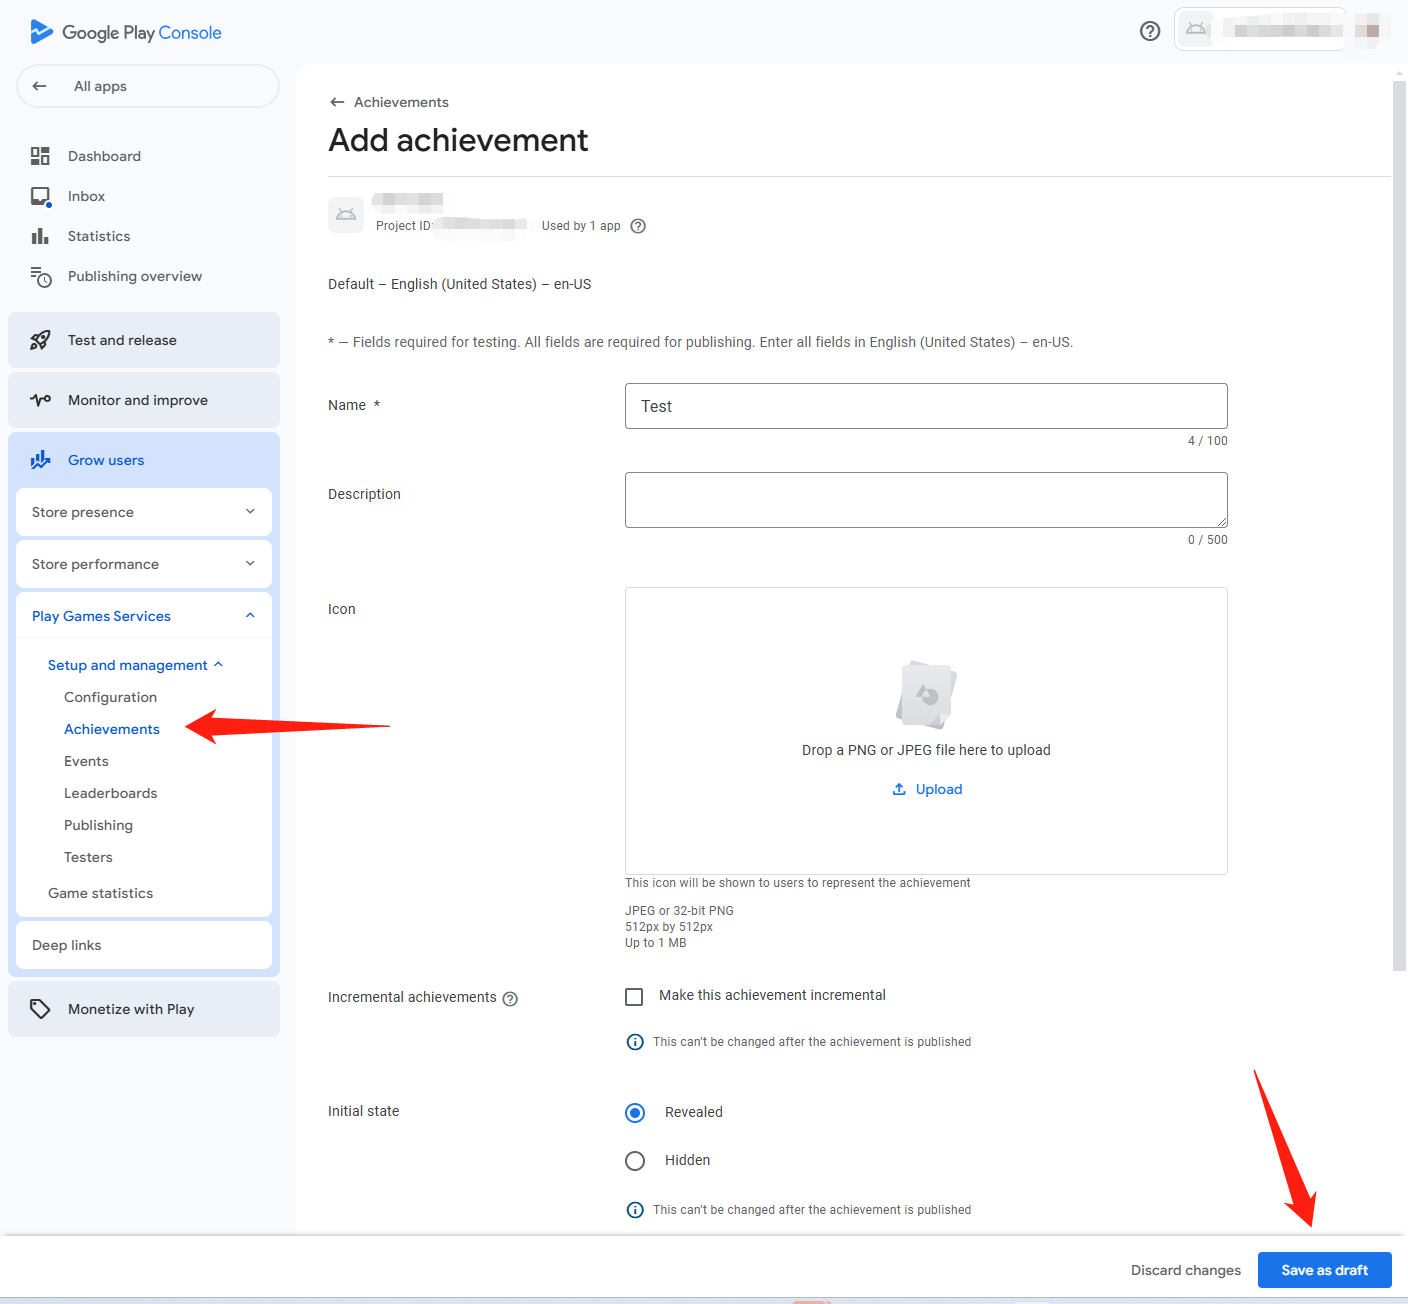
Find the Achievements and Leaderboards functions in the Games Services menu and configure them as needed.
6. Get Google API ID
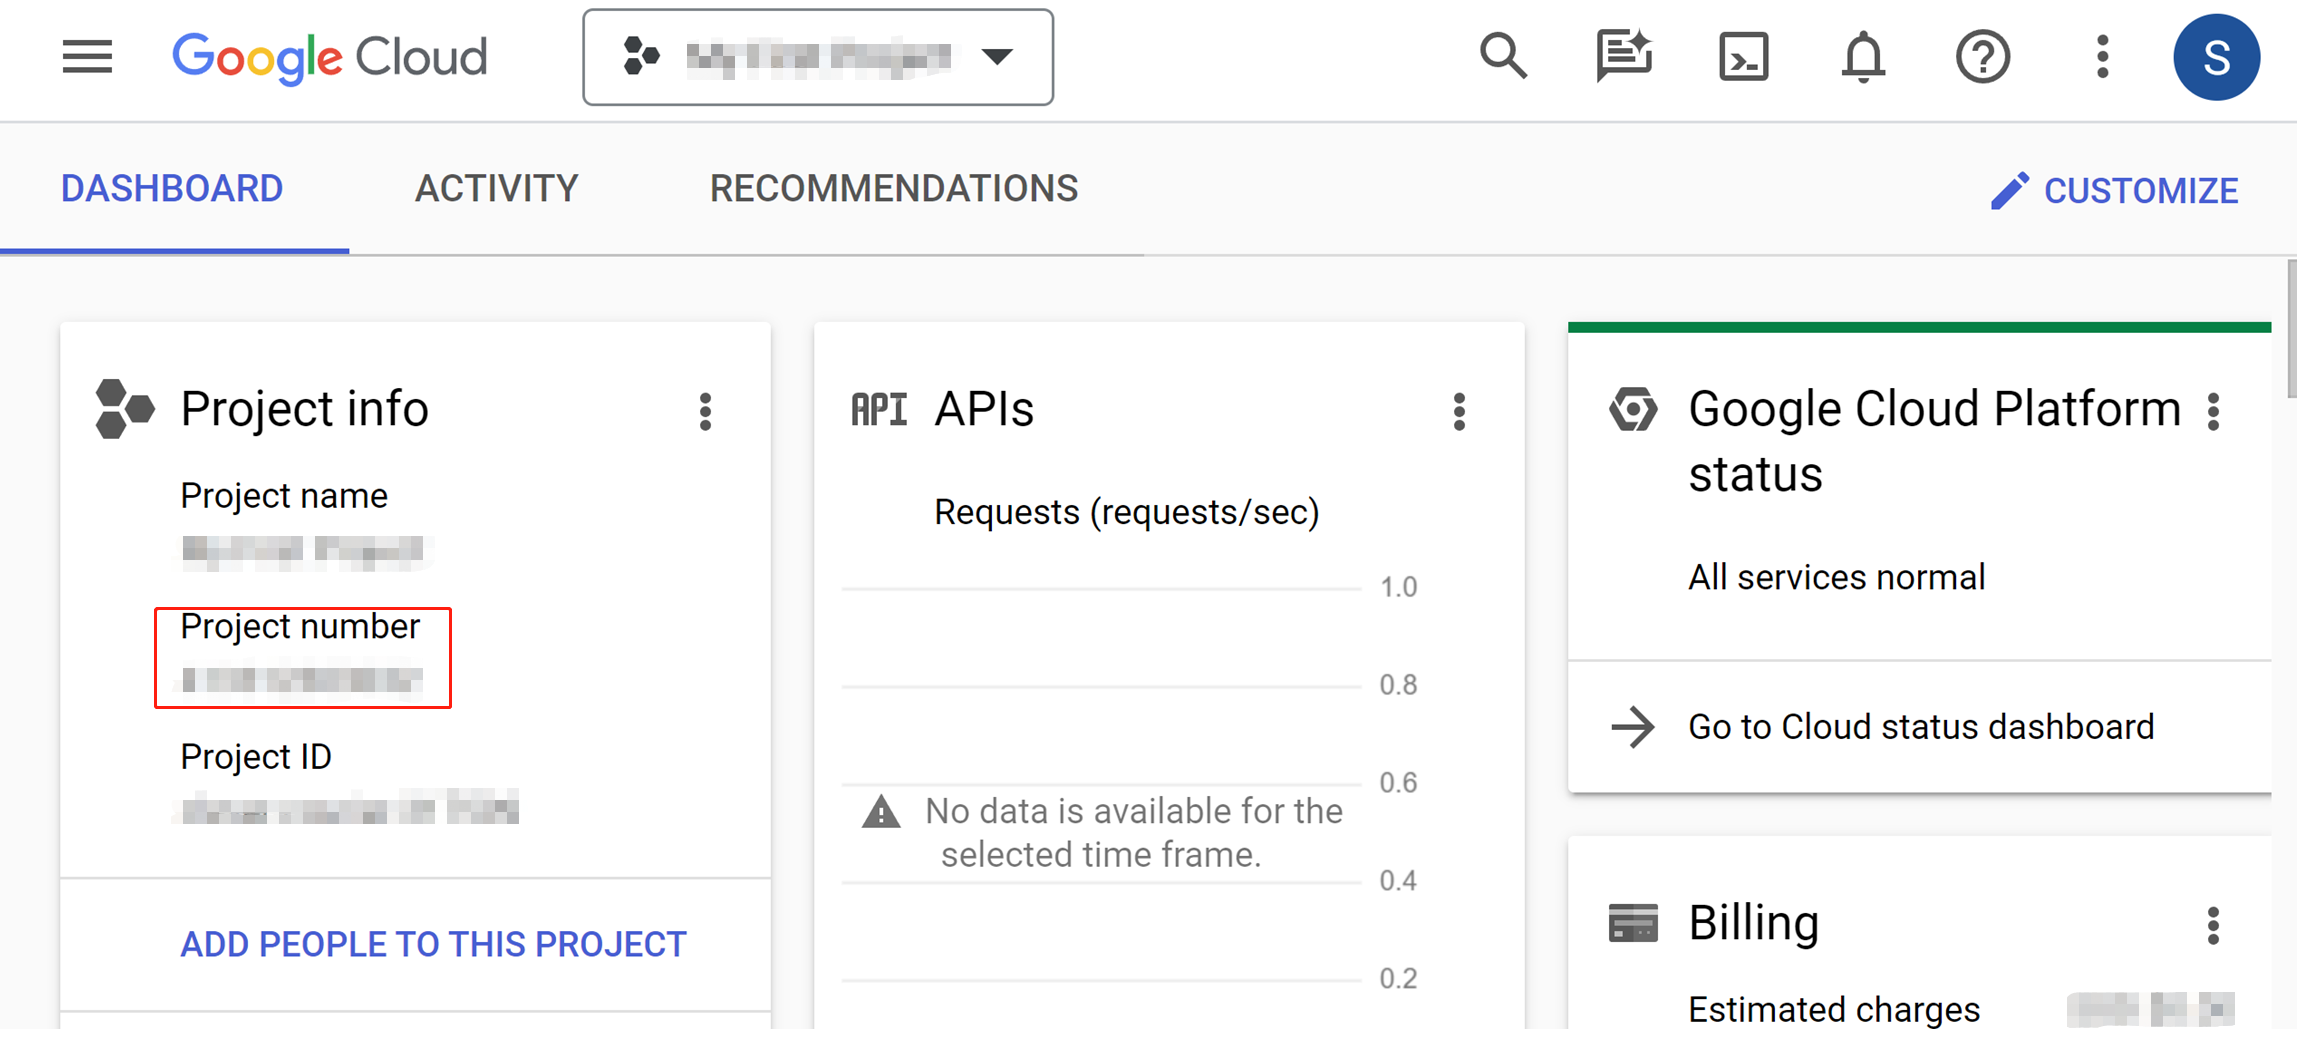
Access the Information Center from the Google Cloud Platform dashboard. The Google API ID is the Project number on this page.
7. Get the Client ID and Client secret
Follow the steps in Add a credential to link the OAuth 2.0 client ID to your game to get the application information.

- Create an account for Player Network Console.
- Create a new project for your game, or join an existing one.
- Download the SDK.
- Integrate the SDK.
- Add Google as an authentication method for your project on Player Network Console.
Step 1: Configure the SDK for Google login
- Open the project's INTLConfig.ini:
[INTL environment]
# WARNING: You should change this URL to the production environment when you release your game.
INTL_URL = https://test.intlgame.com
GAME_ID = {INTL_GAME_ID}
SDK_KEY = {INTL_SDK_KEY}
[INTL Log]
LOG_LEVEL = 1
LOG_CONSOLE_OUTPUT_ENABLE = 1
LOG_FILE_OUTPUT_ENABLE = 1
LOG_ENCRYPT_ENABLE = 0
LOG_COMPRESS_ENABLE = 0
[Google Channel Configuration]
GOOGLE_WEBVIEW_LOGIN_ENABLE = 0
GOOGLE_CLIENT_REDIRECT_URL = {INTL_GOOGLE_CLIENT_REDIRECT_URL}
- Set the SDK backend environment to
INTL_URL = https://test.intlgame.com. - Replace
{INTL_GAME_ID}and{INTL_SDK_KEY}with theGAME_IDandSDK_KEYassigned by Player Network Console. - Set
LOG_LEVEL = 1,LOG_CONSOLE_OUTPUT_ENABLE = 1,LOG_FILE_OUTPUT_ENABLE = 1,LOG_ENCRYPT_ENABLE = 0, andLOG_COMPRESS_ENABLE = 0to output console logs and log files without encrypting or compressing the output. - Set
GOOGLE_WEBVIEW_LOGIN_ENABLEto 0 to use the system browser to log in to Google on Windows. - Replace
{INTL_GOOGLE_CLIENT_REDIRECT_URL}with the webpage to redirect to after logging in with the system browser on Windows.
Step 2: Add Google login
Login with browser uses the loopback IP address to return data to the system. Since the data does not leave the system and does not have to pass through the Windows firewall, there is no need to configure the Windows firewall.
Windows games need to open the Google login page for players to log in through Google. Developers can open the Google login page in the following two ways:
- To open the Google login page using Player Network SDK WebView, developers need to include
"webview_login":truein theextraJsonparameter when calling theLoginmethod. - To open the Google login page using the system browser, developers need to include
"webview_login":falsein theextraJsonparameter when calling theLoginmethod.
Other than the above methods, developers can also define the default method to open Google login page by assigning a value to the GOOGLE_WEBVIEW_LOGIN_ENABLE field in the INTLConfig file.
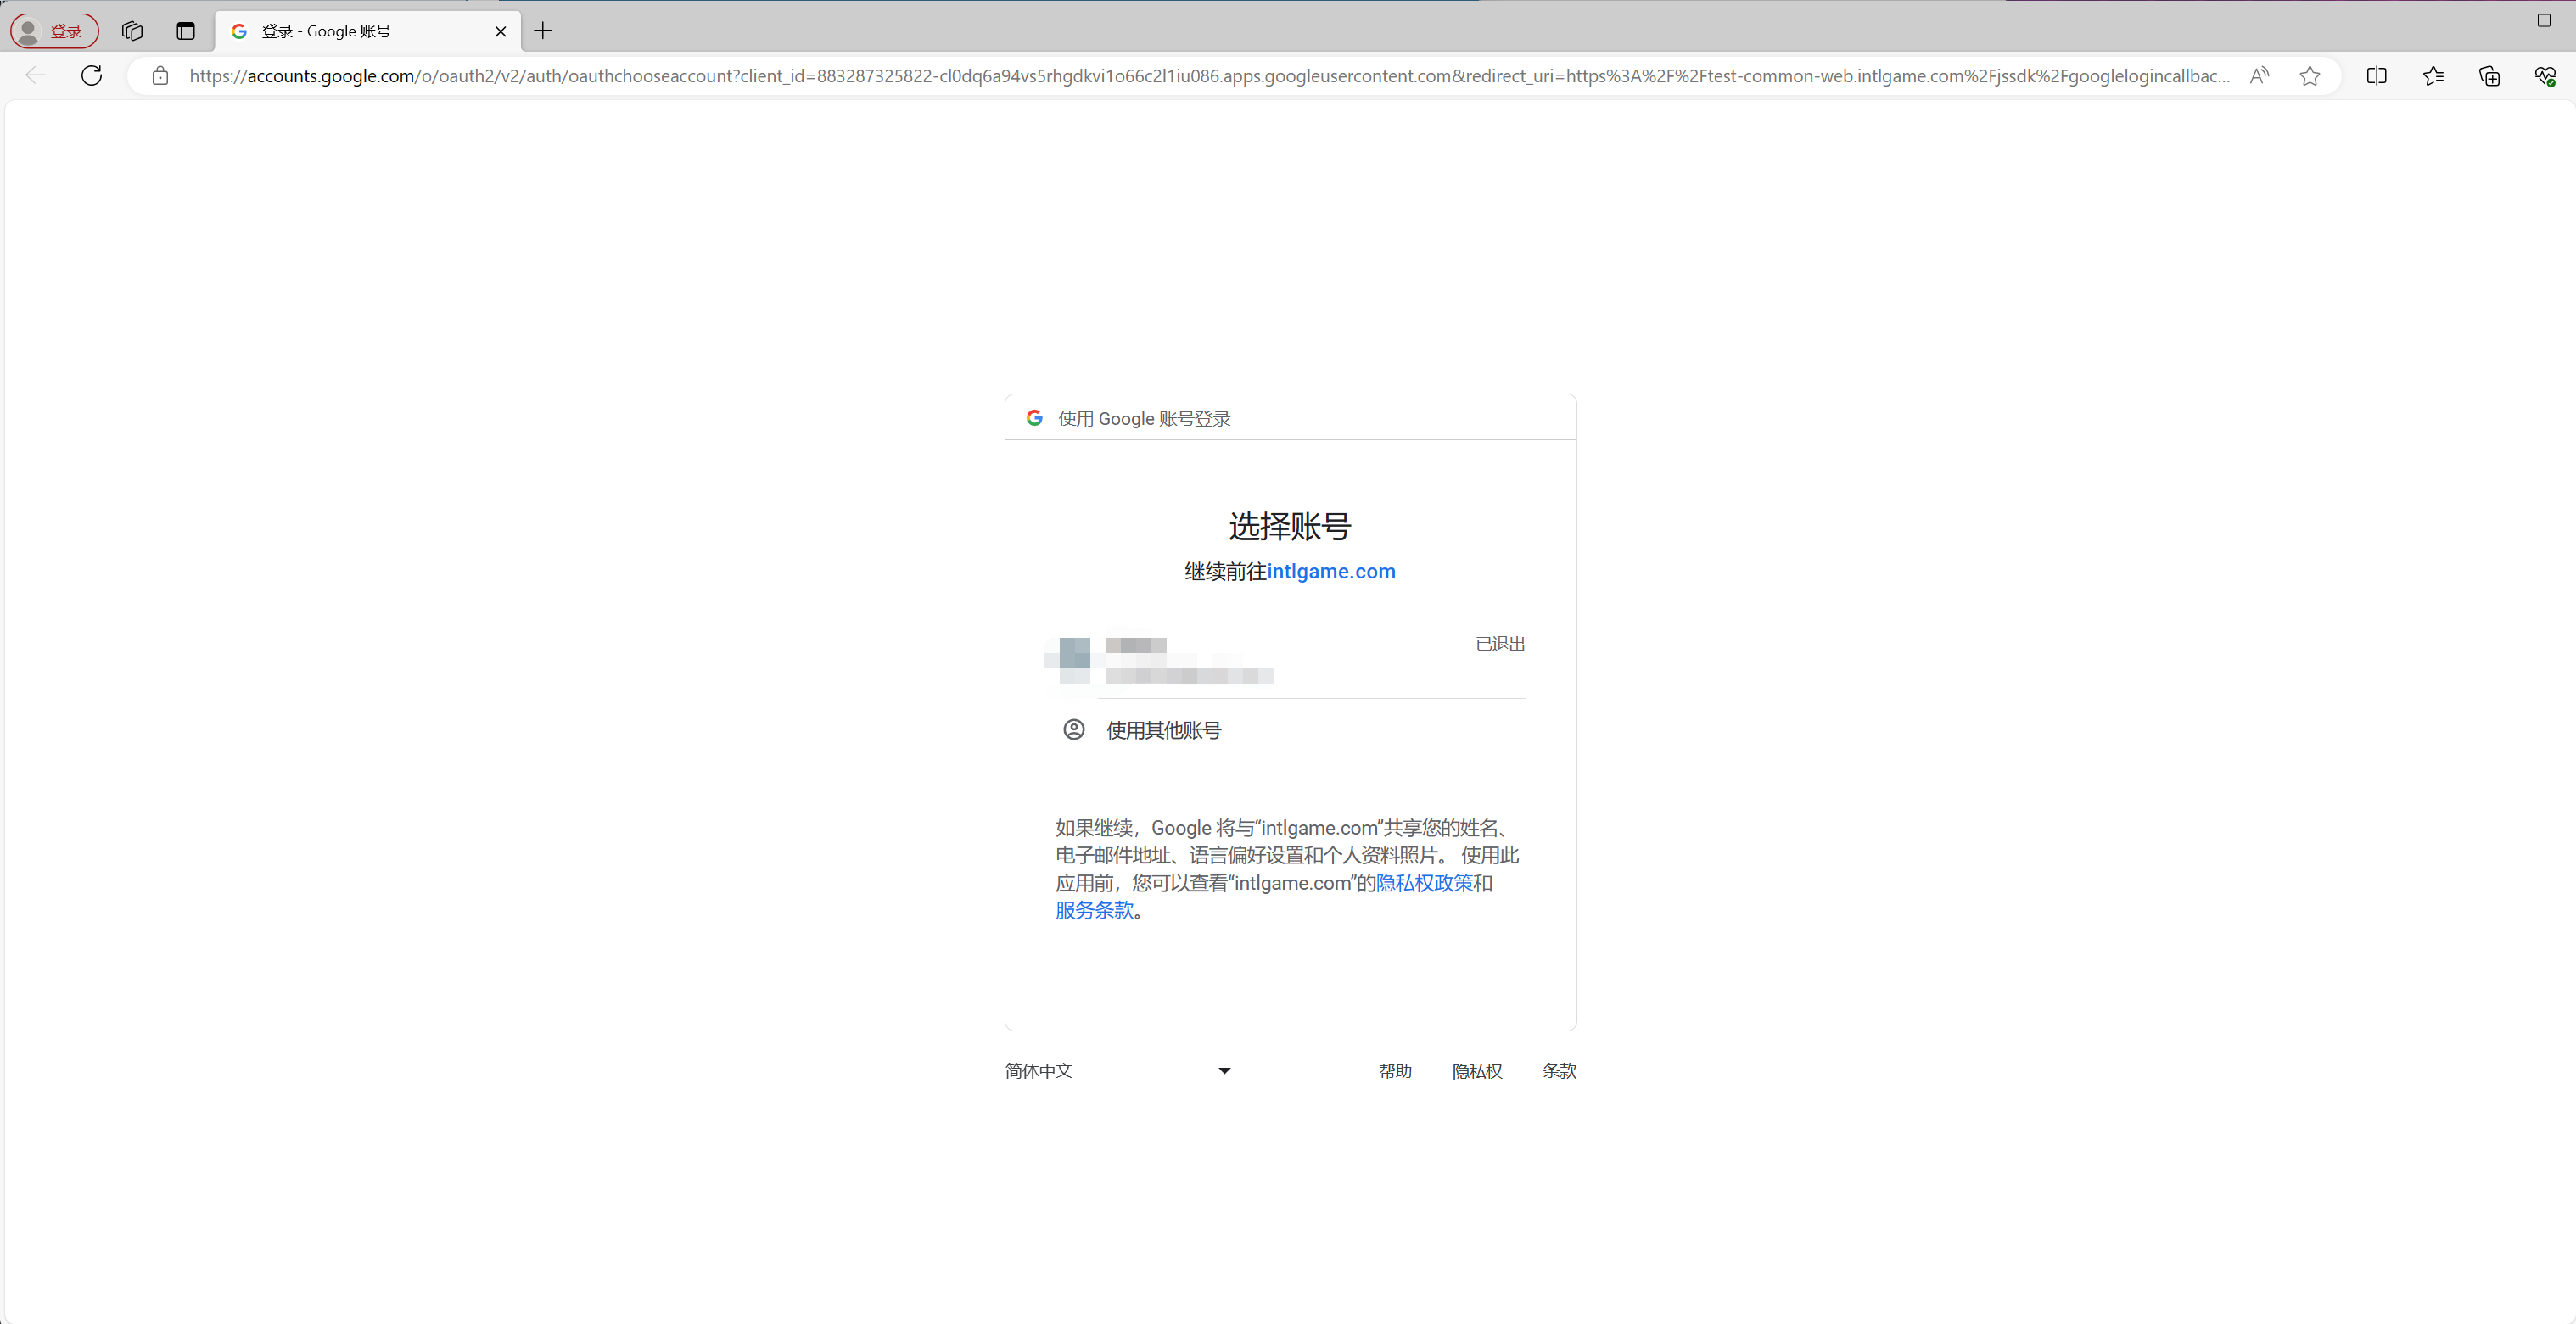
All Google operations require a connection to Google services.
Automatic Login (AuthLogin)
During automatic login, the device may be unable to connect to Google services. By default, Player Network SDK connects to Google services upon automatic login, which is recommended. (Game teams can disable the connection by configuring the GOOGLE_LOGOUT_NEED_CONNECT field as instructed in Google Channel Configuration.)
Login��
Before calling Google login, Player Network SDK will check if Google Mobile Services (GMS) is available. The login service can be called only when GMS is available. If GMS is unavailable, Player Network SDK will return the error code returned by Google to games through the ThirdCode field of INTLAuthResult.
| Return code | Value | Error Description |
|---|---|---|
| SERVICE_MISSING | 1 | The GMS is unavailable on the device. |
| SERVICE_VERSION_UPDATE_REQUIRED | 2 | The installed GMS version has expired. |
| SERVICE_DISABLED | 3 | The GMS is disabled. |
| SERVICE_INVALID | 9 | The installed GMS version is incorrect. |
| SERVICE_UPDATING | 18 | The GMS is being updated on the device. |
For more information, see Google Docs and Google FAQs
-
Add an observer to handle authentication callbacks.
- Unity
- Unreal Engine
// Add callbacks
public void AddAuthObserver()
{
    INTLAPI.AddAuthResultObserver(OnAuthResultEvent);
}

// Remove callbacks
public void RemoveAuthObserver()
{
    INTLAPI.RemoveAuthResultObserver(OnAuthResultEvent);
}

// Process the INTLAuthResult callback
public void OnAuthResultEvent(INTLAuthResult ret)
{
    Debug.Log($"MethodID: {ret.MethodId}");

    string methodTag = "";
    if (authRet.MethodId == (int)INTLMethodID.INTL_AUTH_LOGIN)
    {
        methodTag = "Login";
    }
    else if (authRet.MethodId == (int)INTLMethodID.INTL_AUTH_BIND)
    {
        methodTag = "Bind";
    }
    else if (authRet.MethodId == (int)INTLMethodID.INTL_AUTH_AUTOLOGIN)
    {
        methodTag = "AutoLogin";
    }
    else if (authRet.MethodId == (int)INTLMethodID.INTL_AUTH_QUERY_USER_INFO)
    {
        methodTag = "QueryUserInfo";
    }
    else if (authRet.MethodId == (int)INTLMethodID.INTL_AUTH_GET_AUTH_RESULT)
    {
        methodTag = "GetAuthResult";
    }
}
C++ Event Handling (above v1.15)
//configure callback
FINTLAuthEvent authEvent;
authEvent.AddUObject(this, &OnAuthResult_Implementation);
UINTLSDKAPI::SetAuthResultObserver(authEvent);
// Remove callbacks
UINTLSDKAPI::GetAuthResultObserver().Clear();
void OnAuthResult_Implementation(FINTLAuthResult ret)
{
UE_LOG(LogTemp, Warning, TEXT("MethodID: %d"), ret.MethodId);
}Unreal Event Handling
void OnAuthResult_Implementation(FINTLAuthResult ret)
{
    UE_LOG(LogTemp, Warning, TEXT("MethodID: %d"), ret.MethodId);
} -
Call the
AutoLoginmethod.- Unity
- Unreal Engine
INTLAPI.AutoLogin();UINTLSDKAPI::AutoLogin(); -
Call the
Loginmethod to ask for user input if auto-login fails.
- Unity
- Unreal Engine
INTLAPI.Login(INTLChannel.Google,"","\"webview_login\":true");
UINTLSDKAPI::Login(EINTLLoginChannel::kChannelGoogle,"","\"webview_login\":true");
- Sync client authentication state with the game's backend and wait for the final authentication result.
Cancel Login
Windows games generally open a web browser for players to log in. If a player closes the login screen, the game is unable to receive a cancellation message. The game will only receive a timeout callback when the login attempt times out.
Therefore, it's recommended that when the Windows platform uses the system browser to log in, a cancellation button is added to the interface to facilitate the cancellation process. When the player clicks the button, the CancelLogin interface of Player Network SDK is called to cancel the login.
- Unity
- Unreal Engine
INTLAPI.Login(INTLChannel.Google, "", "{\"cancel_login\":1}");
//Available after Player Network SDK 1.17
INTLAPI.CancelLogin(INTLChannel.Google);
UINTLSDKAPI::Login(EINTLLoginChannel::kChannelGoogle, "", "{\"cancel_login\":1}");
//Available after Player Network SDK 1.17
UINTLSDKAPI::CancelLogin(EINTLLoginChannel::kChannelGoogle);
[Optional] Set up email permissions
Set up permissions to obtain the email address of players during Google login, returned as email in the ChannelInfo of AuthResult.
- Email masking can be performed on the returned
emailaccording to compliance requirements, reach out to the Player Network representative to enable this feature. - The hashed
base64(sha256(email))can be reported to the backend logs, reach out to the Player Network representative to enable this feature. - Can be used to verify if
emailis present in a player's profile or third-party channel information, reach out to the Player Network representative to enable this feature.
Enable email return on Player Network Console by setting return_email to YES, see Configure Third-party Channels for detailed procedures.
Step 3: Test the login function
Search for the keyword "AuthResult" in the Player Network SDK logs to verify if the correct channel name and OpenID are returned. If they are, it indicates a successful configuration and the login function has been added successfully.
Step 4: Release your game
Before preparing for a production release, create a testing release with Android App Bundle.
The advantage of releasing a Beta version is that users can download it from Google play, but have no permission to add comments. A specific channel is set for users to submit feedback.
Create a production release
-
Go to Google Play Console.
-
In the left navigation bar, select Release > Production.

-
Follow the instructions to create the production release.
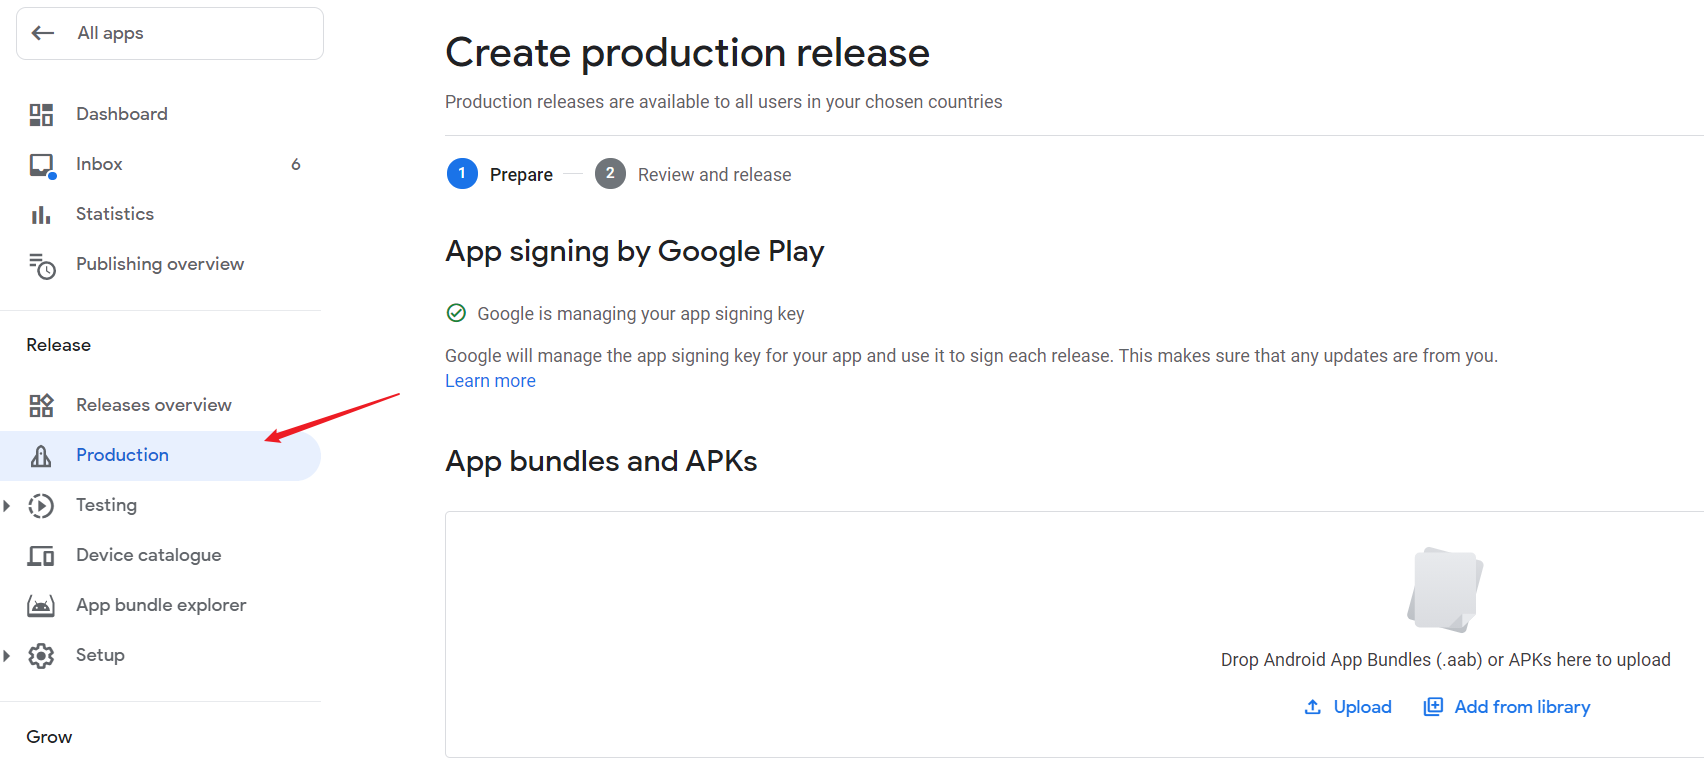
Change the publishing status
If users do not release the app, authentication may fail.
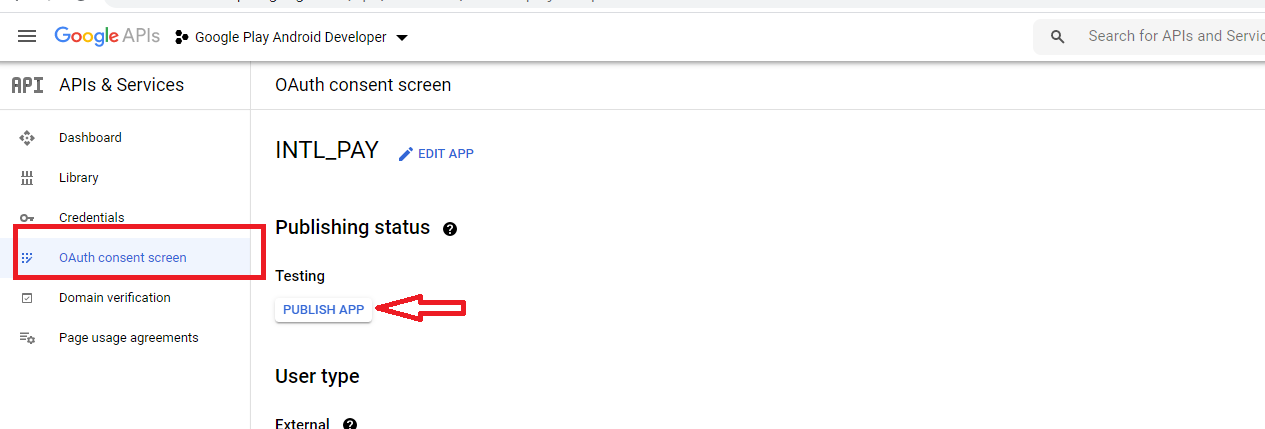
- Go to the OAuth consent screen page of Google Cloud Platform.
- Change the Publishing status to PUBLISH APP.
