Nintendo
本文旨在介绍如何设置 Nintendo Switch 身份验证,让您的游戏可以使用 Player Network 登录鉴权服务通过 Nintendo Switch 渠道登录
Nintendo Switch 渠道登录目前仅支持 Unreal Engine,Unity 端正在准备当中。
前提条件
1. 在 Nintendo Developer Portal 上创建产品
业务应先自行申请任天堂开发者账号并创建好游戏产品,再进行 Player Network 的配置。
所需字段:
| 字段 | 类型 | 描述 |
|---|---|---|
| application_id | string | Nintendo 提供的 Application ID |
| redirect_uri | string | 重定向 URI |
| client_id | string | Nintendo 提供的 Client ID |
| client_secret | string | Nintendo 提供的 Client Secret |
1. 创建 Nintendo 产品
-
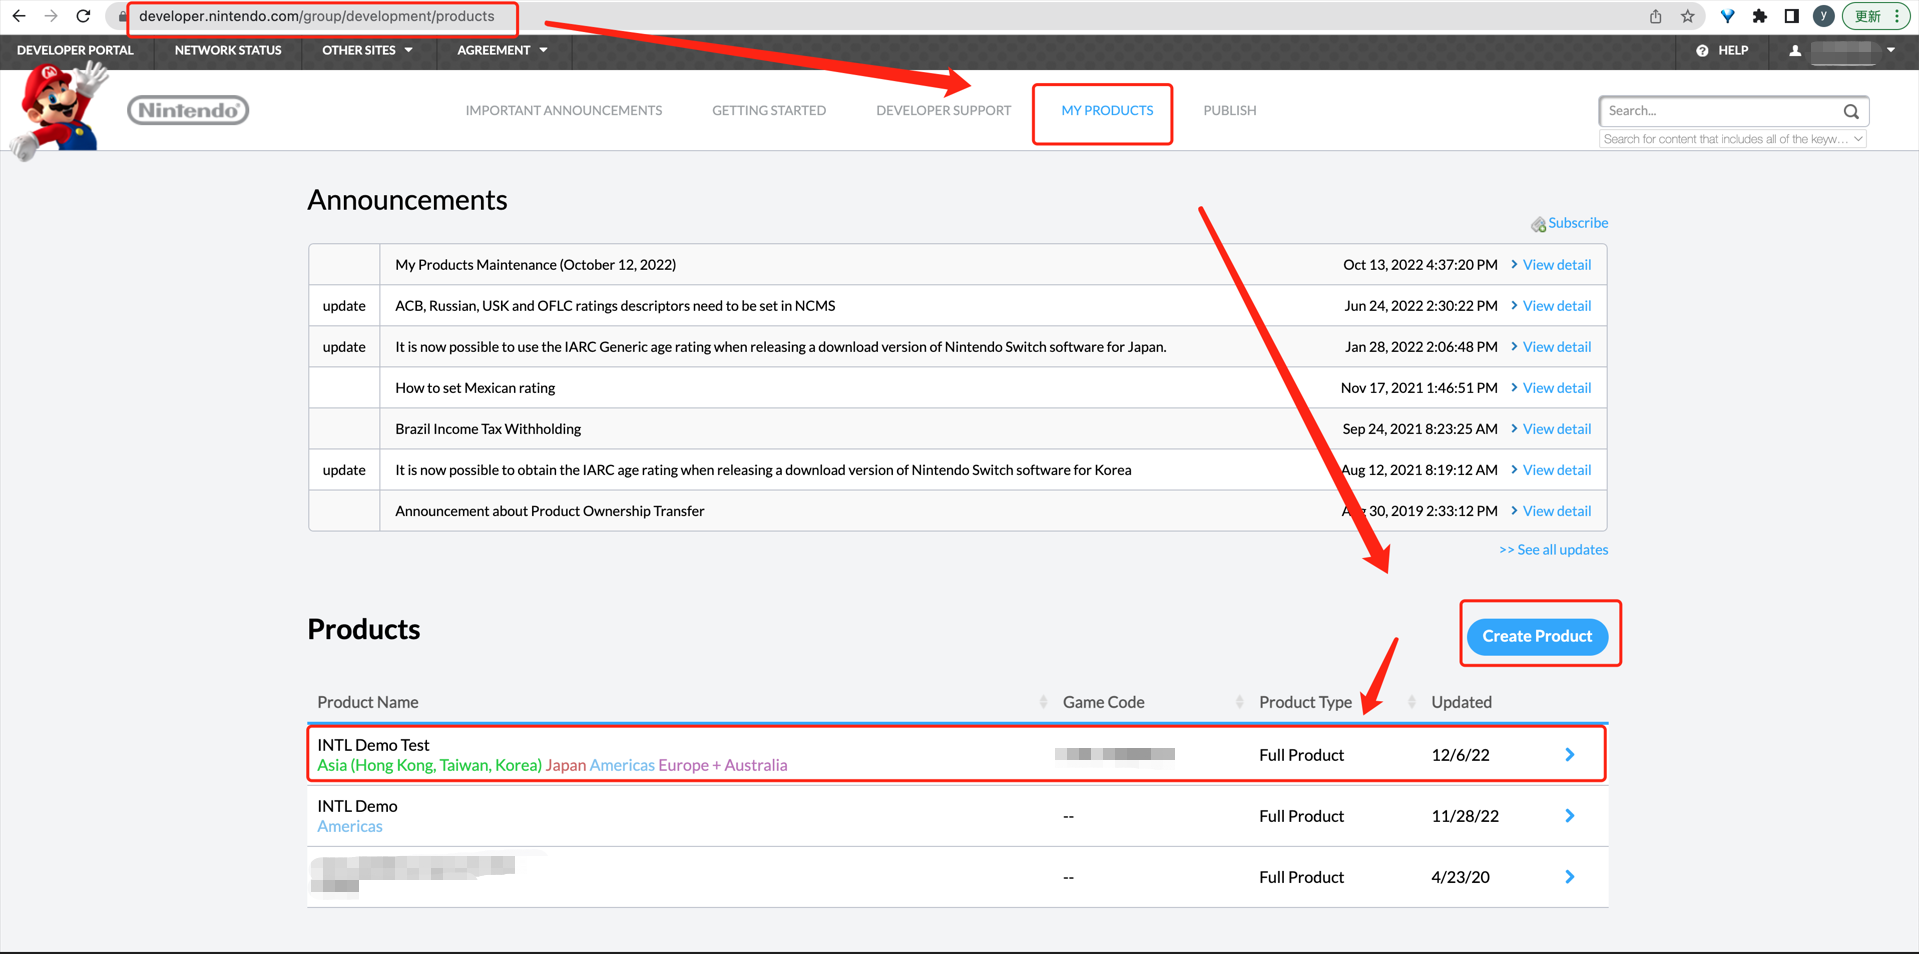
登录 Nintendo Developer Portal,并选择 MY PRODUCTS。
-
在 Products 下,点击 Create Product。
-
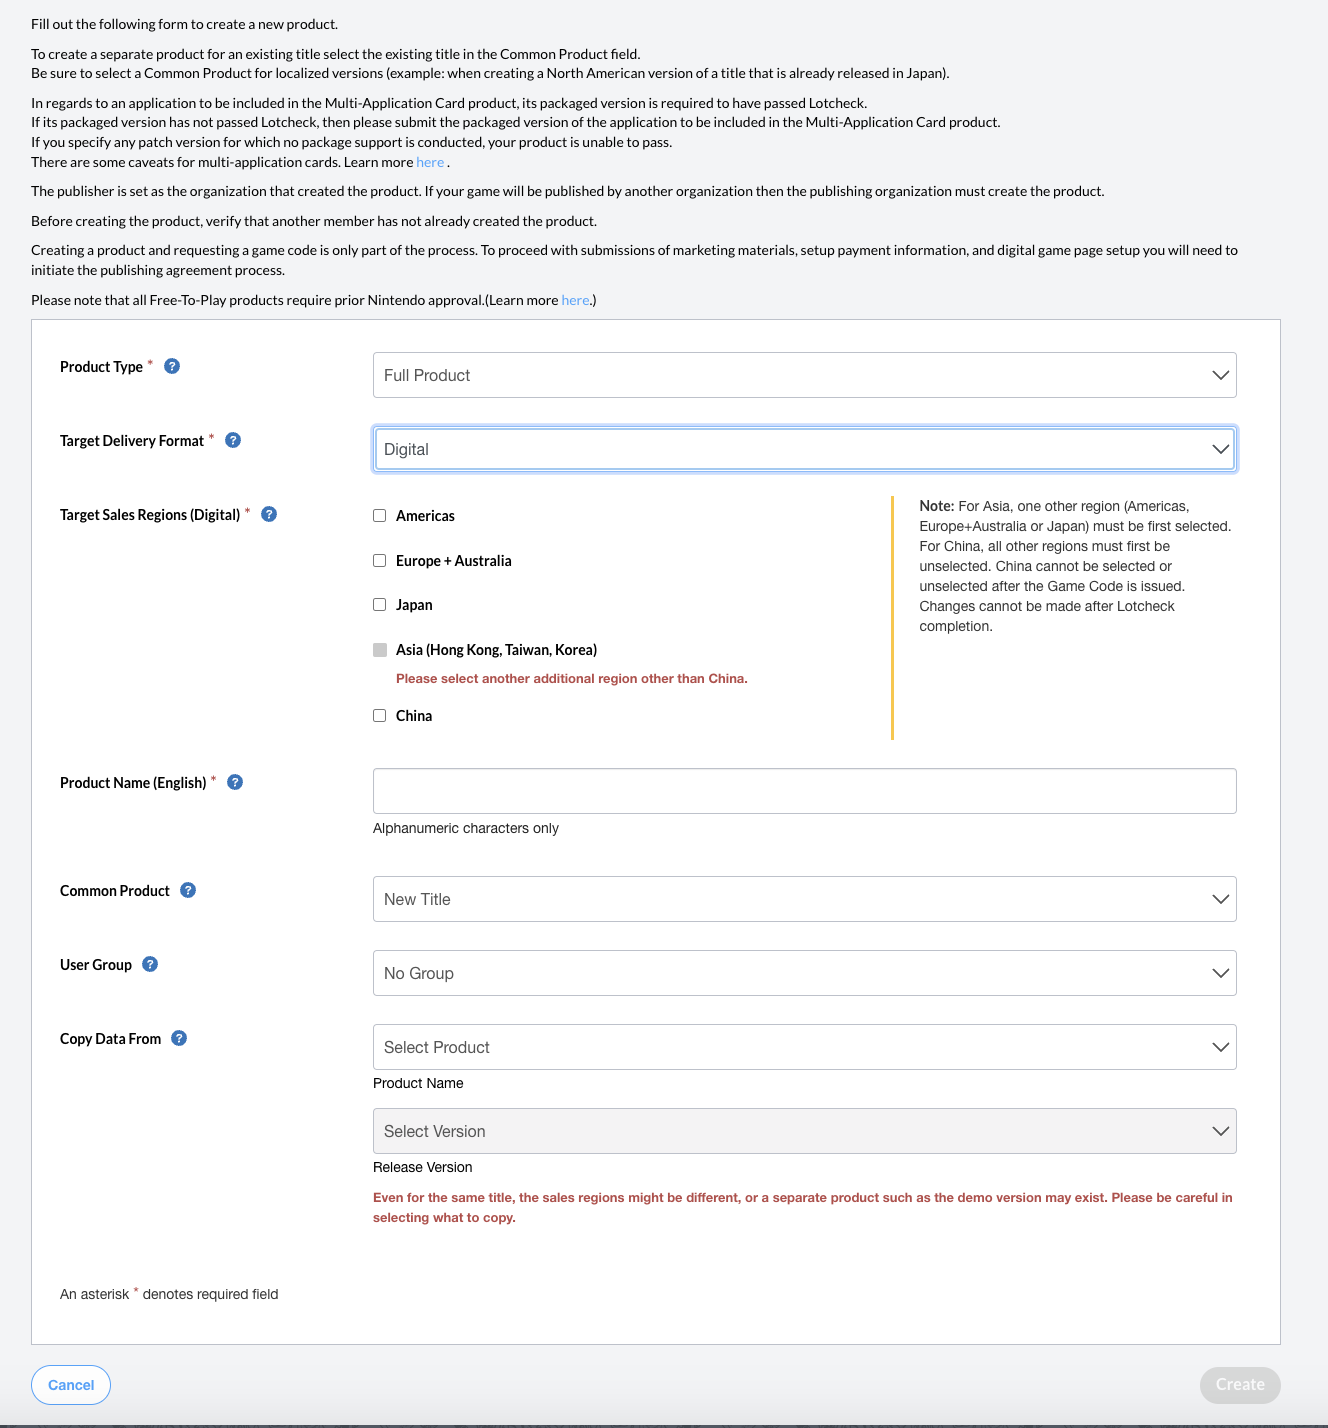
输入应用详情。在点选 Target Delivery Format 后会出现 Target Sales Regions 相关的选项。
注意Target Sales Regions 需选择中国以外的地区。
-
点击 Create 创建您的产品。
2. 发布游戏代码, 获取 Application ID
-
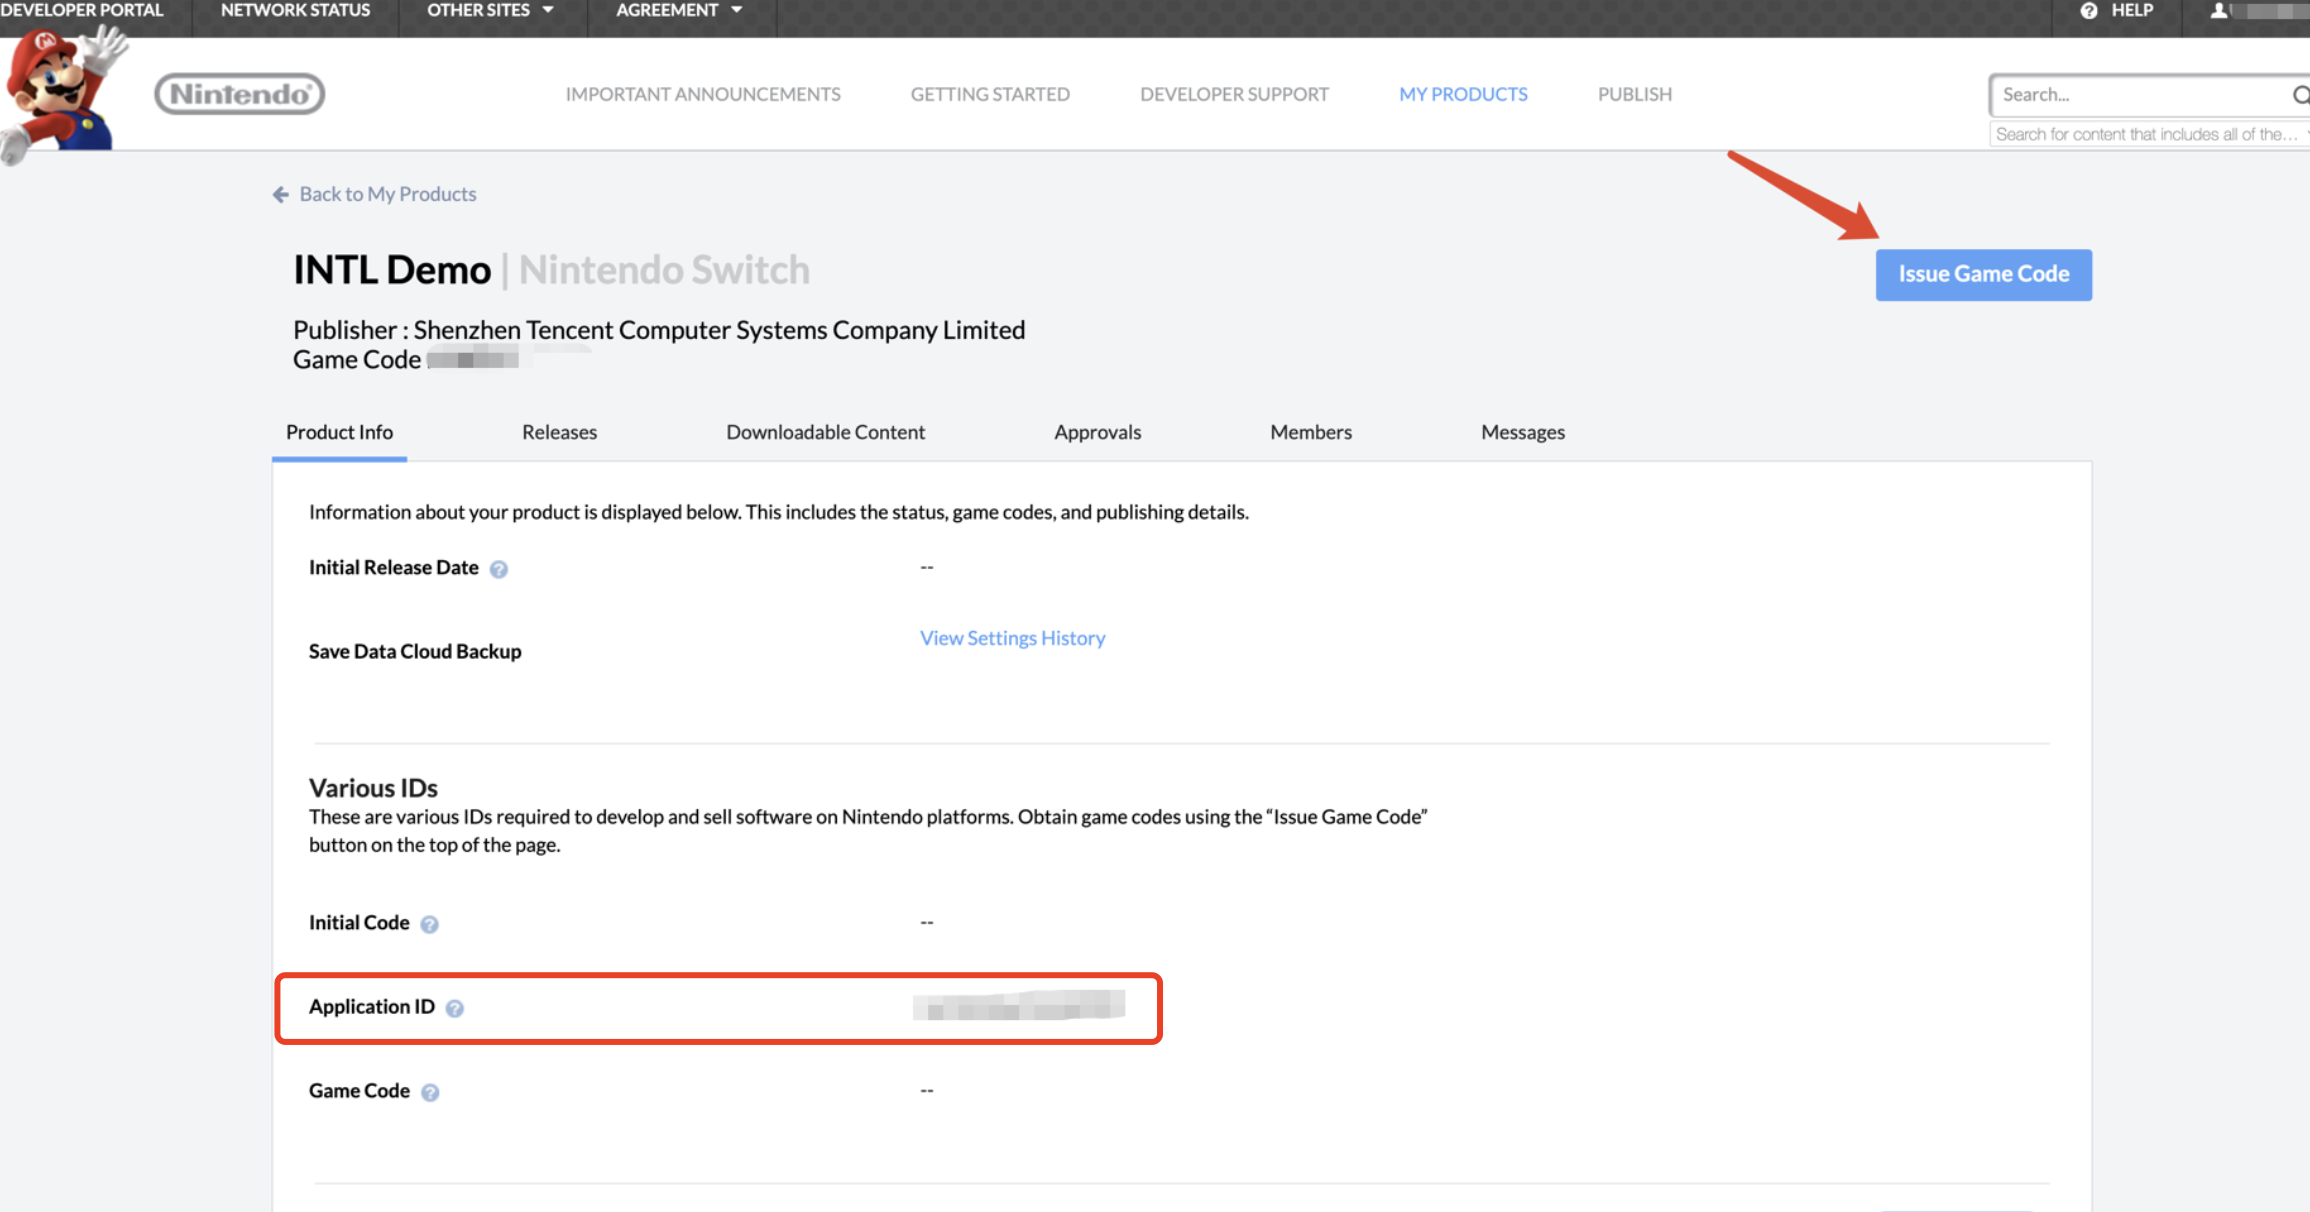
在 MY PRODUCTS 页面中,Products 下选择您的产品。
-
在页面的右上角,点击 Issue Game Code。
-
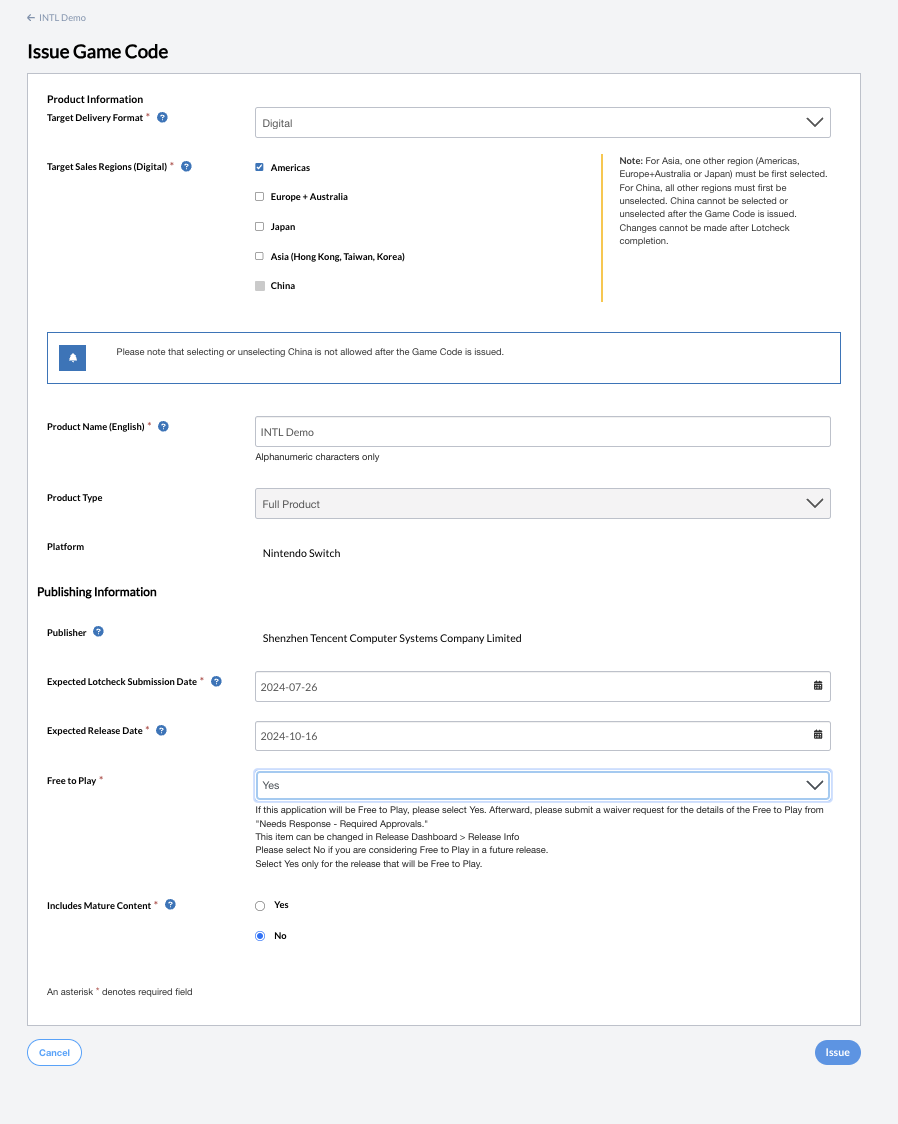
在 Publishing Information 下输入详情。
-
点击 Issue,所创建的 Application ID 和 Game Code 将显示在产品页面。
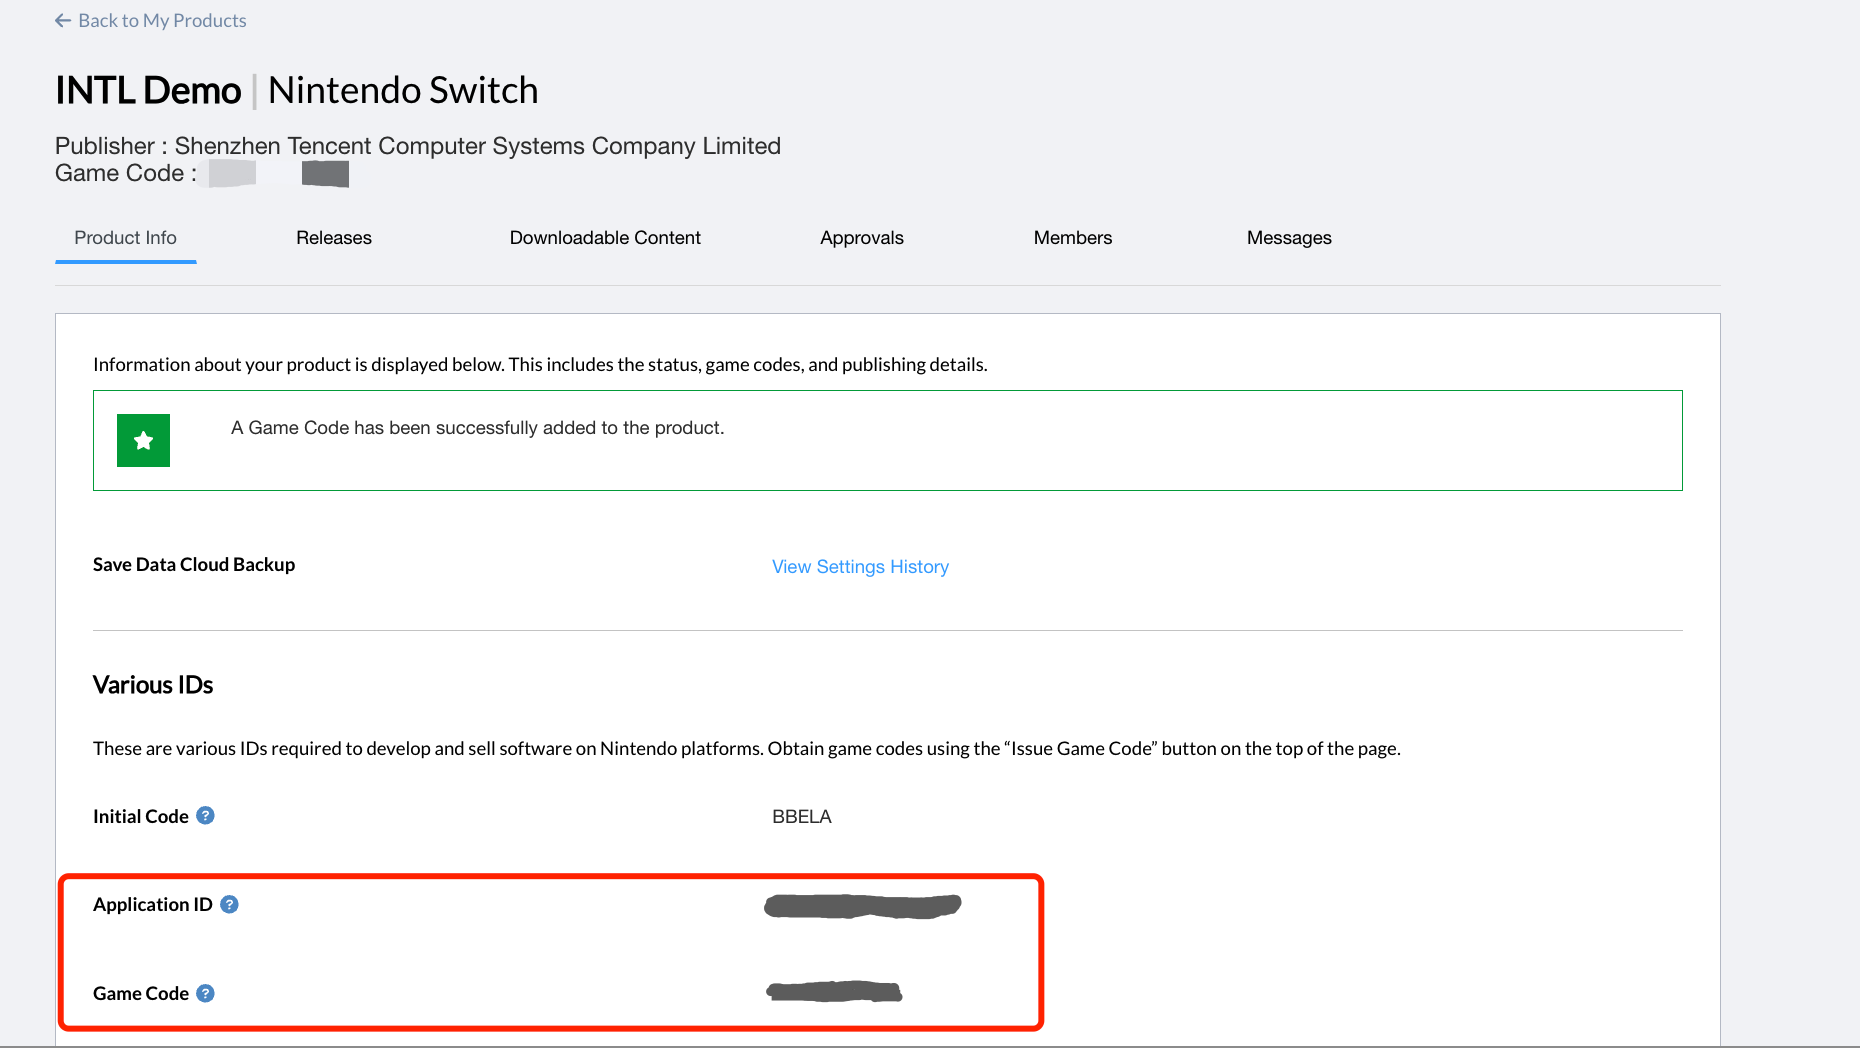
3. 配置套接字和 HTTP 通信
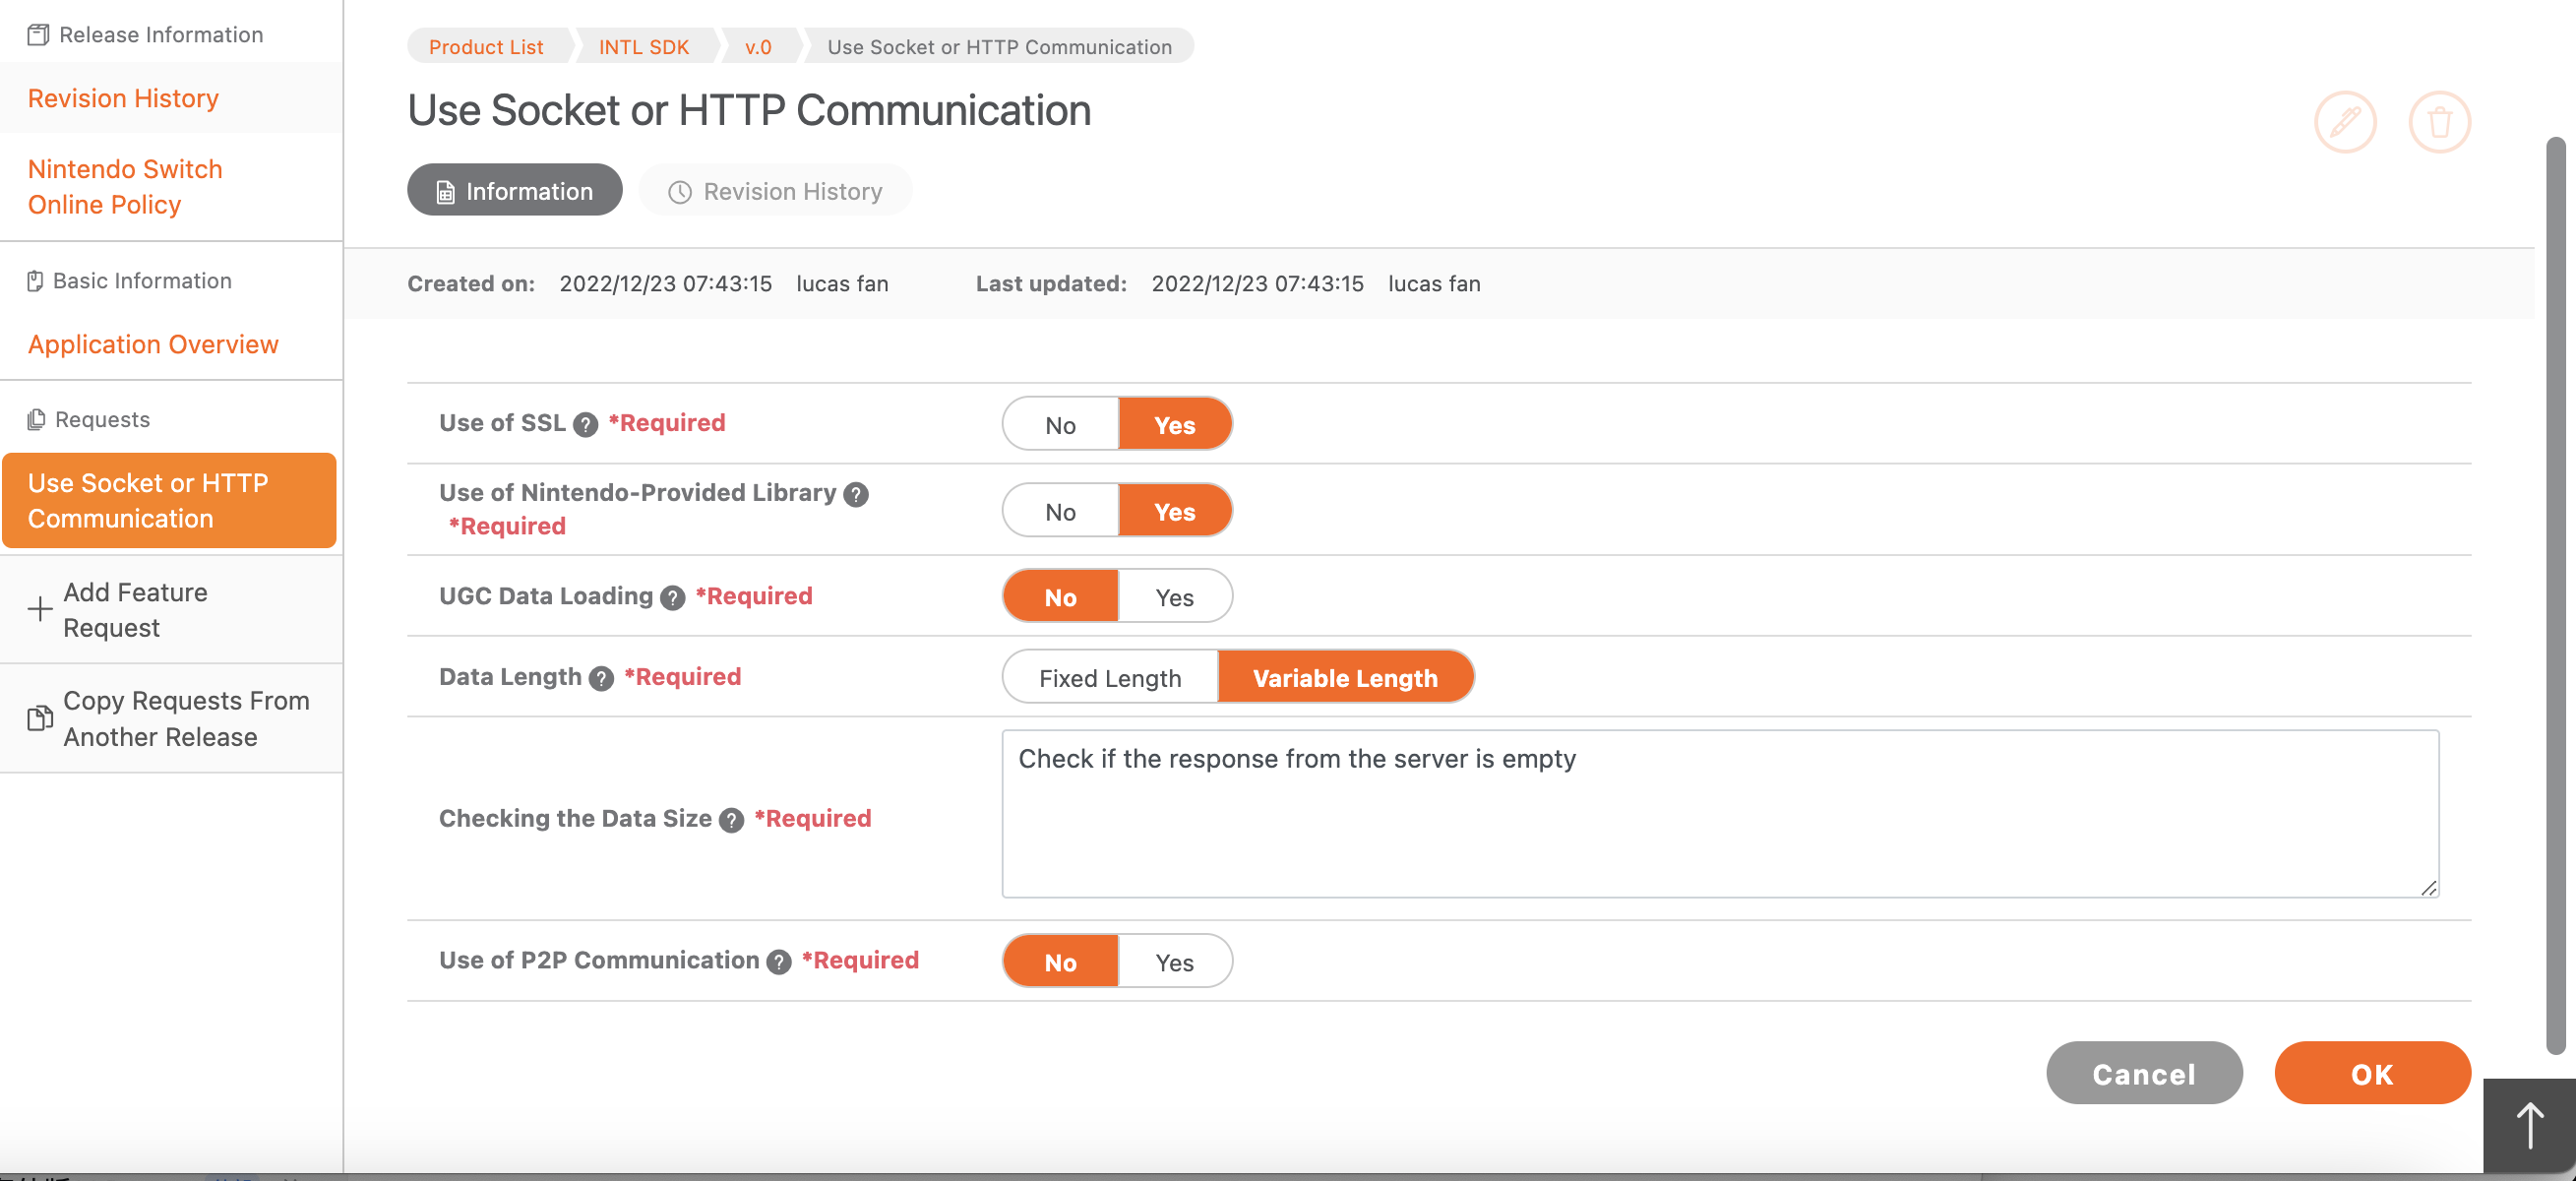
创建线上游戏时,需要添加以下信息以保证游戏可顺利连接网络。
-
使用您的 Nintendo Developer 账号登录 OMAS2,并在侧边栏选择 Products and Releases。
-
在 Product List 页面选择您的产品。
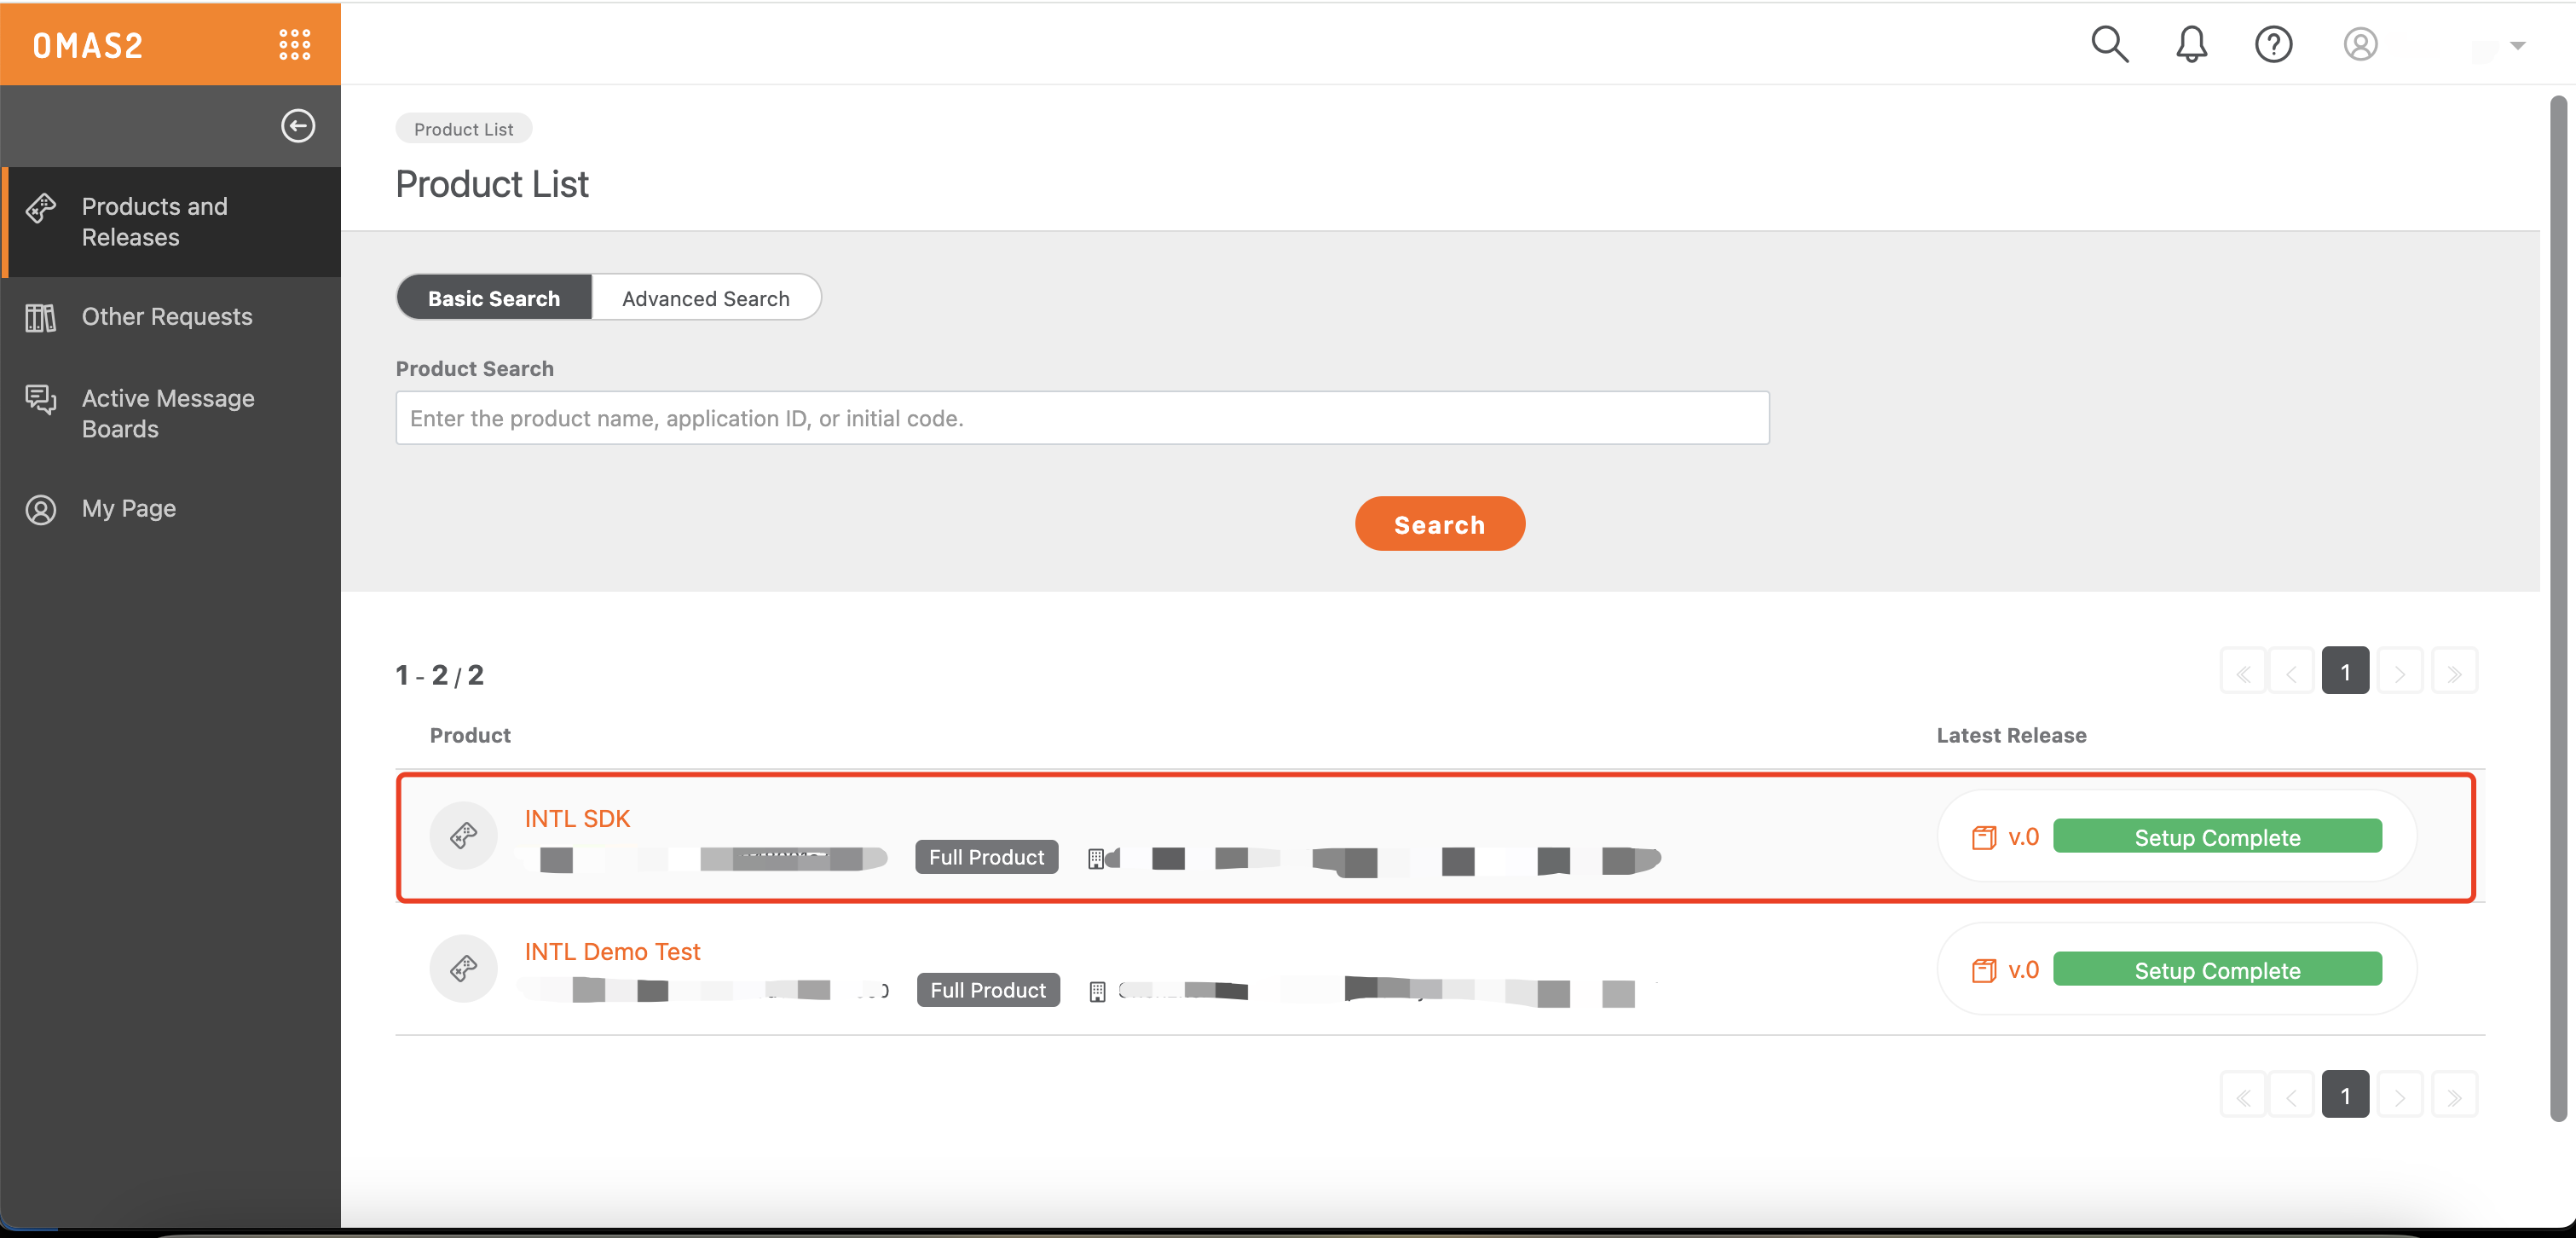
- 点击 Latest Release。

- 在 Add Feature Request 下,点击 Use Socket or HTTP Communication。
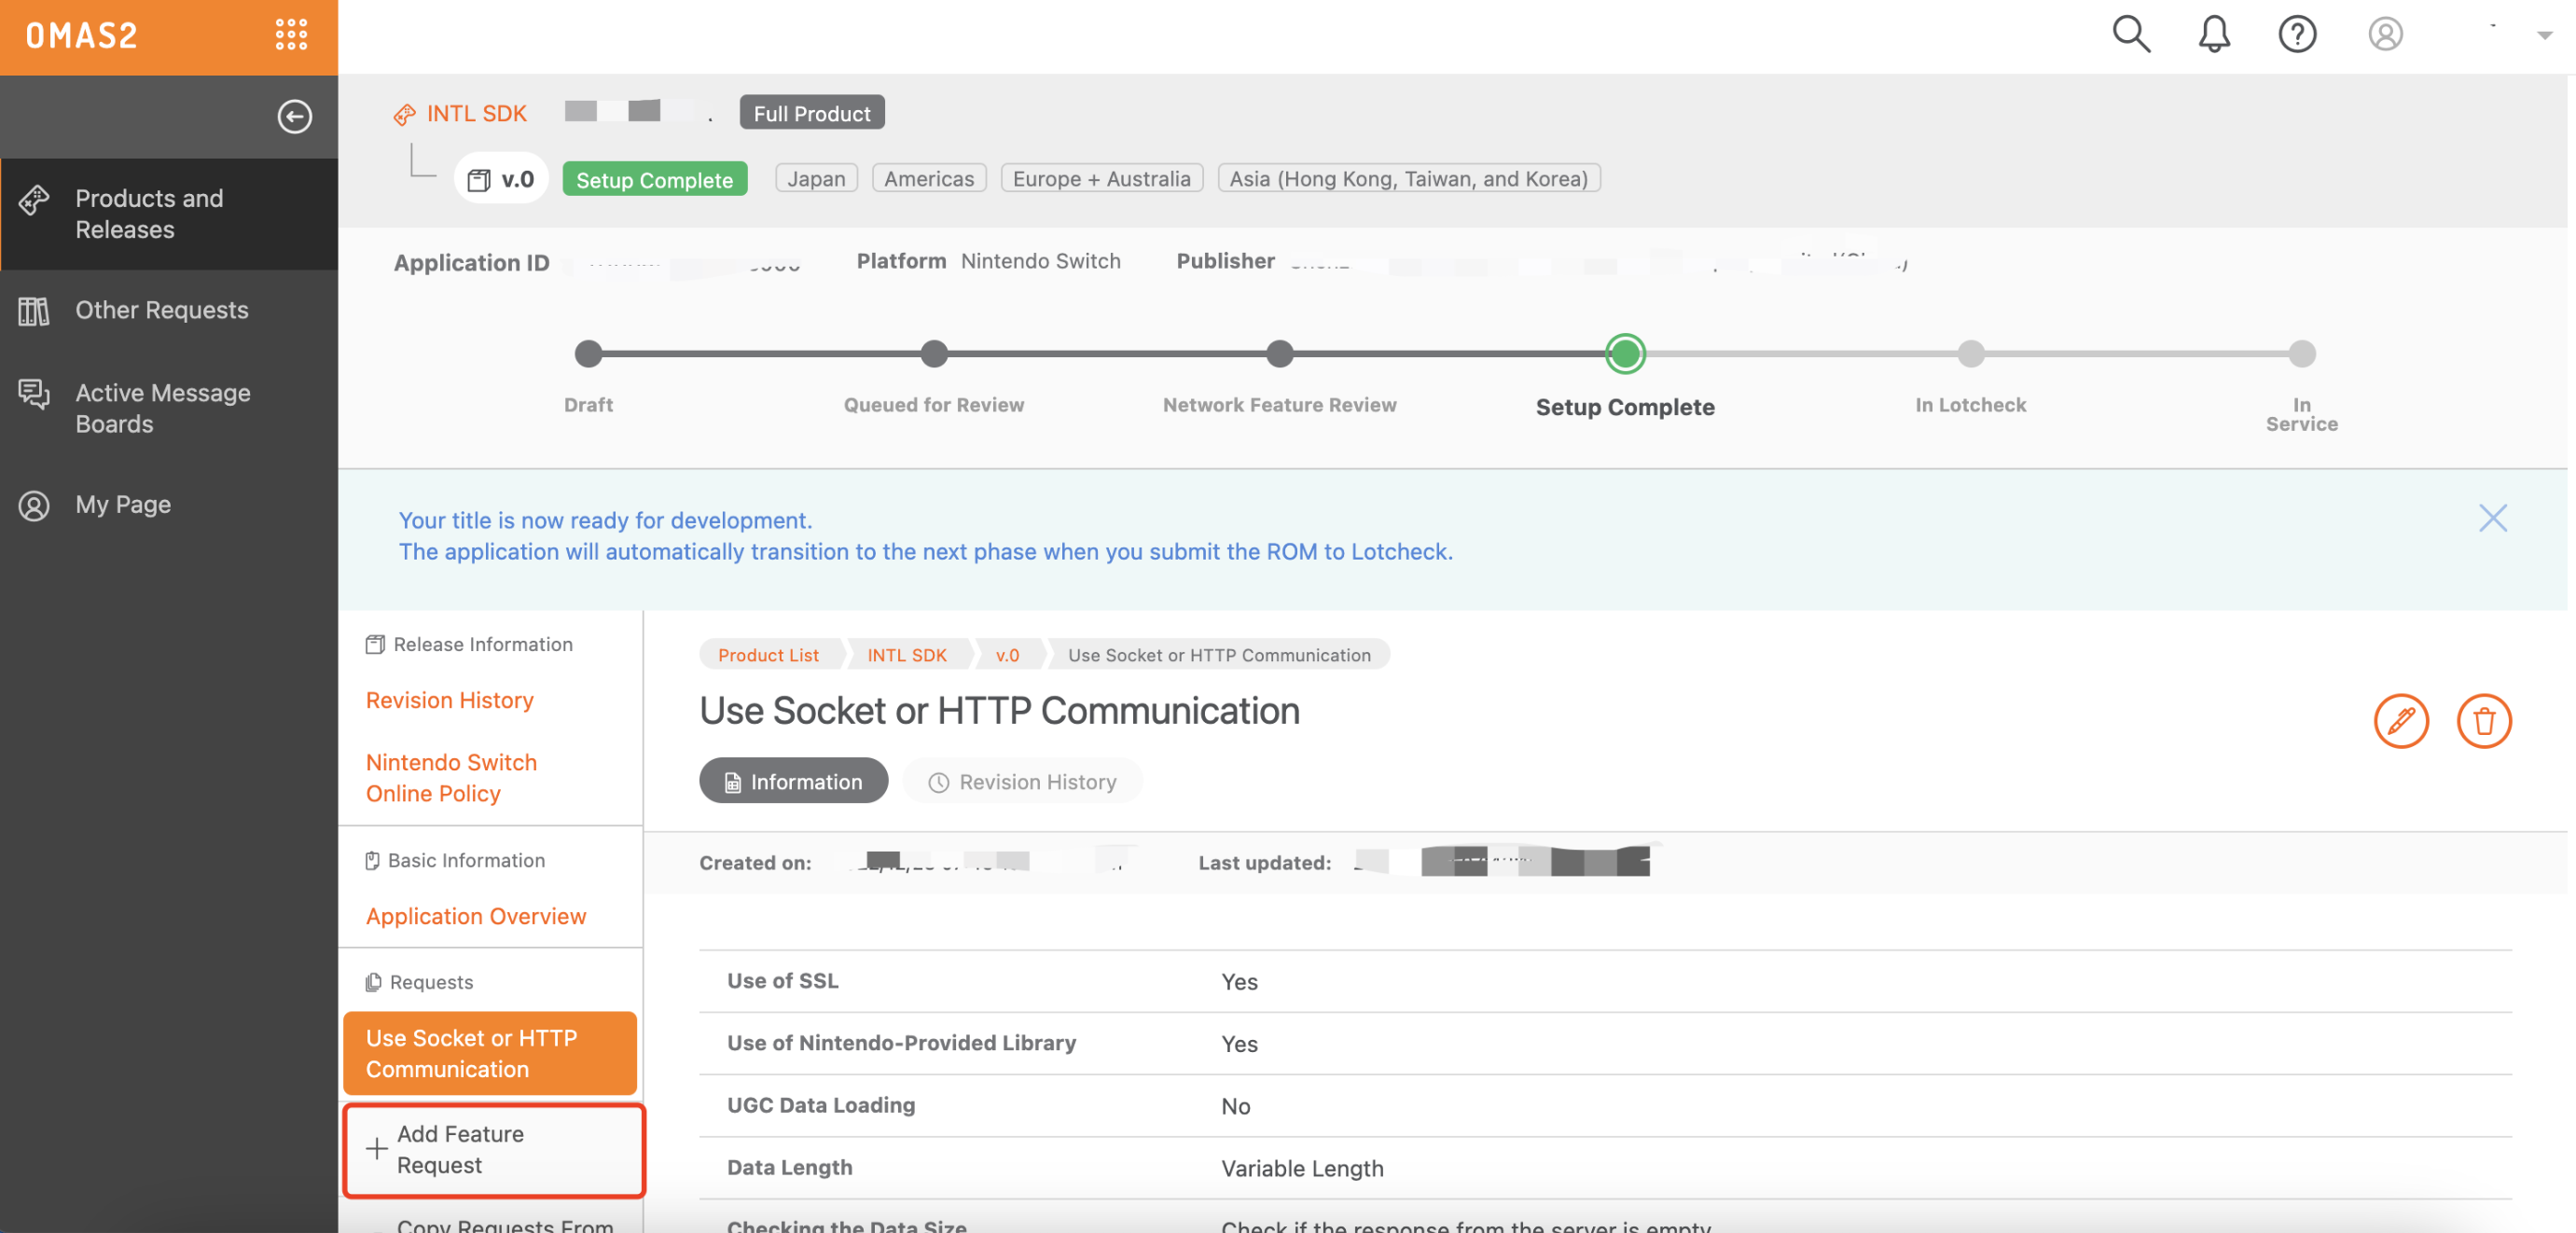
- 输入产品的网络详情后,点击 OK。
4. 申请 Client ID 和 Client Secret
为了部署到不同的服务器环境,必须为开发版本和发布版本各申请一组 client_id 和 client_secret。
-
使用您的 Nintendo Developer 账号登录 OMAS2 申请页面。
-
输入所需信息。
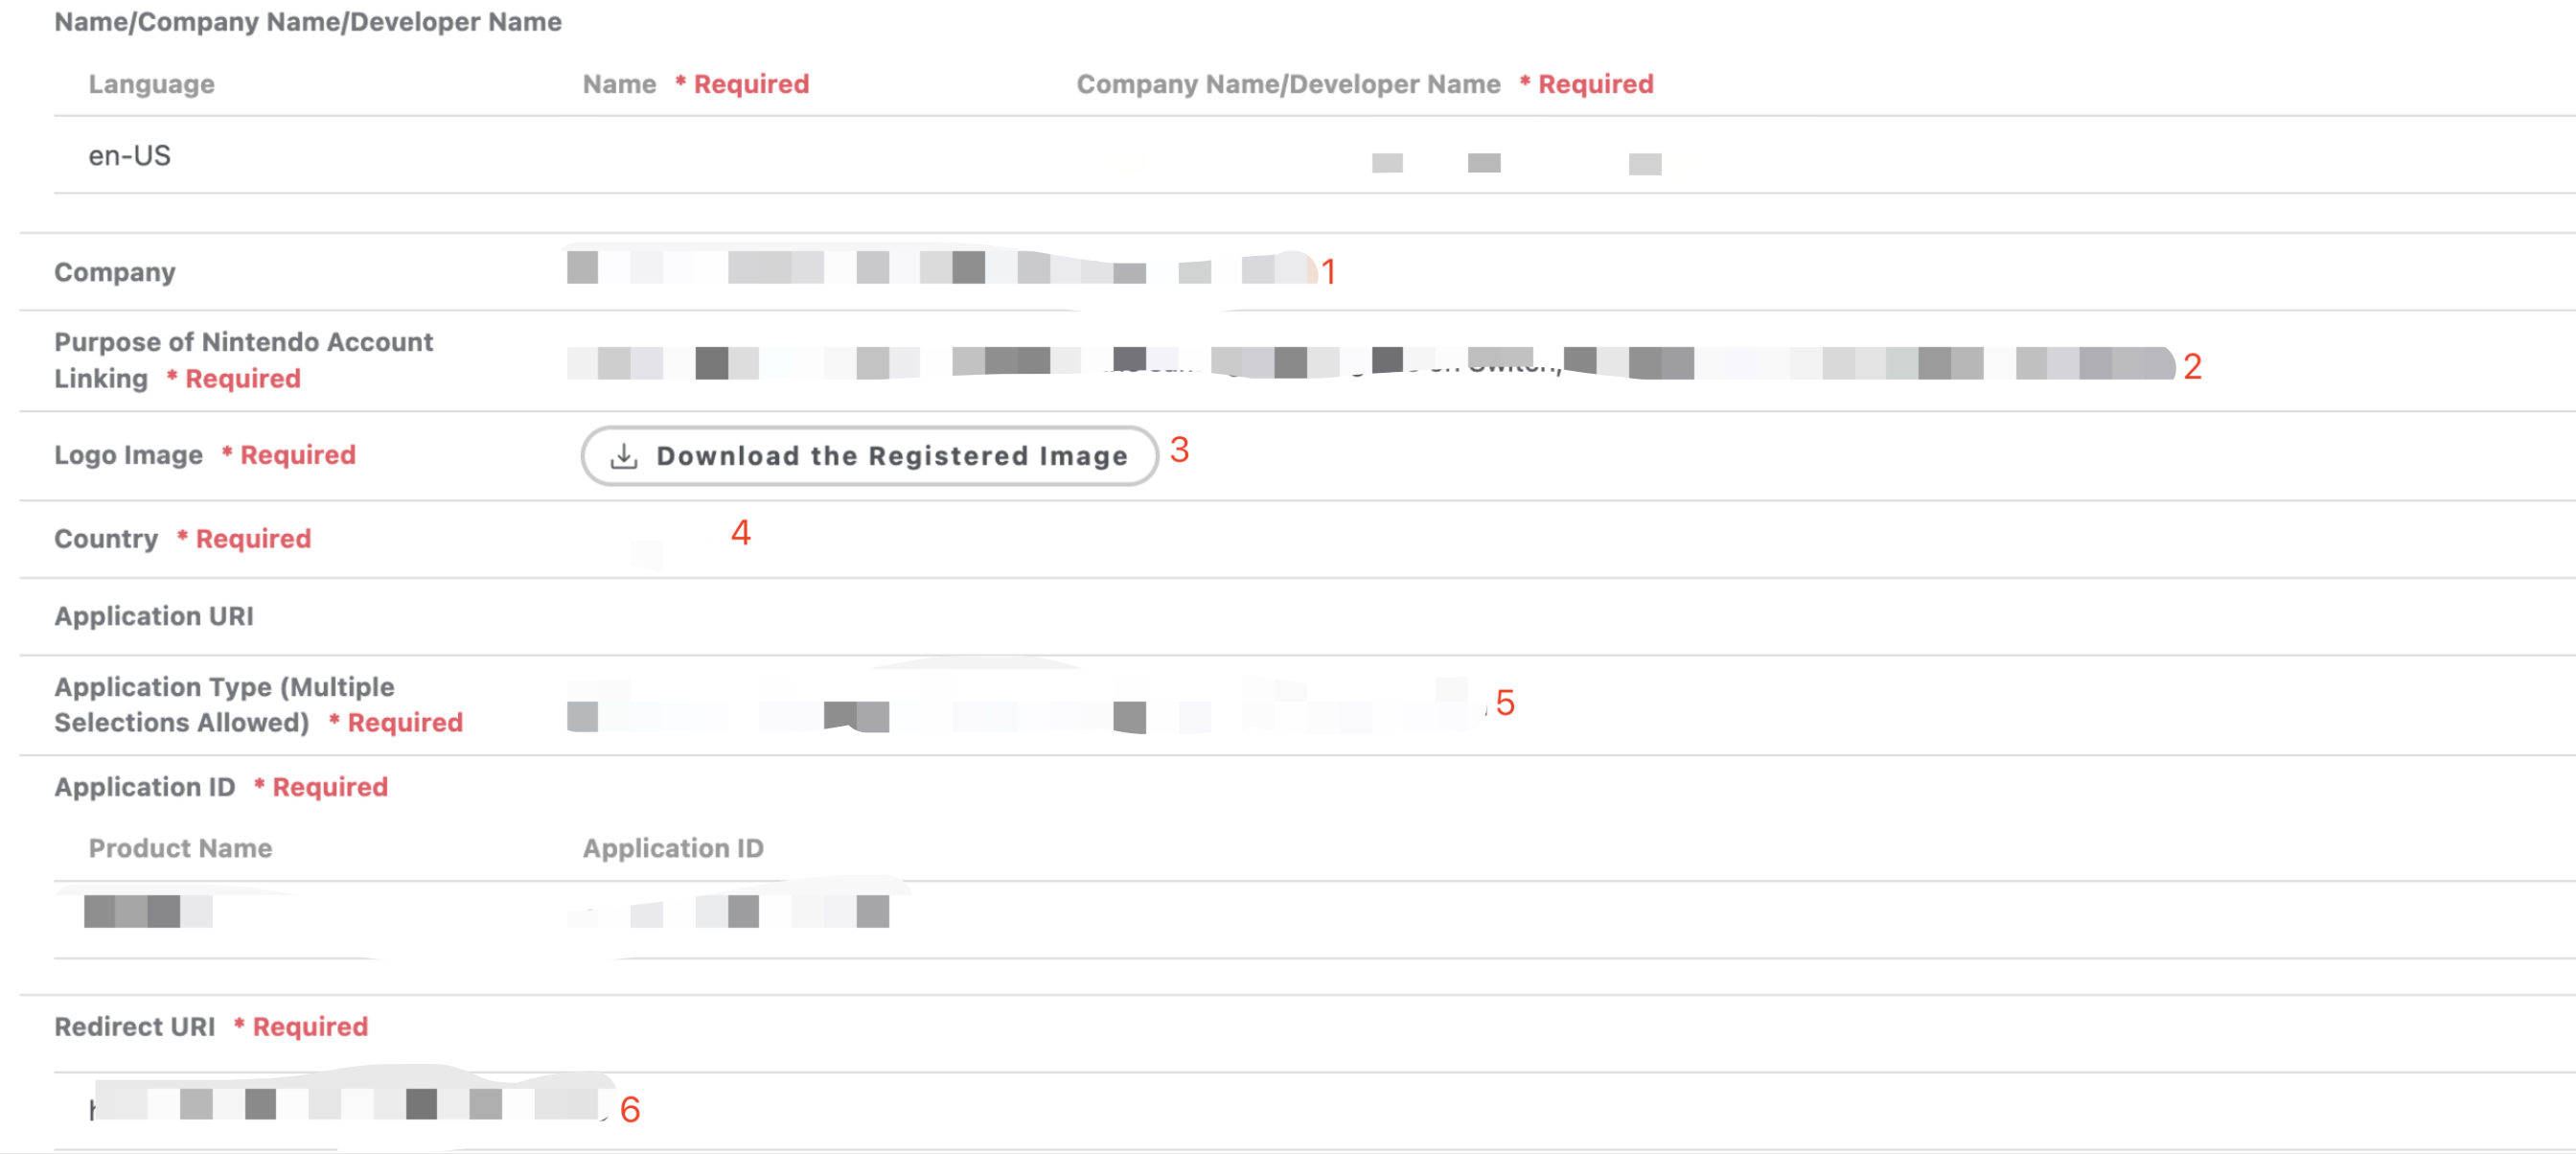 注意
注意请勿在 Country 字段中输入中国。
在测试阶段,您可在 Redirect URI 字段中输入任何重定向 URI。但是,游戏应在发布游戏之前将此字段更新为实际的重定向URI。该字段可在申请完成后修改。
-
申请在获得批准后将获得该产品版本的
client_id和client_secret。
- 获取 Player Network 控制台登录账号。
- 为游戏创建新项目,或加入已有项目。
- 下载 SDK。
- 接入 SDK。
- 在 Player Network 控制台添加 Nintendo 为业务的登录鉴权方式。
步骤1:添加 Nintendo 登录
INTLConfig.ini 里面不需要配置 Nintendo 账号信息。
- 注册登录相关回调。
//configure callback
FINTLAuthEvent authEvent;
authEvent.AddUObject(this, &OnAuthResult_Implementation);
UINTLSDKAPI::SetAuthResultObserver(authEvent);
// Remove callbacks
UINTLSDKAPI::GetAuthResultObserver().Clear();

void OnAuthResult_Implementation(FINTLAuthResult ret)
{
    UE_LOG(LogTemp, Warning, TEXT("MethodID: %d"), ret.MethodId);
}

void OnAuthResult_Implementation(FINTLAuthResult ret)
{
    UE_LOG(LogTemp, Warning, TEXT("MethodID: %d"), ret.MethodId);
} - 调用
AutoLogin接口自动登录。UINTLSDKAPI::AutoLogin(); - 在自动登录失败时调用
Login接口使玩家手动登录。UINTLSDKAPI::Login(EINTLLoginChannel::kChannelNintendo); - 与游戏后台同步客户端身份验证状态,等待最终验证结果。
步骤2:打包配置 URL 白名单
在 Nintendo 中,系统浏览器加载 URL 需要配置对应的白名单。Player Network SDK 提供了 LI PASS 合规流程中需要用到的 URL 白名单内容,业务只需将内容添加到游戏工程中的 URL 白名单中。
对应的 AccessibleUrls.txt 文件��可在 INTLCore 插件下的 Switch 目录中找到:
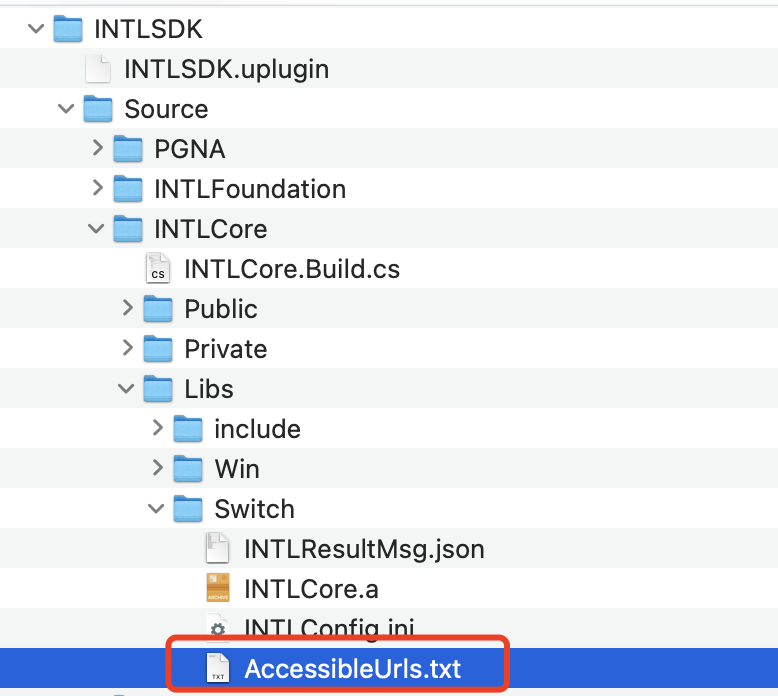
AccessibleUrls.txt 内对应的 URL 白名单内容为:
^https://test\.account\.levelinfinite\.com/(.*)
^https://account\.levelinfinite\.com/(.*)
^https://www\.levelinfinite\.com/(.*)
^https://test\.account\.levelinfinite\.com/(.*)
^https://test-common-web\.intlgame\.com/(.*)
^https://common-web\.intlgame\.com/(.*)
^https://test\.intlgame\.com/(.*)
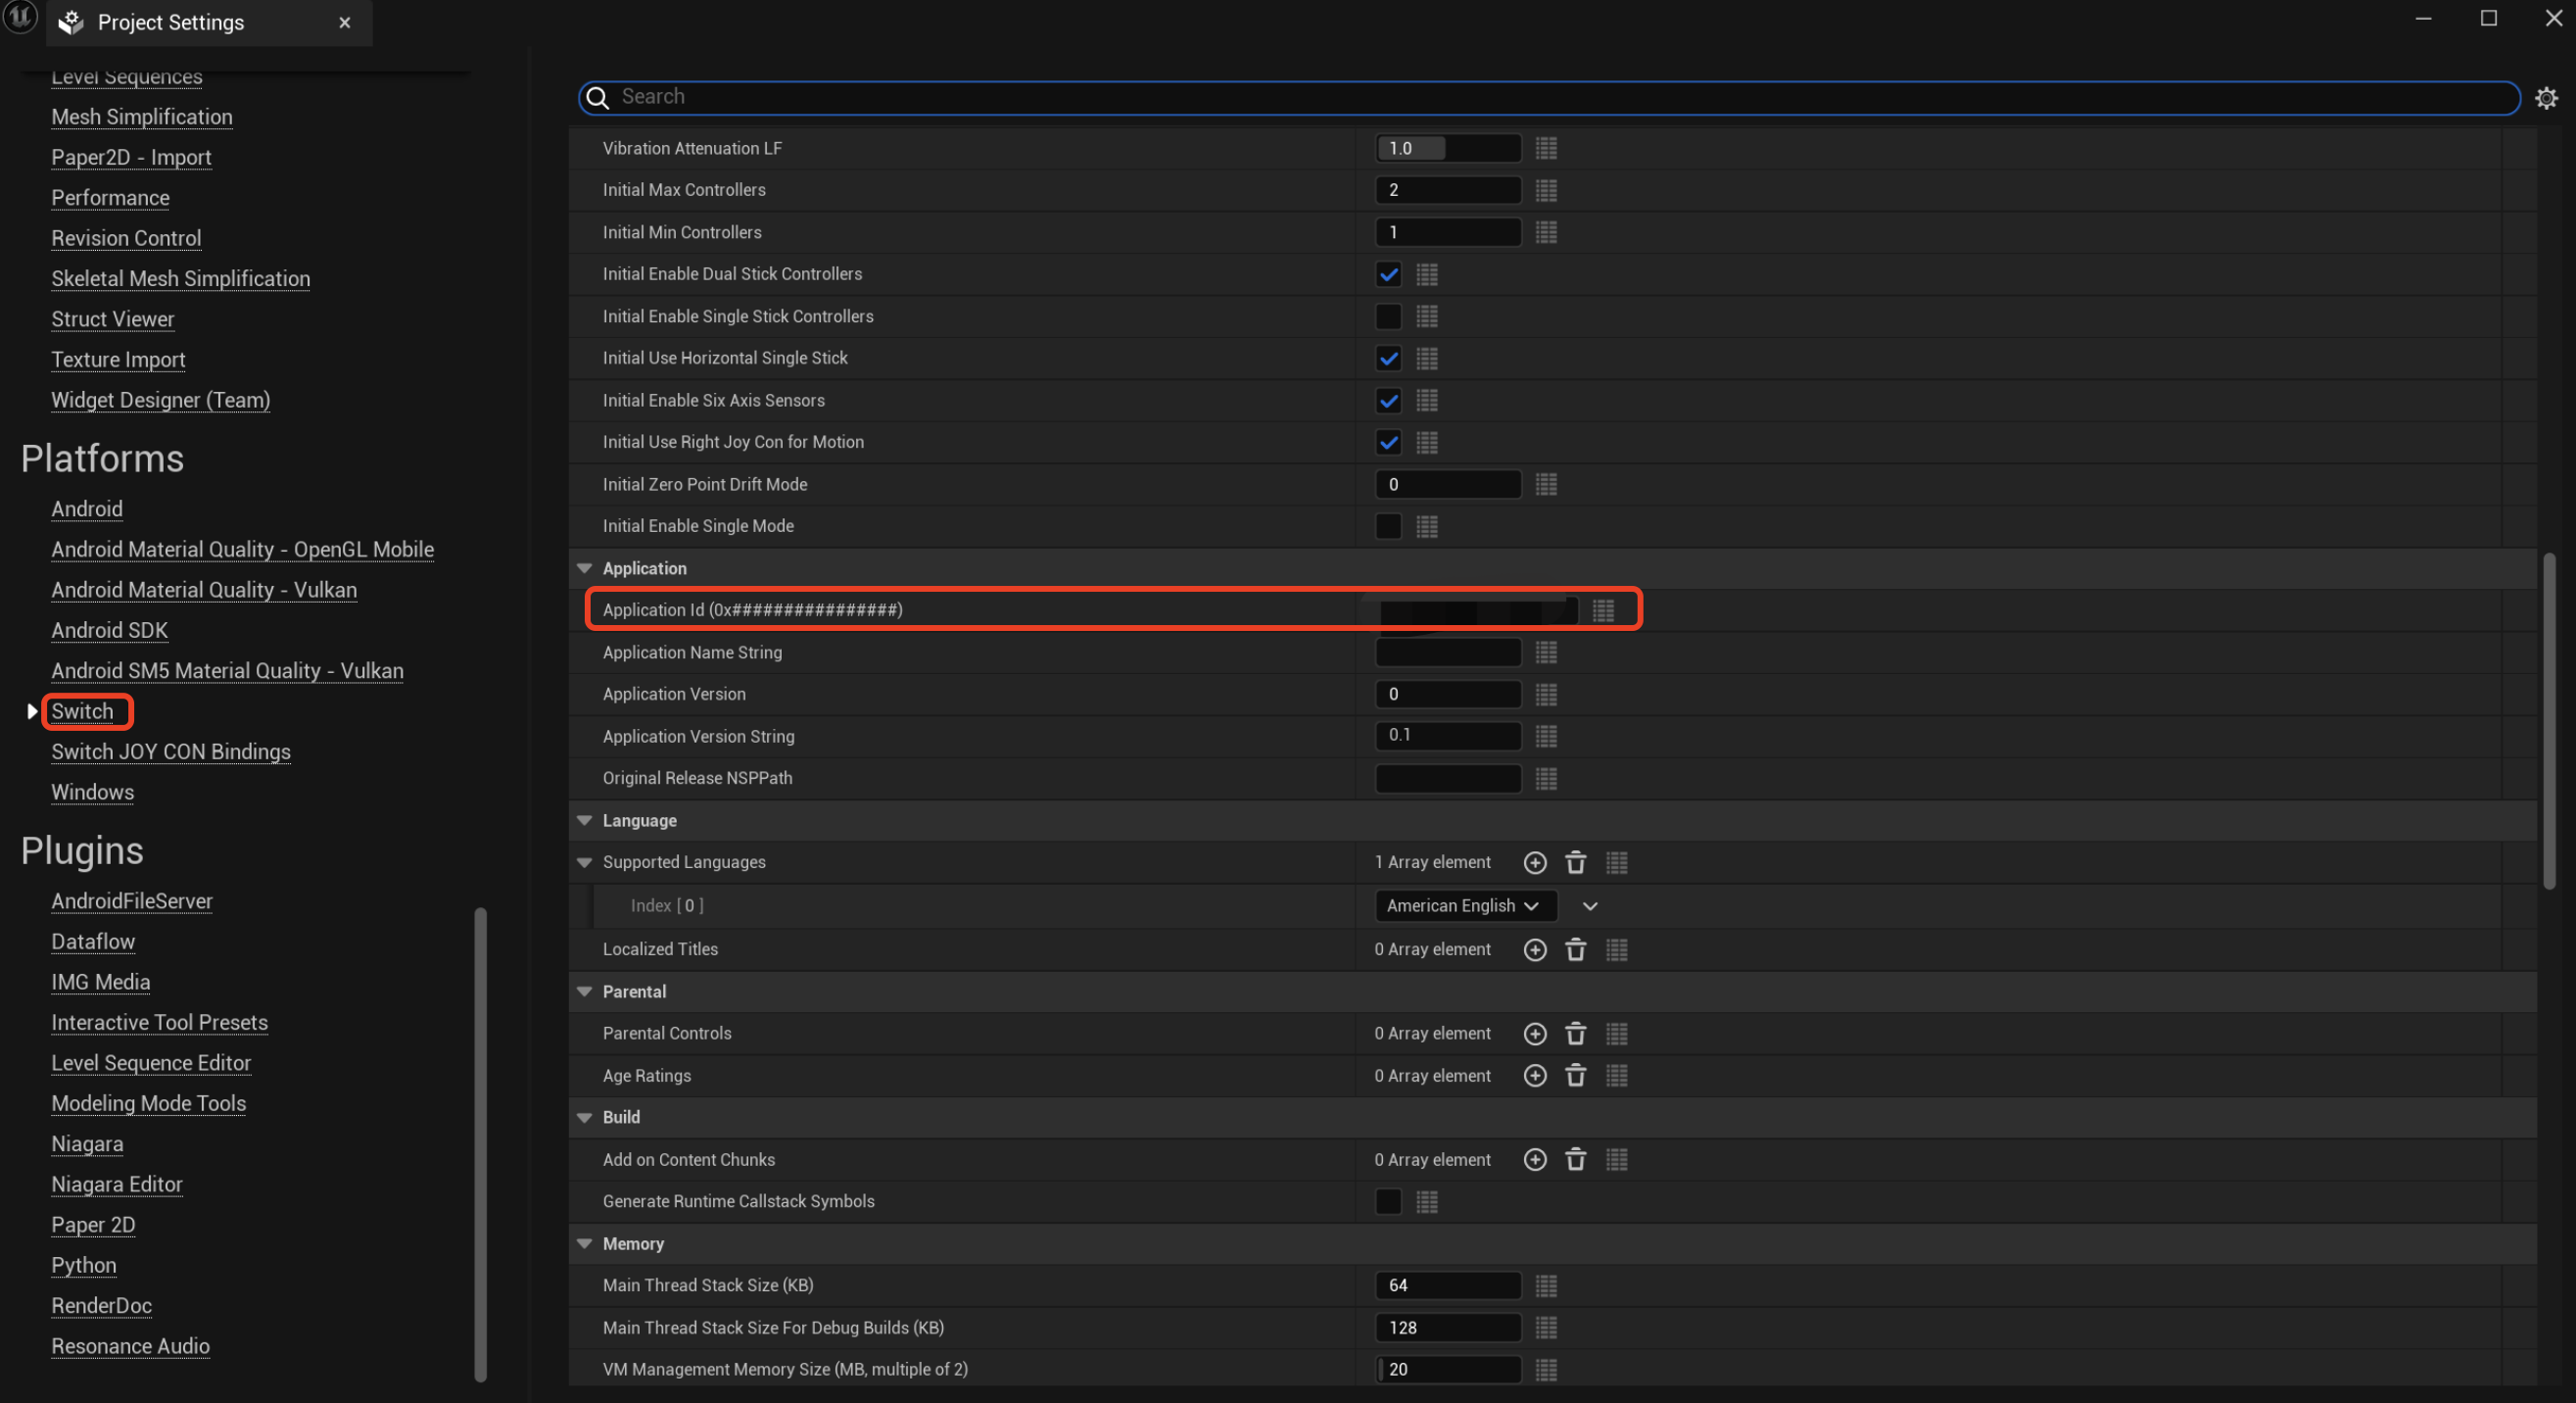
业务在打包 Nintendo 版本的时候,需要将 Nintendo 提供的 Application ID 值配置到项目设置内的 Application Id
步骤3:验收登录功能
在 Player Network SDK 日志中搜索关键字 "AuthResult" 确认渠道名称和 OpenID 是否正确返回。如果正确,则表明集成配置成功,登录功能已成功添加。