iOS
- SDK 1.26 及之后版本
- SDK 1.26 之前的版本
UE4.21 ~ UE4.27 & UE5 ~ UE5.5
UE4.21 ~ UE4.27 & UE5 ~ UE5.4
前提条件
游戏使用的每个 SDK 插件的版本(包括游戏启动器使用的版本)必须保持一致。如果游戏需要同时访问多个版本的 Player Network SDK,或者只有一个组件需要升级,请联系 Player Network 助手。
步骤1:安装 SDK
1. 将 Player Network SDK 添加到您的项目
-
解压 SDK 软件包。
-
将
INTLSDK文件夹复制到项目的Plugins文件夹中。
如果项目中没有Plugins文件夹,请创建一个。 -
打开项目的
{项目名称}.Build.cs文件,并按照示例将 Player Network SDK 添加到 Unreal Engine 中。public INTLSample(ReadOnlyTargetRules Target) : base(Target)
{
PrivateDependencyModuleNames.AddRange(new string[] {
"INTLCore",
"INTLFoundation",
"INTLConfig",
});
}
Player Network SDK package
├─INTLSDK
│  ├─INTLSDK.uplugin    // Player Network SDK plugins description files
│  ├─Resources          // Player Network SDK resources
│  └─Source             // Player Network SDK plugin modules. Each module contains its own Build.cs file, libraries, and interfaces.
│    ├─INTLApple
│    ├─INTLConfig       // Player Network SDK configurations
│    ├─INTLCore         // Player Network SDK Core module
│    ├─INTLDiscord
│    ├─INTLEpic
│    ├─INTLFacebook
│    ├─INTLFoundation
│    ├─INTLGoogle
│    ├─INTLKakao
│    ├─INTLLine
│    ├─INTLSteam
│    ├─INTLTwitter
│    └─INTLVK
├─LevelInfinite     // LI PASS APIs
└─Symbols           // Player Network SDK symbol table *.so files
INTLSDK/Source/INTLCore
└─INTLSDK
   ├─INTLSDK.uplugin
   ├─Resources
   └─Source
     ├─INTLConfig
     ├─INTLCore
     |  ├─INTLCore.Build.cs // INTLCore Build.cs file
     |  ├─Libs              // INTLCore libraries for different platforms which contain dll, lib, and other binary files.
     |  |  ├─Android
     |  |  ├─include
     |  |  ├─iOS
     |  |  ├─MacOS
     |  |  └─Win
     |  ├─Private           // Player Network SDK private folder
     |  └─Public            // Player Network SDK public interfaces
     |                      // INTLSDKAPI.h: Player Network SDK APIs
     |                      // INTLSDKPluginObserver.h: Player Network SDK observer classes
     |                      // INTLSDKPluginDefine.h: Player Network SDK data types
     |                      // INTLSDKOutputUtility.h: Player Network SDK utility to process callbacks
     |                      // INTLSDKBaseUserWidget.h: Player Network SDK base class for UserWidget which includes registration and deregistration APIs
     ├─INTLCustomer
     ├─INTLDiscord
     ├─INTLEpic
INTLSDK/Source/INTLConfig
└─INTLSDK
   ├─INTLSDK.uplugin
   ├─Resources
   └─Source
     ├─INTLConfig
     |  ├─Configs       // Player Network SDK configurations for different platform
     |  |  ├─Android
     |  |  |  └─INTLConfig_APL.xml  // Player Network SDK Android gradle configuration file
     |  |  ├─iOS
     |  |  |  └─INTLConfig_UPL.xml
     |  |  ├─Resources
     |  |  |  ├─APASConfig.ini      // APAS device level configuration file
     |  |  |  └─INTLConfig.ini      // Player Network SDK main configuration file
     |  ├─Encrypt
     |  ├─INTLConfig.Build.cs
     |  ├─INTLConfig.uplugin
     |  ├─Private
     |  ├─Public
     |  └─Resources
     ├─INTLCore
2. 加载所需的权限和插件
打开 INTLSDK/Scripts/INTLConfig/Editor/Resources/INTLConfig.ini 文件,并添加 Player Network SDK 配置。将占位符替换为游戏配置的对应值。
    [INTL environment]
    # WARNING: You should change this URL to the production environment when you release your game.
    INTL_URL = https://test.intlgame.com
    GAME_ID = {INTL_GAME_ID}
    SDK_KEY = {INTL_SDK_KEY}
    [INTL Log]
    LOG_LEVEL = 1
    LOG_CONSOLE_OUTPUT_ENABLE = 1
    LOG_FILE_OUTPUT_ENABLE = 1
    LOG_ENCRYPT_ENABLE = 0
    LOG_COMPRESS_ENABLE = 0
    [Facebook channel configuration]
    FACEBOOK_APP_ID = {INTL_FACEBOOK_APP_ID}
    FACEBOOK_DISPLAYNAME = {INTL_APP_NAME}
iOS 使用说明
集成时,用户可根据自己的需要修改内容,并 与法律团队确认内容是否合规。如果没有修改,请用游戏名称替换 INTLSample。
根据 iOS 权限要求,在申请敏感权限时,当系统弹出提示用户填写信息时,填写 用途描述。
-
在
Plugins/INTLSDK/Source/INTLConfig/Configs/iOS/Plist/INTLCore.plist中,以下权限已升级:<key>NSPhotoLibraryUsageDescription</key>
<key>NSCameraUsageDescription</key>
<key>NSLocationWhenInUseUsageDescription</key>
<key>NSPhotoLibraryAddUsageDescription</key>
<key>NSMicrophoneUsageDescription</key> -
在
Plugins/INTLSDK/Source/INTLConfig/Configs/iOS/Plist/INTLADTracking.plist中,以下权限已升级:<key>NSUserTrackingUsageDescription</key>
3. Swift SDK 兼容设置
Unreal Engine 5.2 及以上��版本已内置 Swift 模块,下列步骤仅适用于 Unreal Engine 5.2 以下版本。
iOS Swift 模块不能直接添加到 Unreal Engine 中,必须先修改引擎配置。
-
修改本地 Unreal Engine 源代码。
在 /Your_UE_Installation_Path/Engine/Source/Programs/UnrealBuildTool/ProjectFiles/Xcode/XcodeProject.cs 的
private void AppendProjectBuildConfiguration(StringBuilder Content, string ConfigName, string ConfigGuid)函数中添加以下代码。// Enable Swift
Content.Append("\t\t\t\tCLANG_ENABLE_MODULES = YES;" + ProjectFileGenerator.NewLine);
Content.Append("\t\t\t\tSWIFT_VERSION = 5.0;" + ProjectFileGenerator.NewLine);
Content.Append("\t\t\t\tLIBRARY_SEARCH_PATHS = \"$(TOOLCHAIN_DIR)/usr/lib/swift/$(PLATFORM_NAME)\";" + ProjectFileGenerator.NewLine);
if (ConfigName == "Debug")
{
Content.Append("\t\t\t\tSWIFT_OPTIMIZATION_LEVEL = \"-Onone\";" + ProjectFileGenerator.NewLine);
}
Content.Append("\t\t\t\tALWAYS_EMBED_SWIFT_STANDARD_LIBRARIES = YES;" + ProjectFileGenerator.NewLine);
Content.Append("\t\t\t\tEMBEDDED_CONTENT_CONTAINS_SWIFT = YES;" + ProjectFileGenerator.NewLine);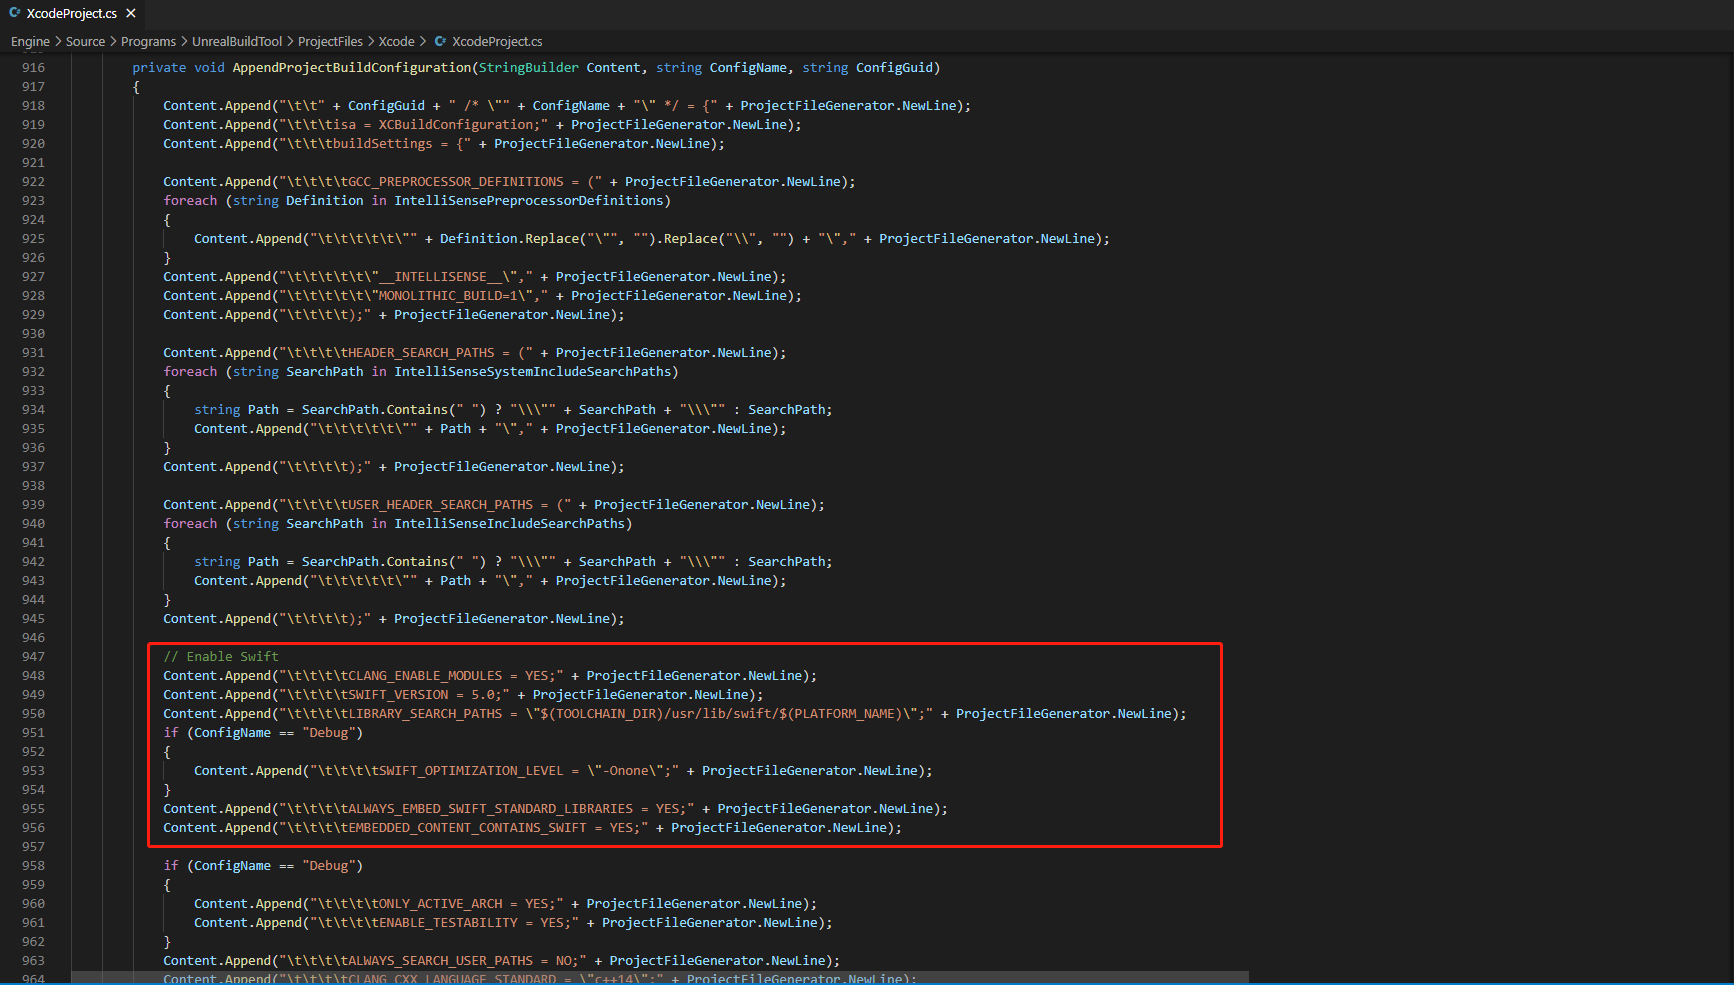
-
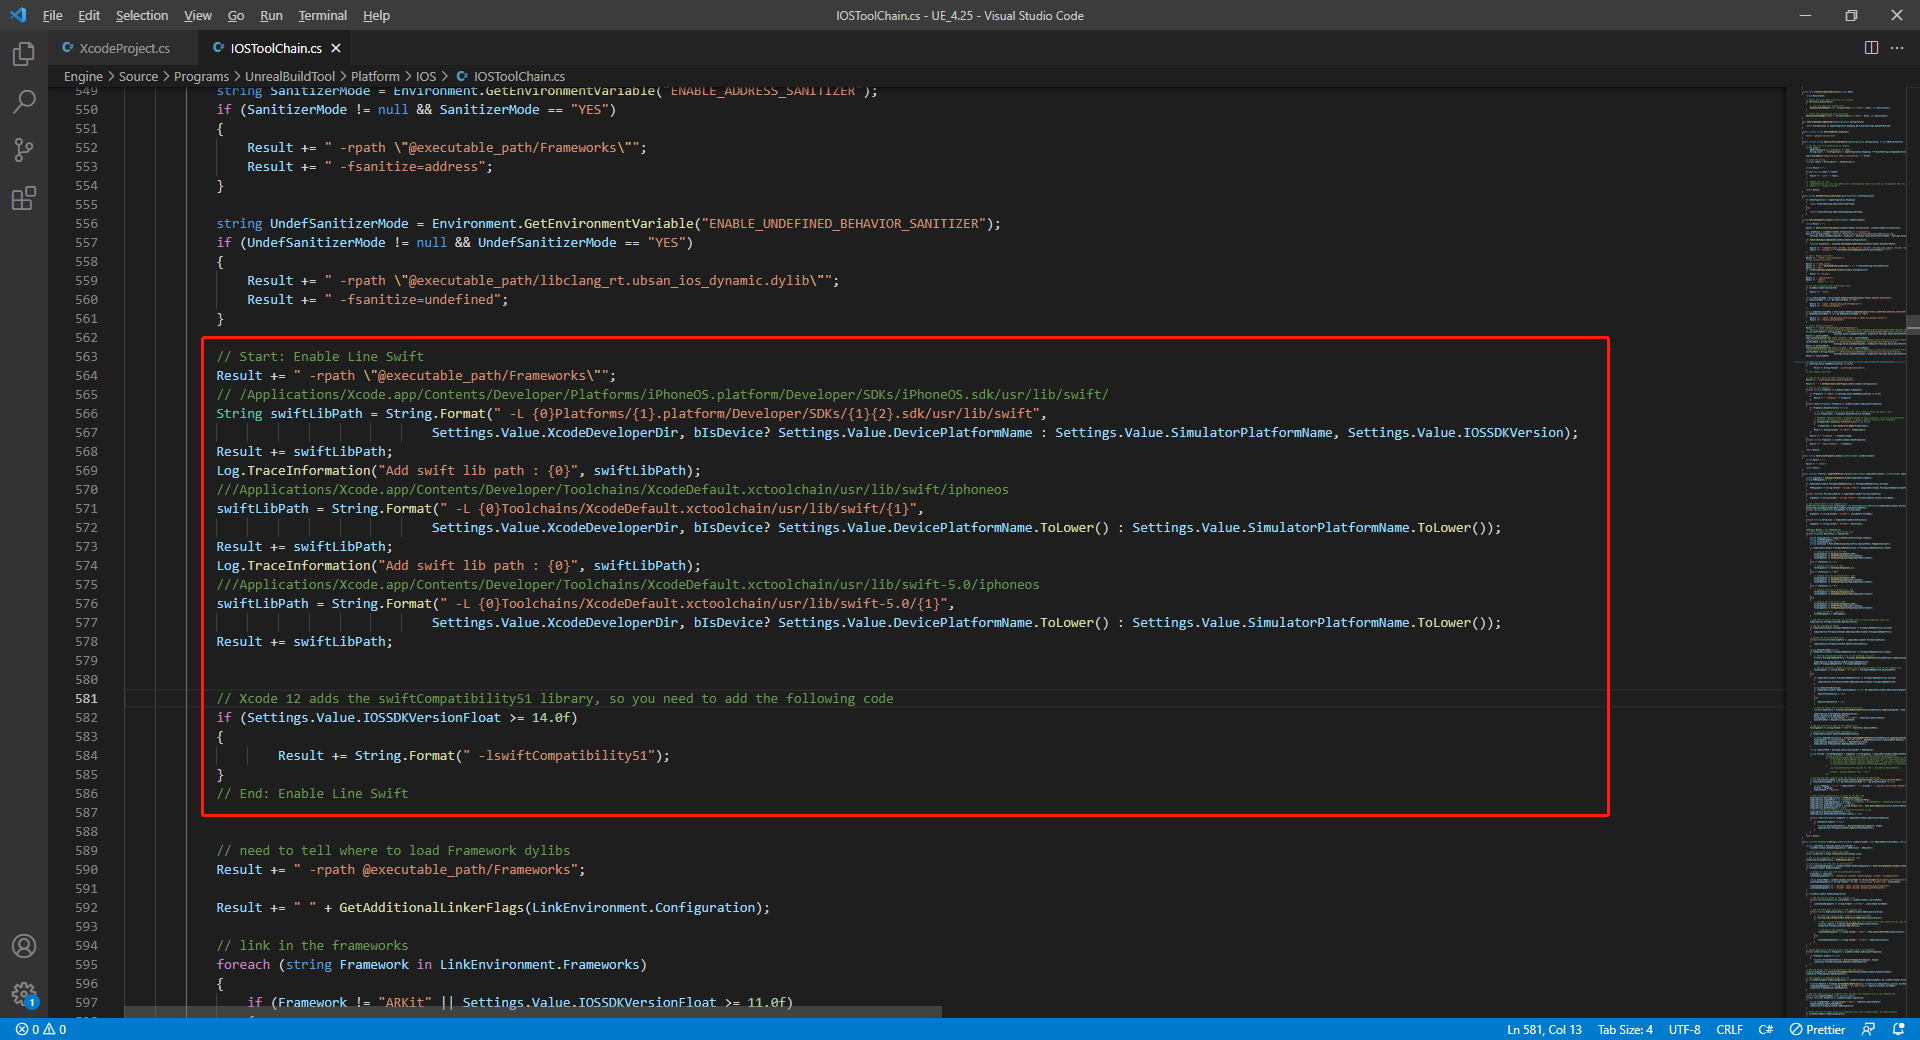
在 /Your_UE_Installation_Path/Engine/Source/Programs/UnrealBuildTool/Platform/IOS/IOSToolChain.cs 的
string GetLinkArguments_Global(LinkEnvironment LinkEnvironment)函数中添加以下代码。- Before XCode 12
- XCode 12 and later
// enable swift support
Result += " -rpath \"/usr/lib/swift\"";
Result += " -rpath \"@executable_path/Frameworks\"";
// /Applications/Xcode.app/Contents/Developer/Platforms/iPhoneOS.platform/Developer/SDKs/iPhoneOS.sdk/usr/lib/swift/
String swiftLibPath = String.Format(" -L {0}Platforms/{1}.platform/Developer/SDKs/{1}{2}.sdk/usr/lib/swift",
    Settings.Value.XcodeDeveloperDir,
    bIsDevice? Settings.Value.DevicePlatformName : Settings.Value.SimulatorPlatformName,
    Settings.Value.IOSSDKVersion);
Result += swiftLibPath;
Log.TraceInformation("Add swift lib path : {0}", swiftLibPath);
///Applications/Xcode.app/Contents/Developer/Toolchains/XcodeDefault.xctoolchain/usr/lib/swift/iphoneos
swiftLibPath = String.Format(" -L {0}Toolchains/XcodeDefault.xctoolchain/usr/lib/swift/{1}",
    Settings.Value.XcodeDeveloperDir,
    bIsDevice? Settings.Value.DevicePlatformName.ToLower() : Settings.Value.SimulatorPlatformName.ToLower());
Result += swiftLibPath;
Log.TraceInformation("Add swift lib path : {0}", swiftLibPath);
///Applications/Xcode.app/Contents/Developer/Toolchains/XcodeDefault.xctoolchain/usr/lib/swift-5.0/iphoneos
swiftLibPath = String.Format(" -L {0}Toolchains/XcodeDefault.xctoolchain/usr/lib/swift-5.0/{1}",
    Settings.Value.XcodeDeveloperDir,
    bIsDevice? Settings.Value.DevicePlatformName.ToLower() : Settings.Value.SimulatorPlatformName.ToLower());
Result += swiftLibPath;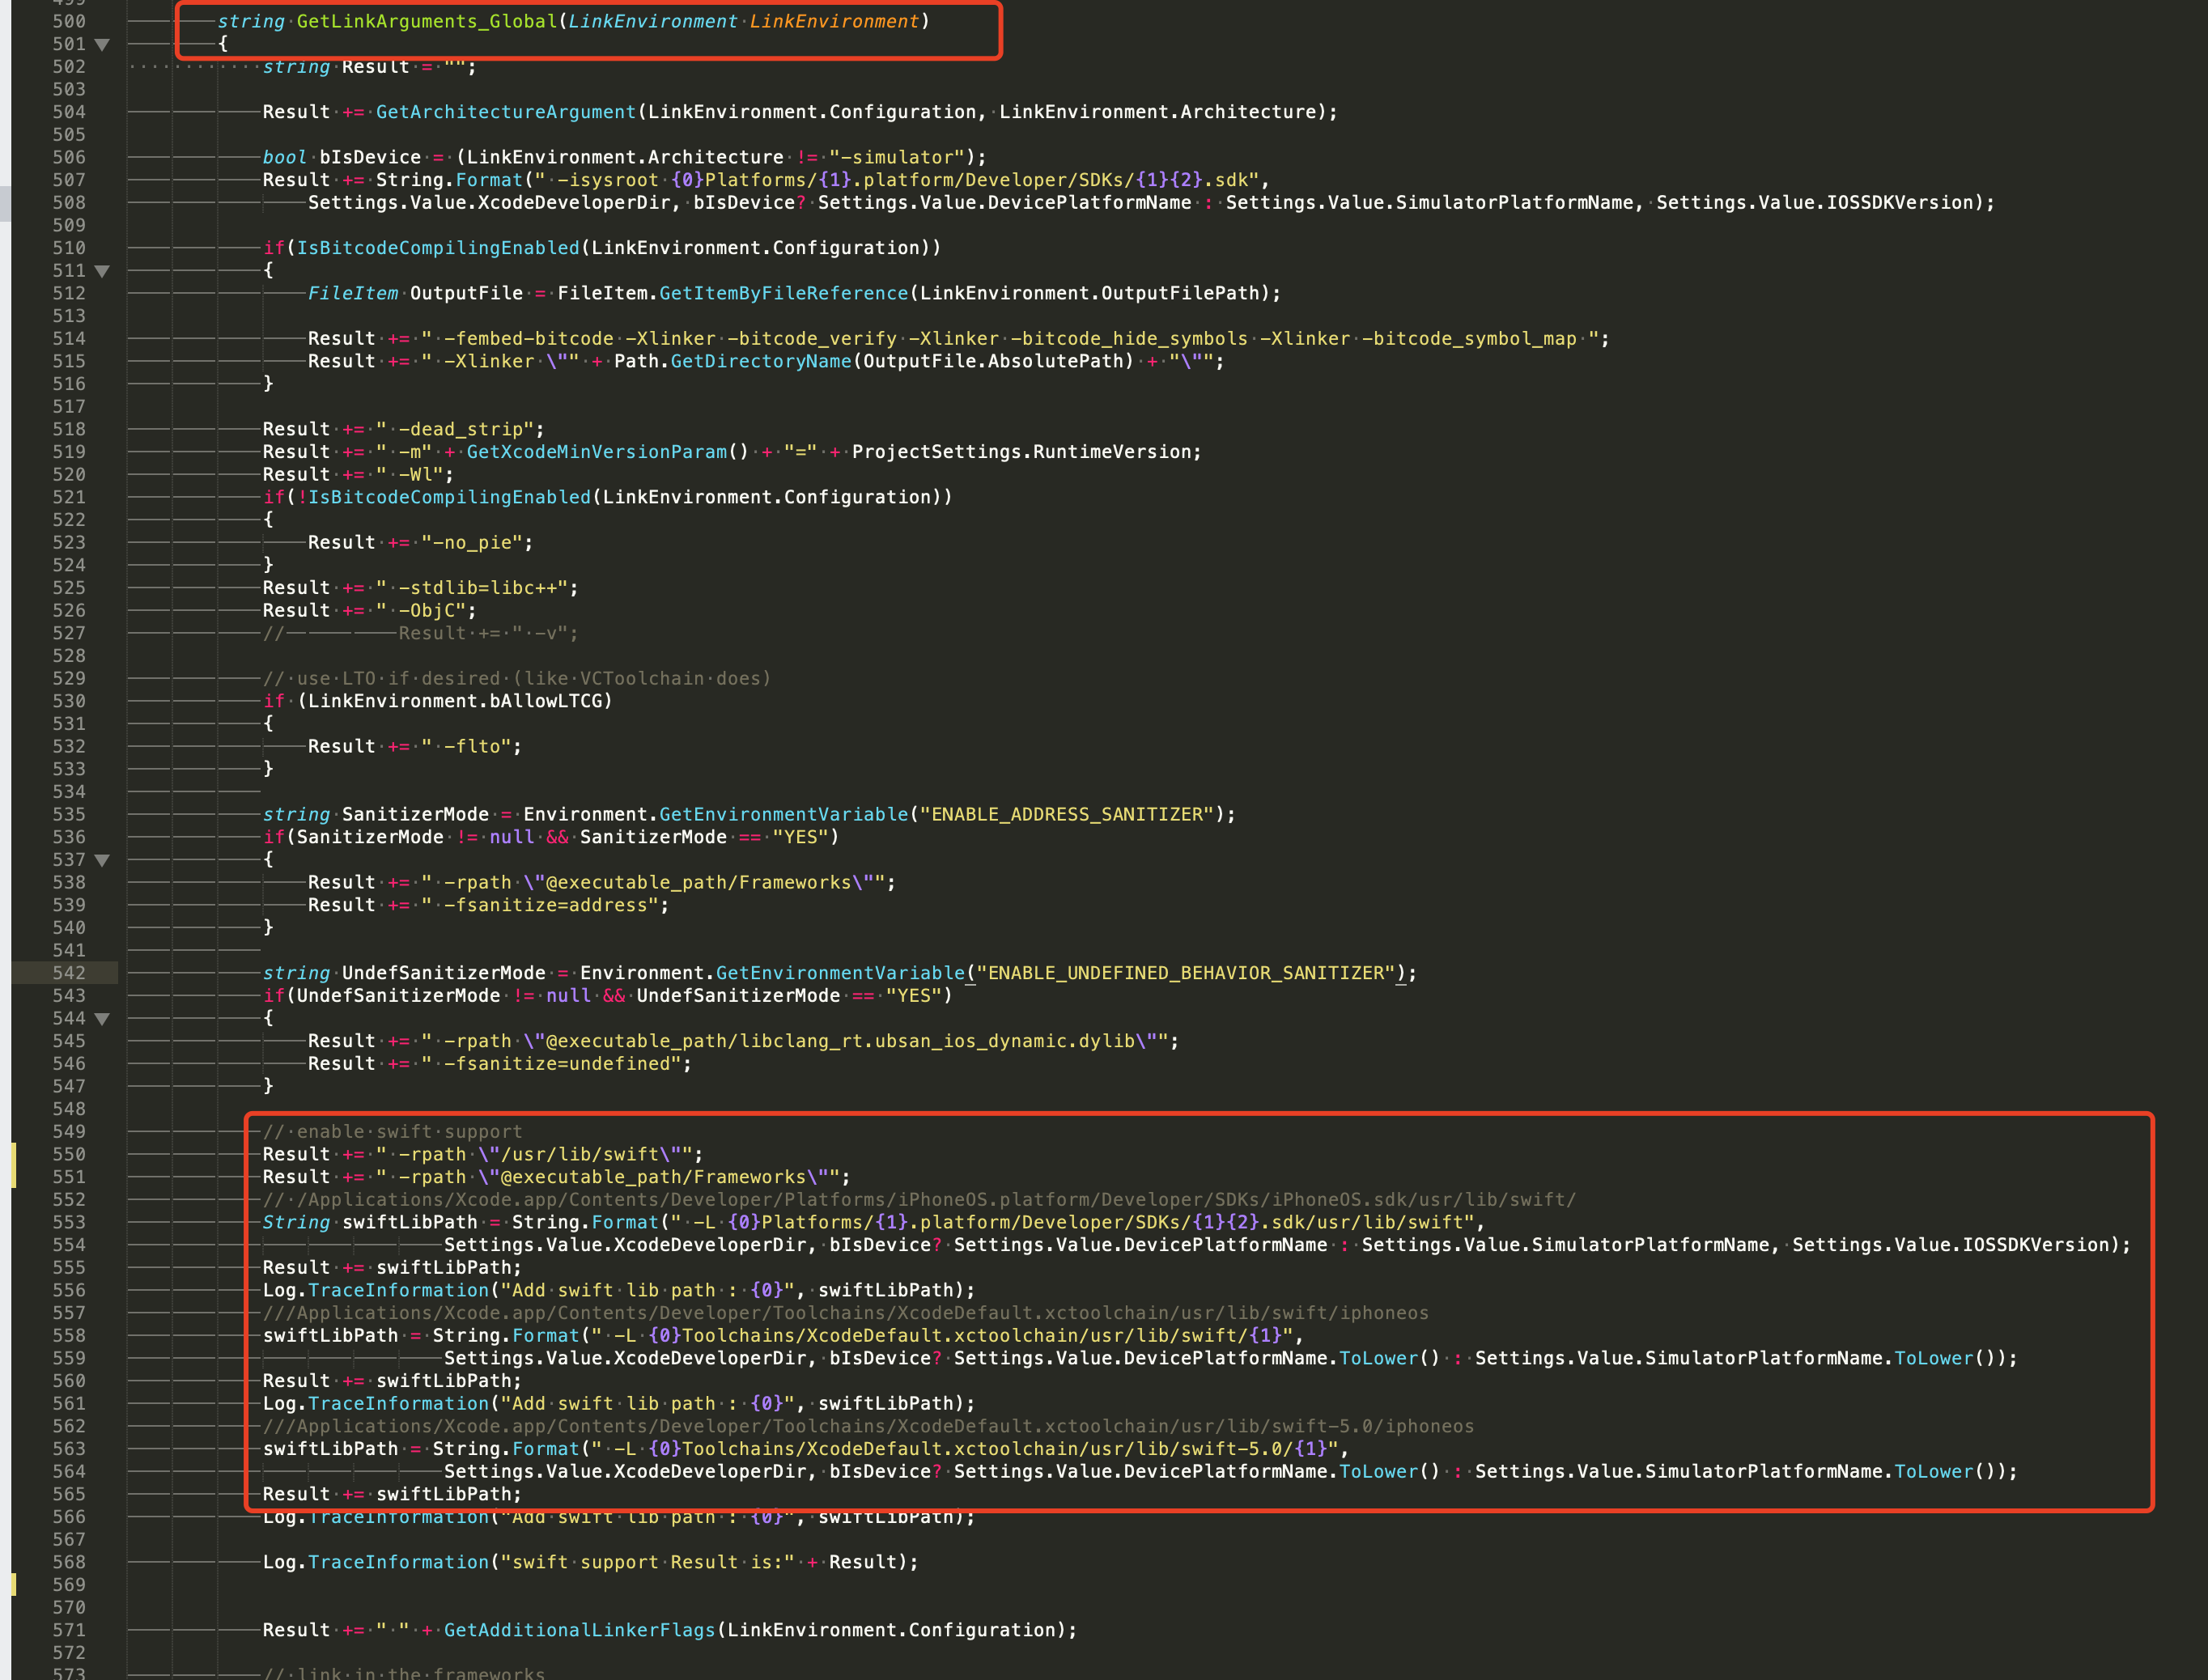
// This line of code must be prepended (see the sample image below for the position of the prepended code)
// enable swift support, make sure '/usr/lib/swift' goes before '@executable_path/Frameworks'
Result += " -rpath \"/usr/lib/swift\"";
// enable swift support
Result += " -rpath \"@executable_path/Frameworks\"";
// /Applications/Xcode.app/Contents/Developer/Platforms/iPhoneOS.platform/Developer/SDKs/iPhoneOS.sdk/usr/lib/swift/
String swiftLibPath = String.Format(" -L {0}Platforms/{1}.platform/Developer/SDKs/{1}{2}.sdk/usr/lib/swift",
    Settings.Value.XcodeDeveloperDir,
    bIsDevice? Settings.Value.DevicePlatformName : Settings.Value.SimulatorPlatformName, Settings.Value.IOSSDKVersion);
Result += swiftLibPath;
Log.TraceInformation("Add swift lib path : {0}", swiftLibPath);
///Applications/Xcode.app/Contents/Developer/Toolchains/XcodeDefault.xctoolchain/usr/lib/swift/iphoneos
swiftLibPath = String.Format(" -L {0}Toolchains/XcodeDefault.xctoolchain/usr/lib/swift/{1}",
    Settings.Value.XcodeDeveloperDir,
    bIsDevice? Settings.Value.DevicePlatformName.ToLower() : Settings.Value.SimulatorPlatformName.ToLower());
Result += swiftLibPath;
Log.TraceInformation("Add swift lib path : {0}", swiftLibPath);
///Applications/Xcode.app/Contents/Developer/Toolchains/XcodeDefault.xctoolchain/usr/lib/swift-5.0/iphoneos
swiftLibPath = String.Format(" -L {0}Toolchains/XcodeDefault.xctoolchain/usr/lib/swift-5.0/{1}",
    Settings.Value.XcodeDeveloperDir,
    bIsDevice? Settings.Value.DevicePlatformName.ToLower() : Settings.Value.SimulatorPlatformName.ToLower());
Result += swiftLibPath;

// Xcode 12 adds the swiftCompatibility51 library, so you need to add the following code
if (Settings.Value.IOSSDKVersionFloat >= 14.0f)
{
        Result += String.Format(" -lswiftCompatibility51");
}
-
打开解决方案并重新编译
/Users/intl/UE4/UE_4.25/Engine/Source/Programs/UnrealBuildTool/UnrealBuildTool.sln。
4. 合并隐私清单
版本要求:Player Network SDK V1.22 及更高版本
从 2024 年春季开始,对于需更新或上传至 Apple App Store Connect 的应用,开发者需明确 注明使用原因,以展示该应用如何使用 required reason API(需提交使用原因的 API)。更多信息,请参见 即将发布的第三方 SDK 要求。
对于受影响的 Player Network SDK 插件,需要手动合并的包括 INTLFoundation、INTLCore、INTLGarena,其中 INTLGarena 只在项目确认接入 Garena 时需配置。
另外,INTLLine 已在 Player Network SDK 自动整合而无需额外操作。
由于其他第三方 SDK 的隐私清单尚未公布,目前 Player Network SDK 隐私清单中不包含对应的内容。要查看尚未发布插件的列表,请参见 iOS 17 隐私清单。
步骤
-
在 Player Network SDK 产物目录内找到所需插件的隐私清单
PrivacyInfo.xcprivacy。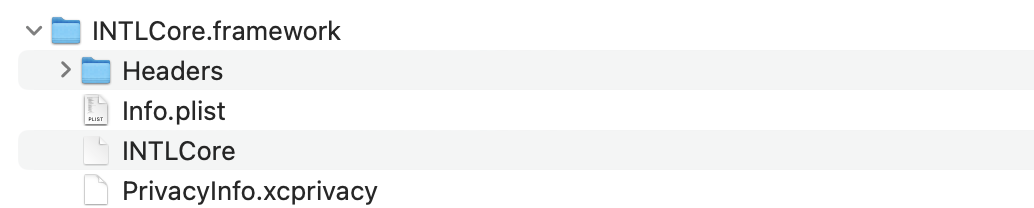
- Unity
- Unreal Engine
插件 路径 INTLFoundation /Plugins/iOS/INTLSDK/INTLFoundation/INTLFoundation.framework/PrivacyInfo.xcprivacy INTLCore /Plugins/iOS/INTLSDK/INTLCore/INTLCore.framework/PrivacyInfo.xcprivacy INTLGarena /Plugins/iOS/INTLSDK/INTLGarena/INTLGarena.framework/PrivacyInfo.xcprivacy 插件 路径 INTLFoundation /INTLSDK/Source/INTLFoundation/Libs/iOS/INTLFoundation/INTLFoundation.embeddedframework/INTLFoundation.framework/PrivacyInfo.xcprivacy INTLCore /INTLSDK/Source/INTLCore/Libs/iOS/INTLCore/INTLCore.embeddedframework/INTLCore.framework/PrivacyInfo.xcprivacy INTLGarena /INTLSDK/Source/INTLGarena/Libs/iOS/INTLGarena/INTLGarena.embeddedframework/INTLGarena.framework/PrivacyInfo.xcprivacy -
将 Player Network SDK 内的
PrivacyInfo.xcprivacy中的4个节点,用于与游戏项目内PrivacyInfo.xcprivacy中对应的内容进行比较,并根据以下条件合并。

-
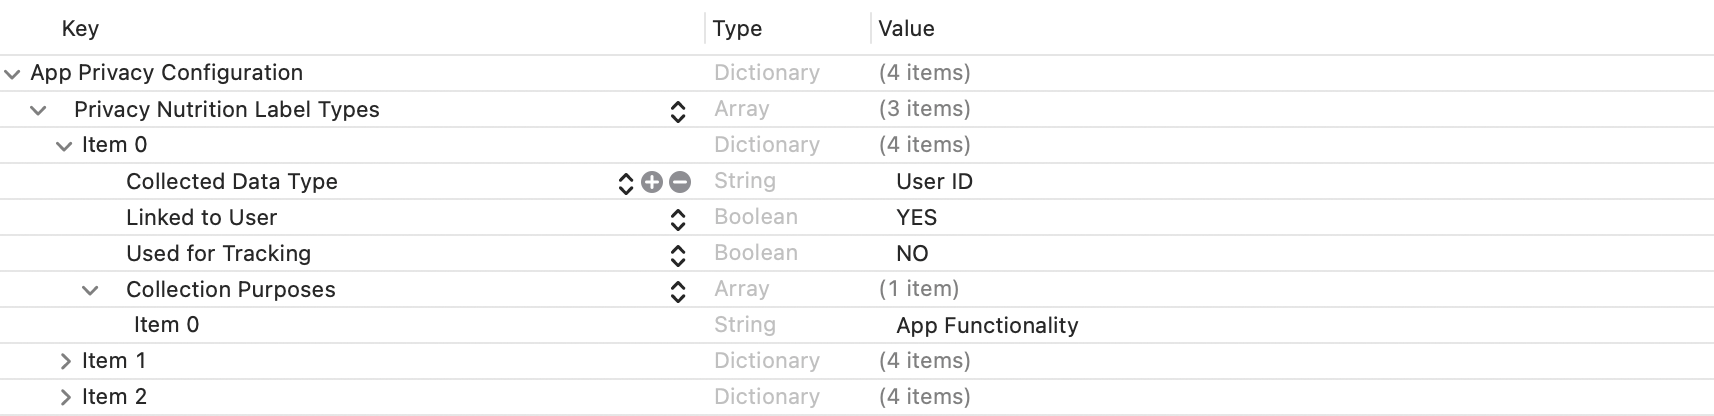
Privacy Nutrition Label Types (NSPrivacyCollectedDataTypes)为使用数据的类型描述节点:
比较各个item的Collected Data Type (NSPrivacyCollectedDataType),有不同值则添加至游戏项目文件。
若存在相同值则比较Collection Purposes (NSPrivacyCollectedDataTypePurposes),有不同值则添加至游戏项目文件。
-
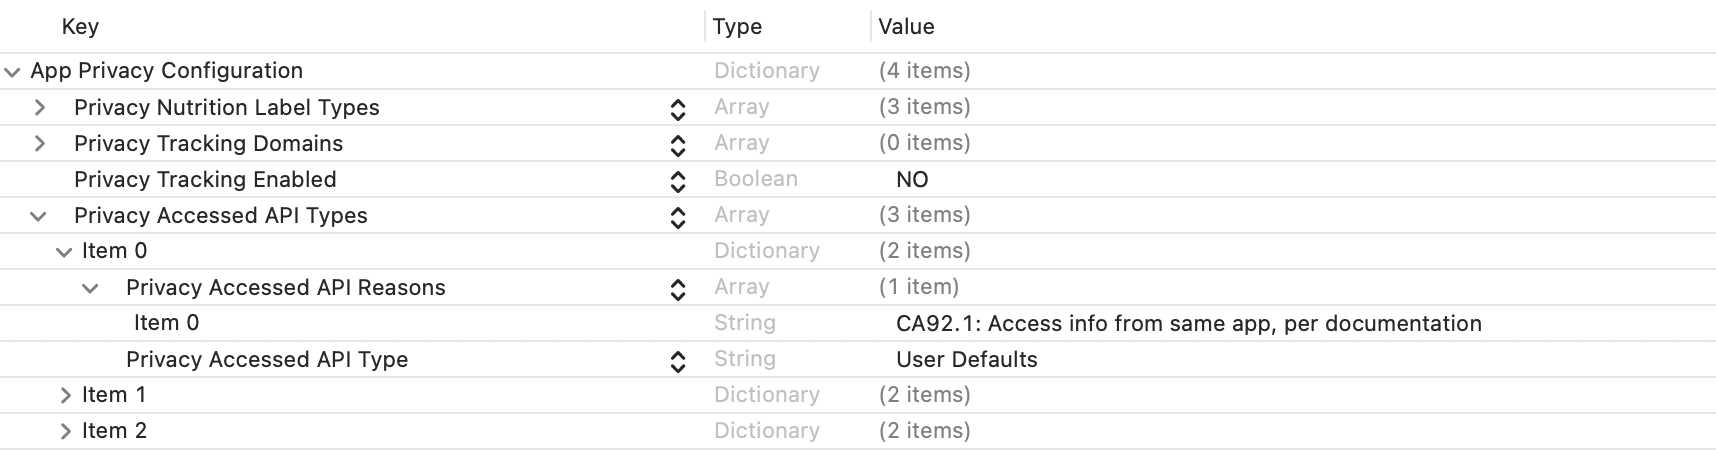
Privacy Tracking Domains (NSPrivacyTrackingDomains)为域名追踪列表节点:
比较对应节点,有不同值则添加至游戏项目文件。 -
Privacy Tracking Enabled (NSPrivacyTracking)描述是否开启 App Tracking Transparency 功能:
比较对应节点,Player Network SDK 隐私清单的值为YES时修改游戏项目文件。 -
Privacy Accessed API Types (NSPrivacyAccessedAPITypes)为使用接口的类型描述节点:
比较各个item的Privacy Accessed API Type (NSPrivacyAccessedAPIType),有不同值则添加至游戏项目文件。
若存在相同值则比较Privacy Accessed API Reasons (NSPrivacyAccessedAPITypeReasons),有不同值则添加至游戏项目文件。
-
-
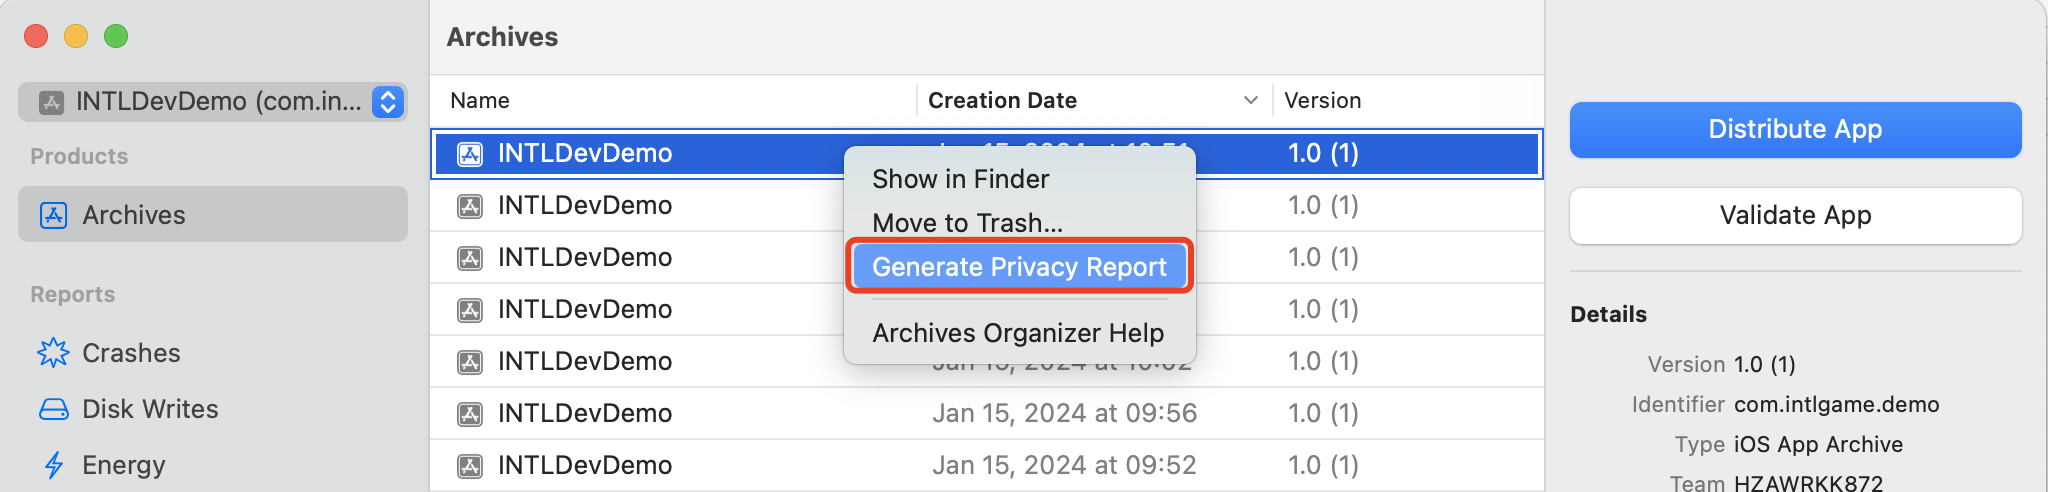
通过 Xcode 15 生成隐私报告来验证是否符合预期。
5. Player Network SDK 配置
手动修改 INTLConfig.ini 配置时,请联系 Player Network 助手确认内容变更是否符合预期,详见 SDK Config 须知。
请按照 INTLConfig.ini 的说明进行相应配置。
6. 初始化 Player Network SDK
在集成第三方渠道之前,必须先初始化 Player Network SDK。更多详情,请参见 初始化 SDK。
#include "INTLSDKAPI.h" // Include the INTL header file

void UExample::Init()
{
    UINTLSDKAPI::Init();
}
步骤2:验证 Player Network SDK 接入成功
- 修改 INTLConfig.ini 文件中
INTL Log节点下的配置。
[INTL Log]
LOG_LEVEL = 1
LOG_ENCRYPT_ENABLE = 0
LOG_COMPRESS_ENABLE = 0
LOG_CONSOLE_OUTPUT_ENABLE = 1
LOG_FILE_OUTPUT_ENABLE = 1
- 运行程序,当日志中显示
Init INTL SDK success.时,表示接入成功。
推荐使用
您已完成 Player Network SDK 的接入,并可开始为您的项目编写程序。
我们建议使用以下 Player Network 的服务:
- 參考 登录鉴权 教程,为您的项目添加第三方渠道登录。
- 查看有关 社交 服务的更多信息,了解如何促进玩家之间的互动。
- 有关配置公告和推送通知的详细步��骤,请参见 玩家参与。
- 查看 数据洞察 服务的相关文档,了解如何收集和上报数据。
- 通过 Player Network 提供的 Deep Link、WebView 等 实用工具,增强 Player Network 服务体验。
- 根据您的发行国家/地区,为您的项目制定 合规保障 方案。
除此之外,您也可以选择接入 LEVEL INFINITE PASS,接入后便可使用上述所有功能。
一般用户可通过简单快捷的流程实现适用于大部分游戏的标准解决方案,而希望定制项目的各种细节的用户也可省去不必要的集成动作,直接开始配置。
更多详情,请联系 Player Network 助手进行咨询。