Web
WinGDK platform supports Xbox account only, and the configuration steps are the same as XSX.
This article guides you through setting up Xbox Series X|S as an identity provider, enabling your website to access Player Network authentication services.
Xbox Series X|S developer access is not open to individual developers. Users have to be a legal entity such as a corporation or a company to request for developer access from Microsoft.
Prerequisites
1. Set up your app in Azure Portal
Register your app on Microsoft from the App Registration page in Azure Active Directory.
-
Log in to the Azure Portal using an account with developer permissions to register apps within the Azure Active Directory.
-
Select App Registration > + New Registration.
-
Enter a name for your application, and select Personal Microsoft accounts only as the Supported account types.
-
Under Redirect URI, choose Web and enter
https://test-common-web.intlgame.com/jssdk/xboxlogincallback.htmlto set the redirect URI after a successful authentication. -
Click Register to complete the registration.
-
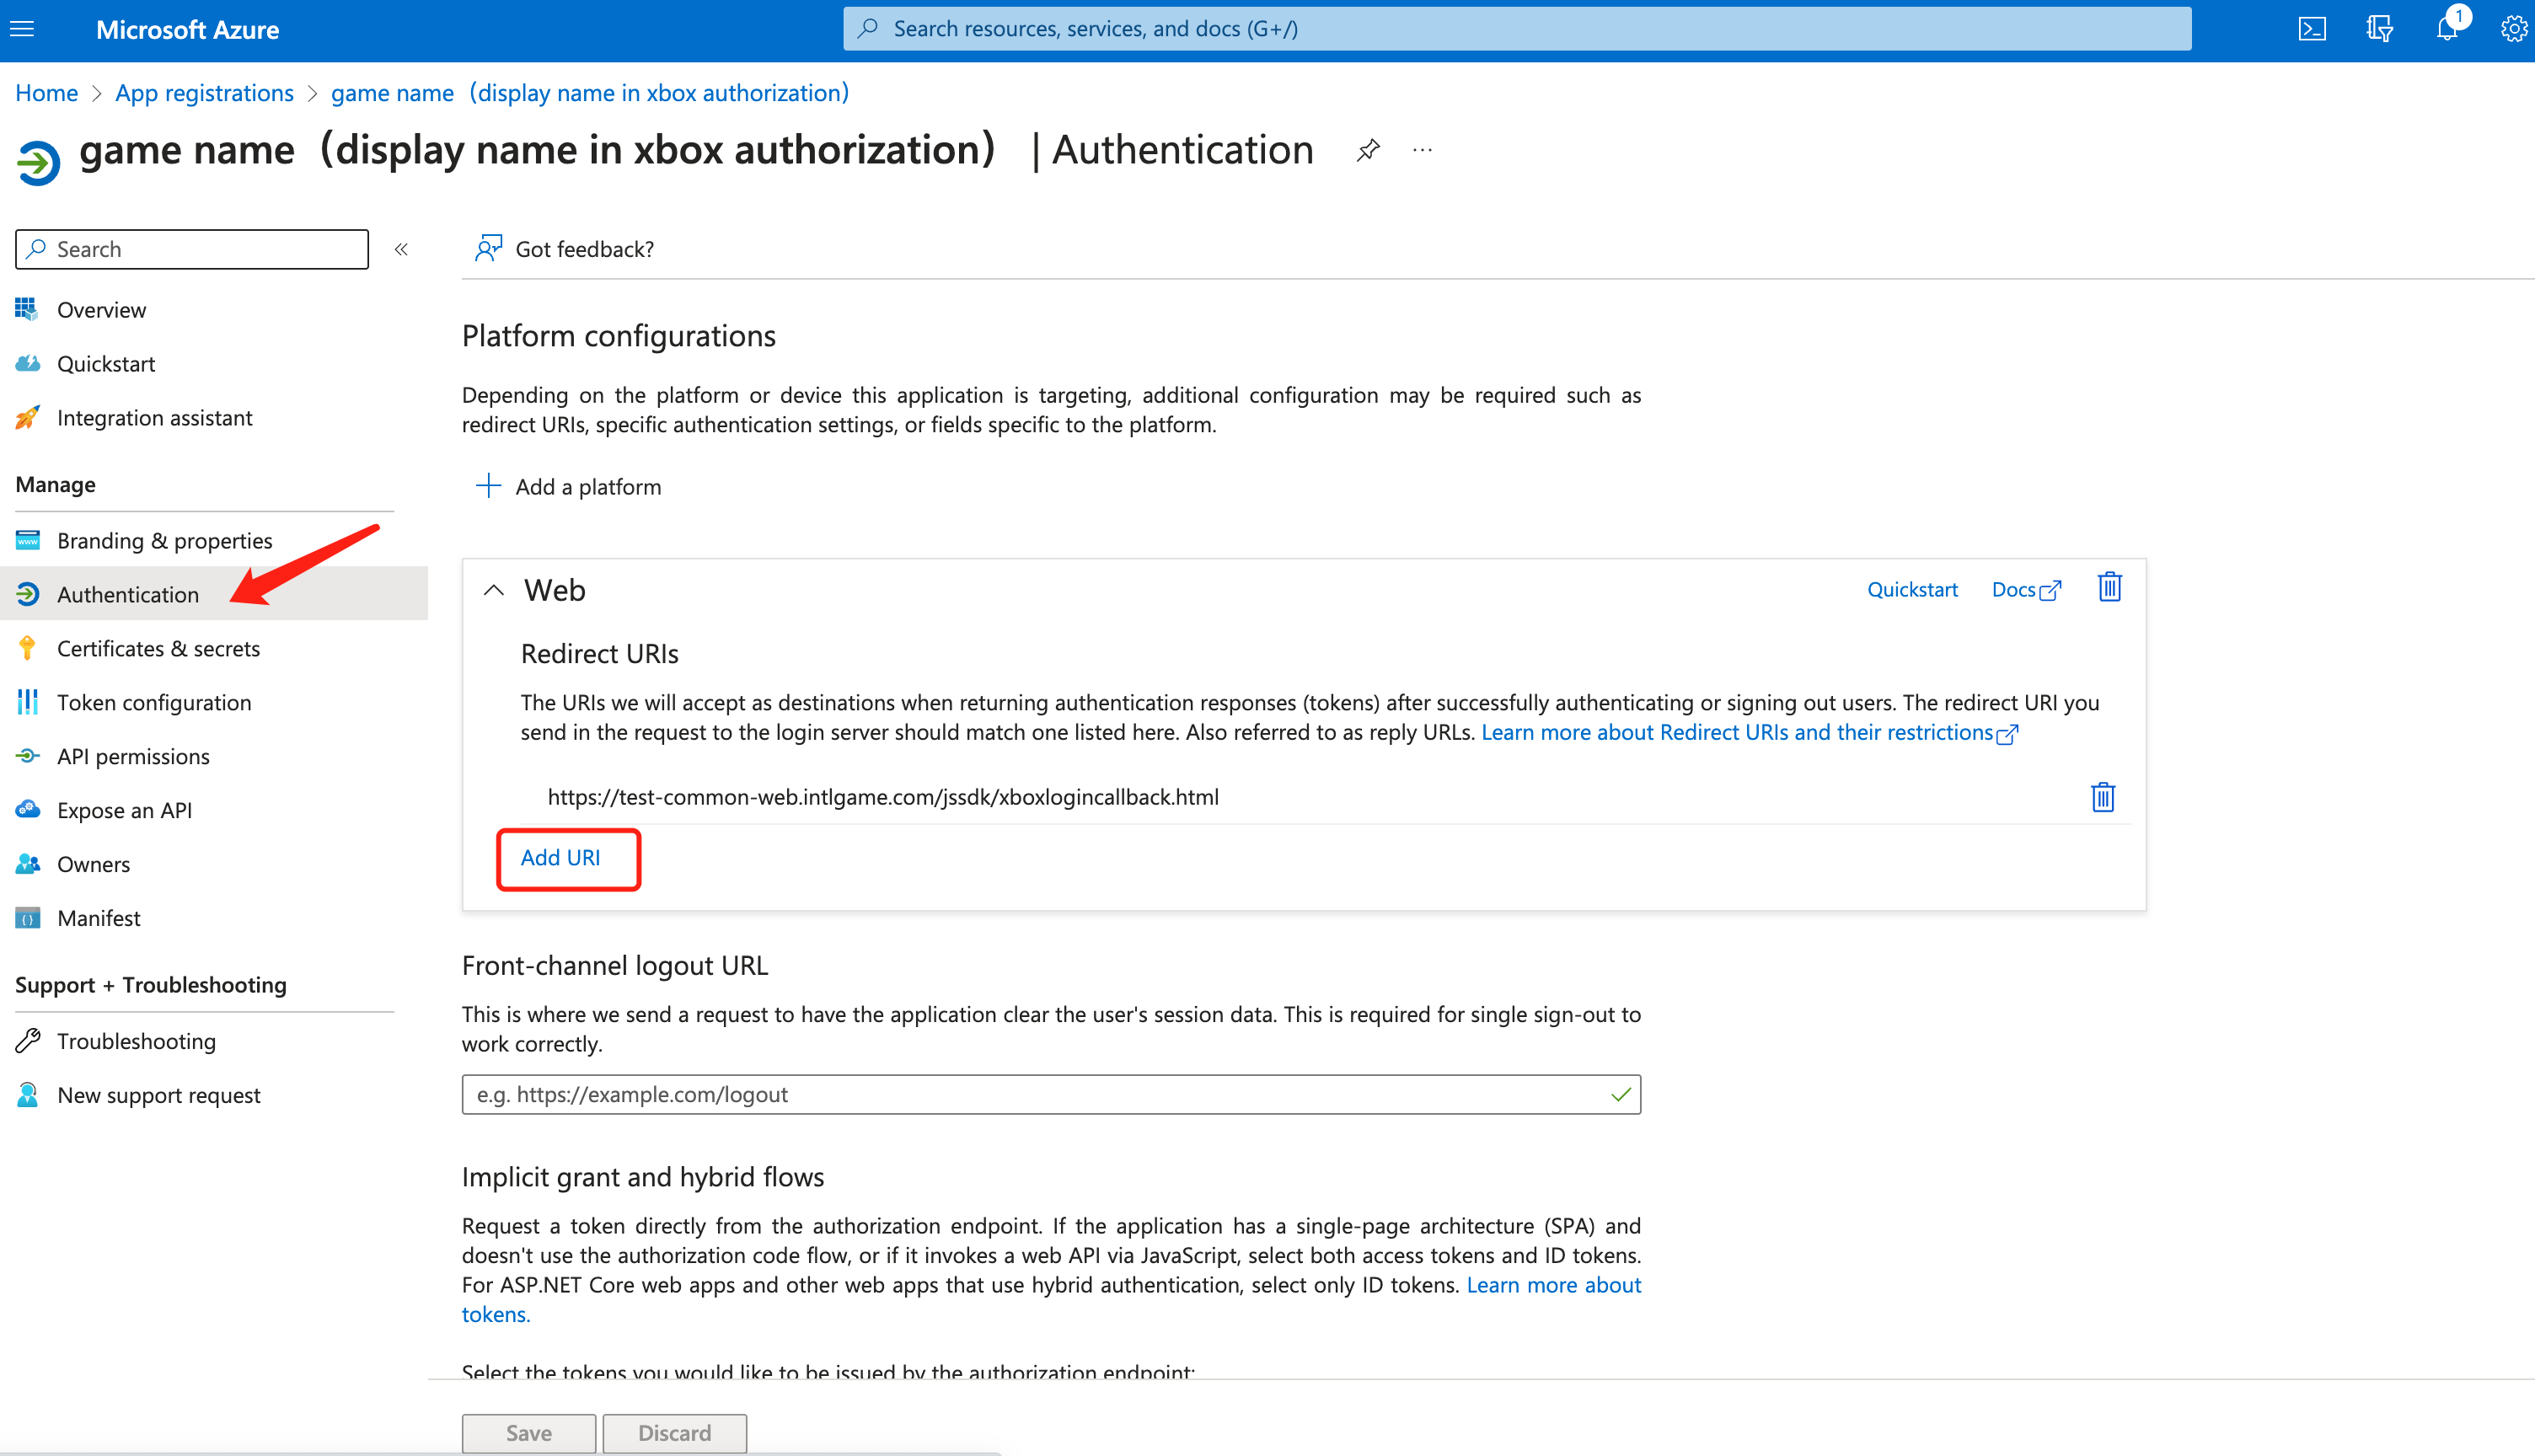
From Authentication under Manage, click Add URI under Web.

-
Enter
https://common-web.intlgame.com/jssdk/xboxlogincallback.htmlas the URI, then click Save. -
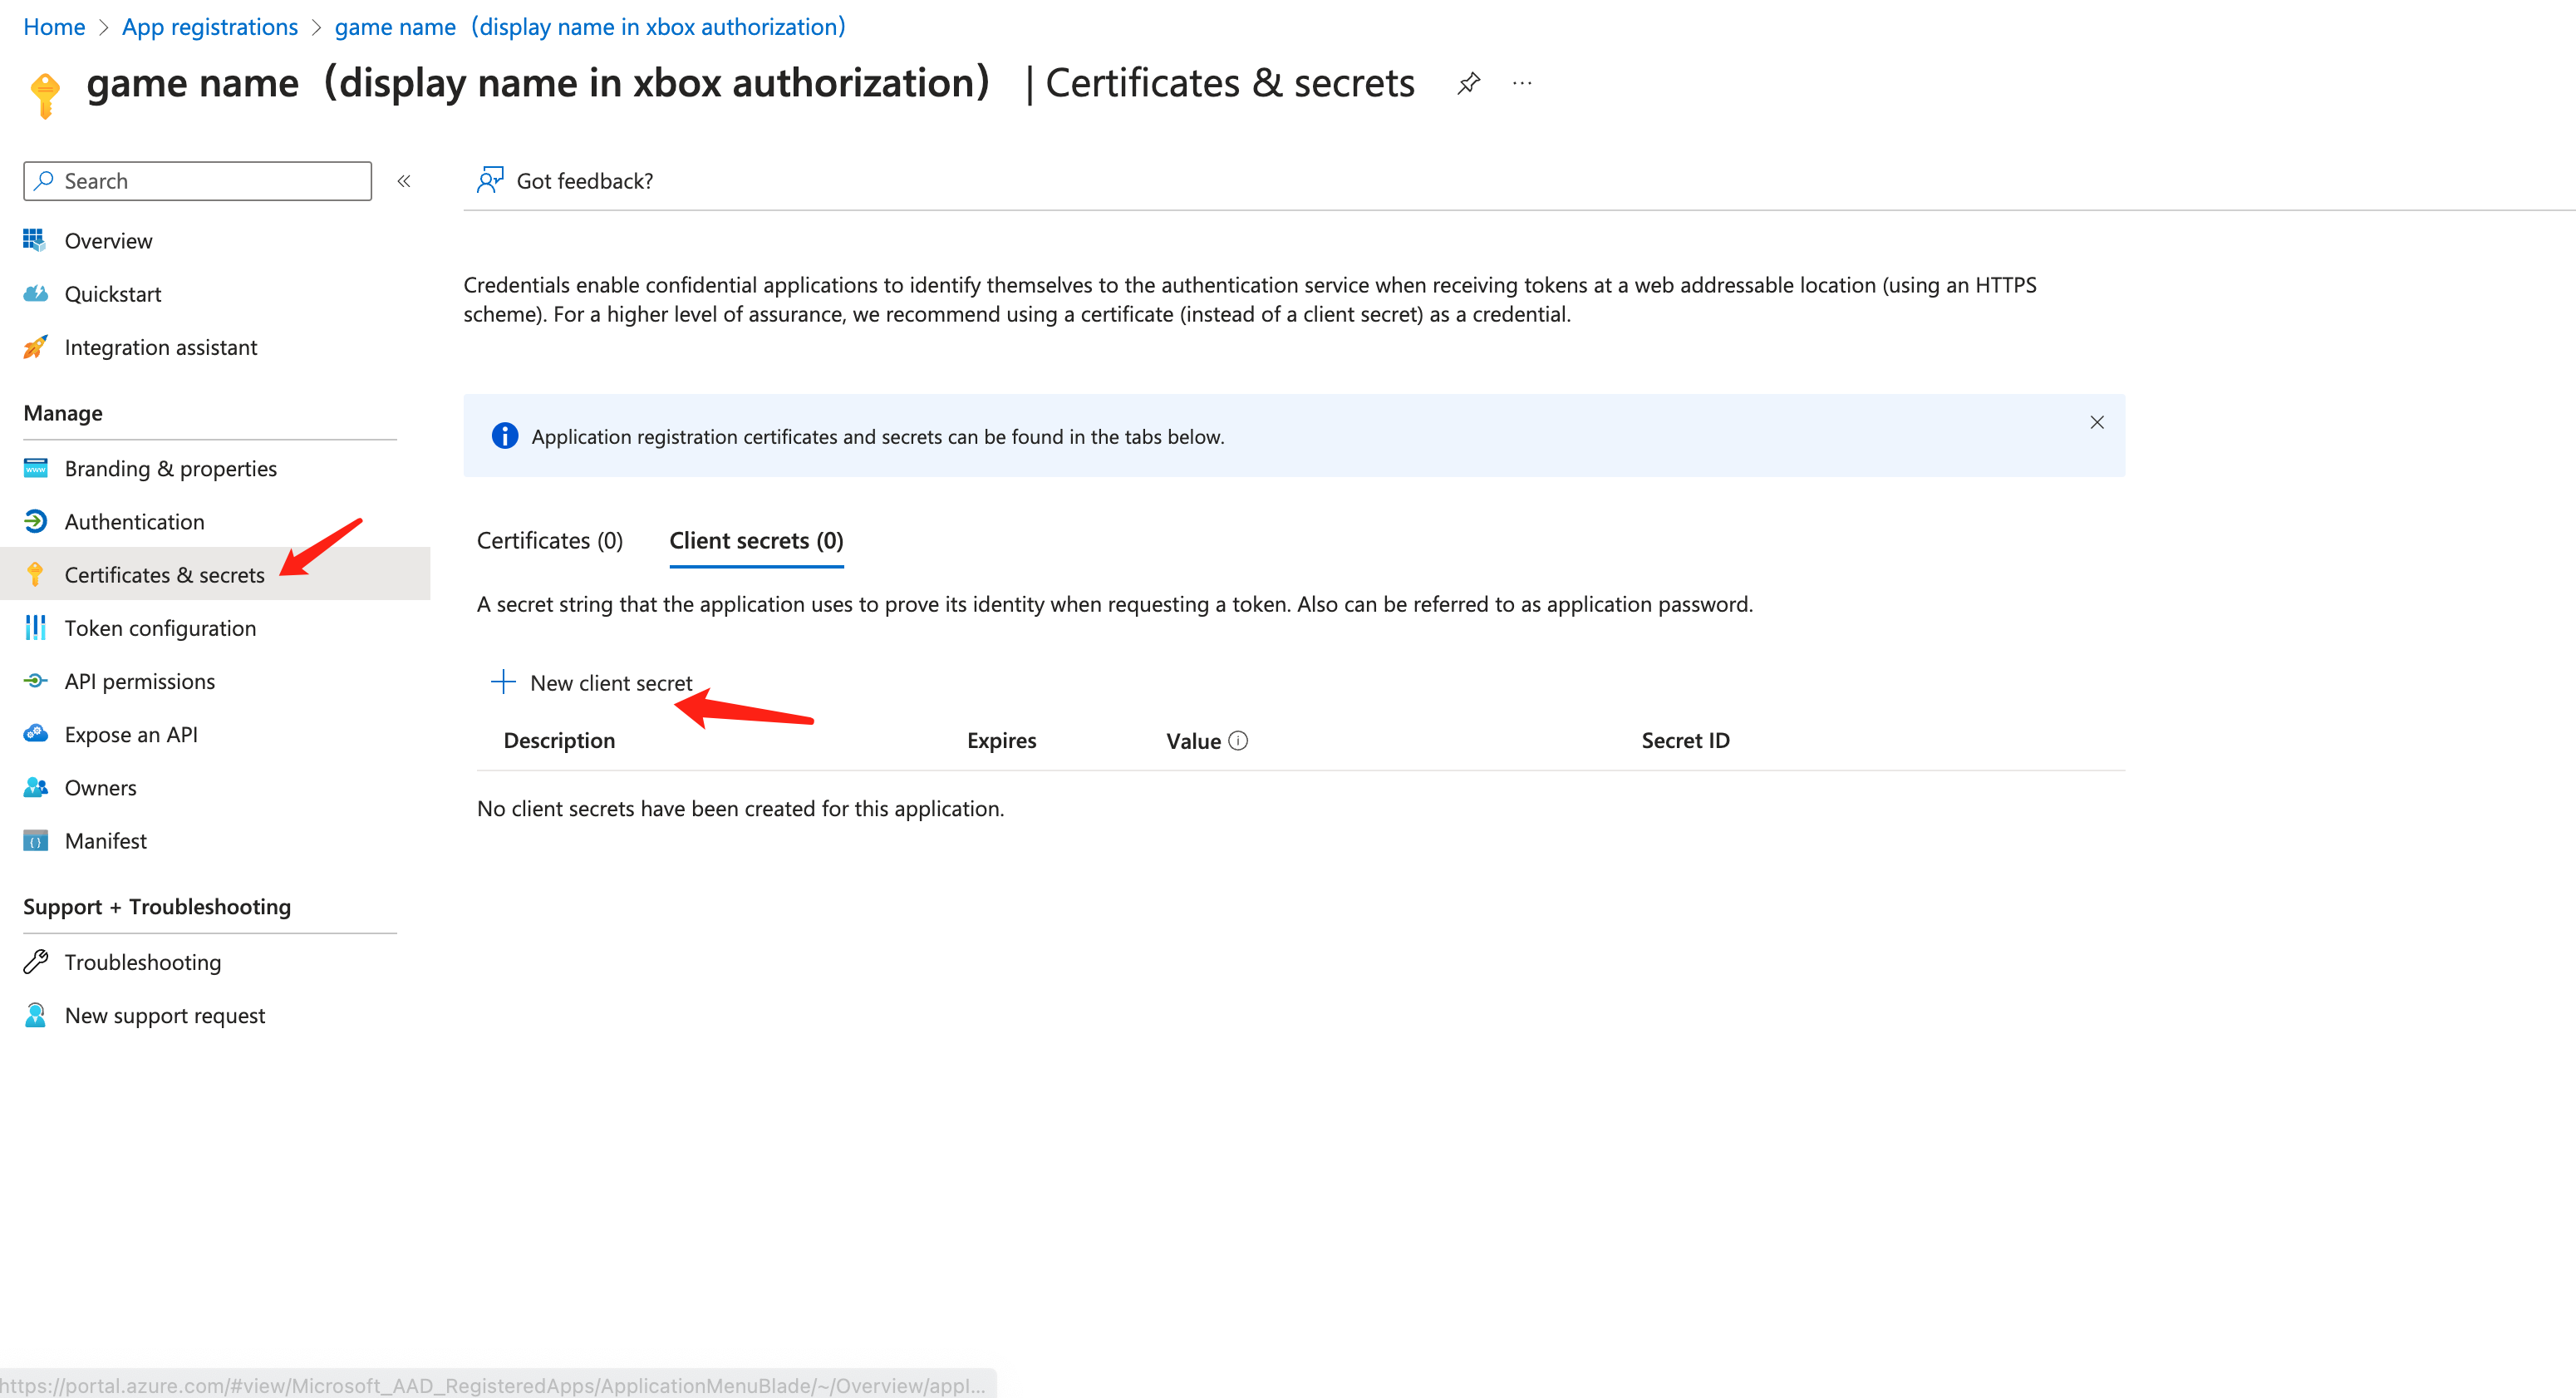
From Certificates & secrets under Manage, click + New client secret under Client secrets.

-
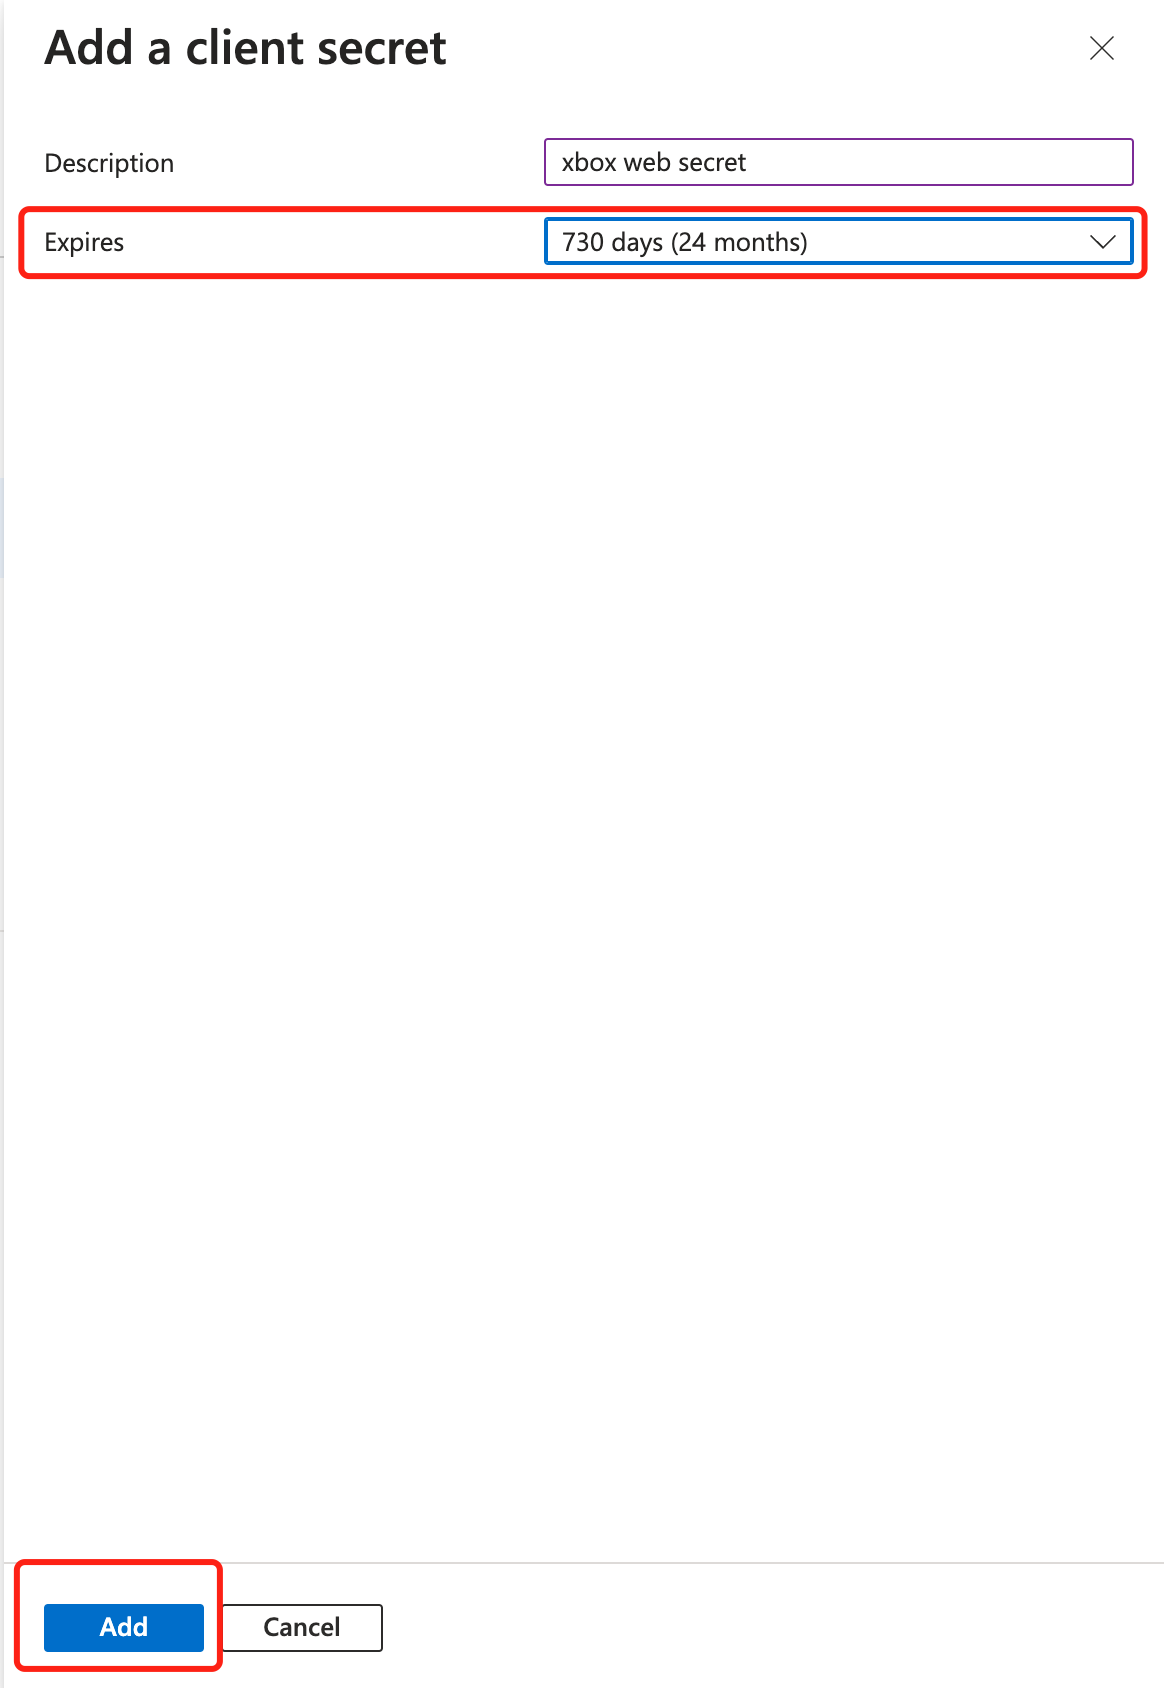
Complete the required fields, then click Add to add a new client secret.

- Description: Enter a description for the client secret.
- Expires: Select the amount of time before the secret expires, with a maximum validity period of two years. Before the secret expires, a new secret has to be created in Azure Portal, then configured again in Player Network Console.
-
Note down the client secret Value. The client secret value can only be viewed immediately after creation.

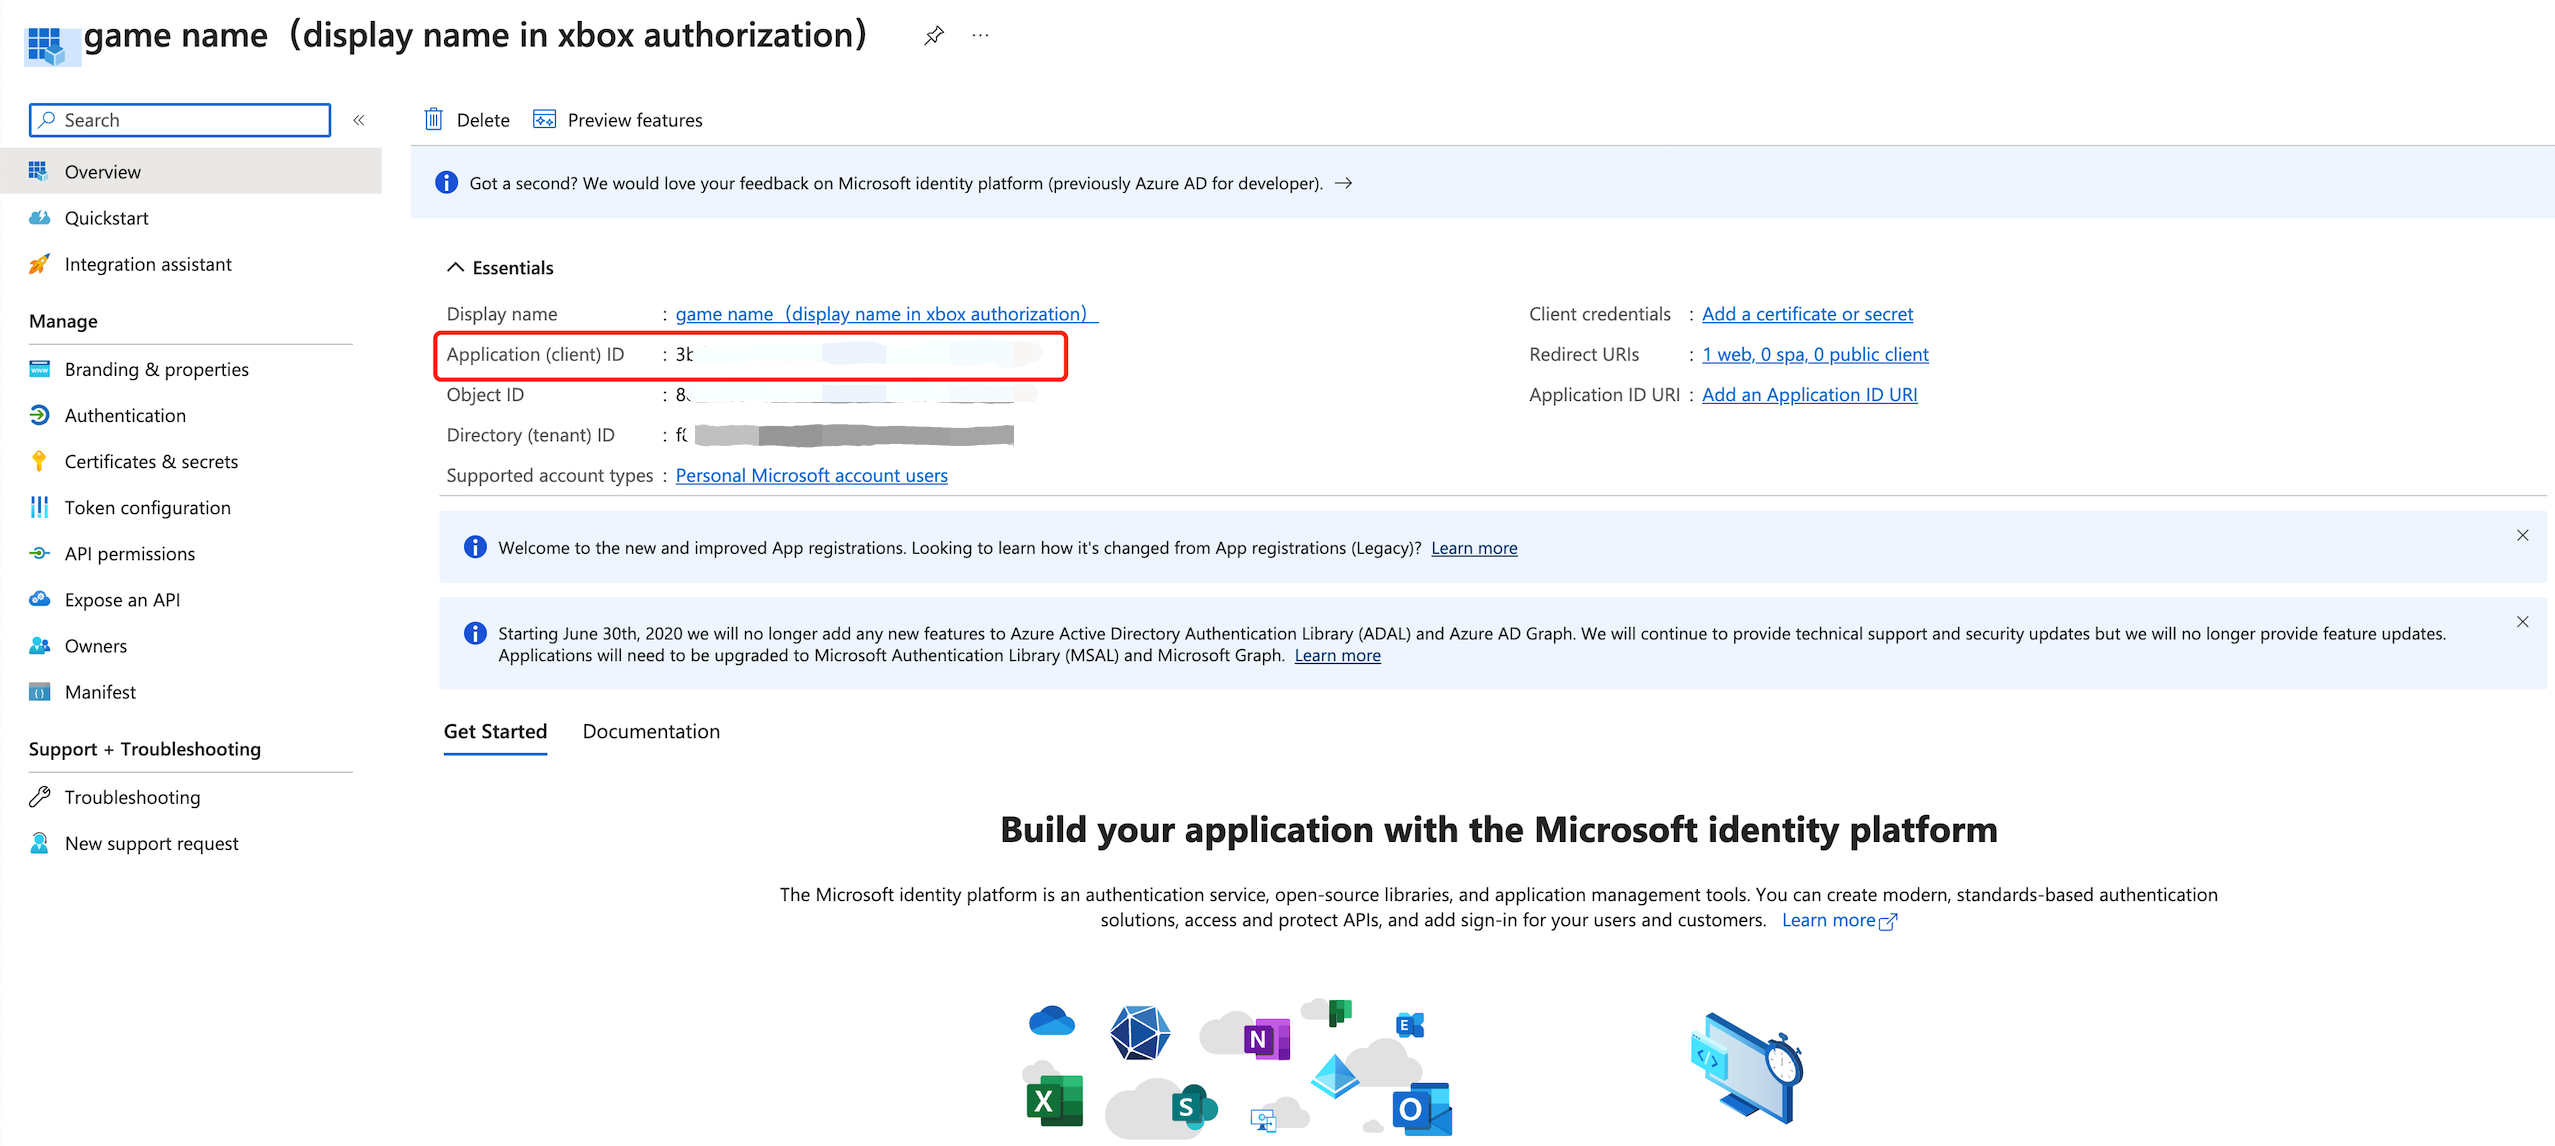
The client ID and client secret value are required information when configuring the Player Network Console. The client ID can be found on the Overview page of your app, from the Application (client) ID field under the Essentials section.

- Create an account for Player Network Console.
- Create a new project for your game, or join an existing one.
- Add Xbox Series X|S as an authentication method for your project on Player Network Console.
For more details about integrating the SDK for other third-party channels, see JavaScript SDK.
Step 1: Install the JavaScript SDK
Install the SDK package from the production environment when launching the game. The SDK package from the test environment is only used for integration testing.
Install the JavaScript SDK from npm or CDN.
- npm
- CDN
$ npm install @intlsdk/account-api
// SDK package from the test environment
<script src="https://test-common-web.intlgame.com/sdk-cdn/account-api/latest/index.umd.js"></script>
// SDK package from the production environment
<script src="https://common-web.intlgame.com/sdk-cdn/account-api/latest/index.umd.js"></script>
Step 2: Instantiate the SDK
Set env to the test environment during the integration testing and env to the corresponding production environment when launching the game.
const accountApi = new IntlgameAccountApi({
  env: "test", // SDK environment
  gameID: 11,
});
| Parameter | Type | Description | Remark |
|---|---|---|---|
| env | string | SDK environment For more information, see Retrieve cluster information. | Required |
| gameID | number | Unique game ID assigned by Player Network | Required |
Step 3: Implement web login
After instantiating the accountApi component, call the thirdAuthorize method to request the access token from Microsoft.
accountApi.thirdAuthorize({
    third_type: 'xbox',
}).then(
(res) => {
    console.log(res);
});
With the Microsoft token returned, call the intlAuthorize method to get the Player Network SDK OpenID and token to log in to your website.
accountApi.intlAuthorize({
    third_type: 'xbox',
    channel_info: {
        auth_token: "XBL3.0 x: xxxx",
        xuid: "xxxx"
    }
}).then(
(res) => {
    console.log(res);
});
Call the intlLogout method to log out from your website.
accountApi.intlLogout({
    token: 'xxxx',
    openid: 'xxxxxxxx',
    channel_id: 27,
}).then(
(res) => {
    console.log(res);
});