Get Started
LEVEL INFINITE PASS provides a streamlined UI and user authentication process for games, allowing projects to leverage the login capabilities of LEVEL INFINITE PASS to rapidly and securely launch their services.
Follow the steps in this article to integrate LEVEL INFINITE PASS, enabling authentication via LI PASS and other third-party channels with only a few lines of code.
Prerequisites
For game client
Step 1: Import LI PASS resources
- Unity
- Unreal Engine
- SDK 1.27 and later
- SDK 1.24 - 1.26
- Before SDK 1.24
Unity 2021 - Unity 6
Unity 2021 - Unity 2022
Unity 2018 - Unity 2022
The directory StreamingAssets/LevelInfinite is used for Player Network SDK V1.20.01 and later, while the directory StreamingAssets/INTLGameNative is used for Player Network SDK V1.20.00 and earlier.
-
Copy the
LevelInfinite,PluginsandStreamingAssets/LevelInfinitefolders to theAssetsfolder of the project first, then import them to Unity.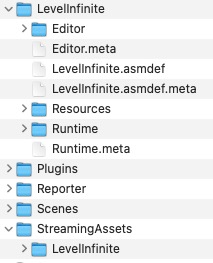
Folder Description LevelInfinite LI PASS engine layer code Plugins LI PASS plugins StreamingAssets/LevelInfinite LI PASS resources, can be hotfixed
2. [Optional] Remove assembly from the project.
Assembly support has been added to LI PASS since V1.08. If assembly is not required for your project, follow the below steps to remove assembly:
- Delete the below Assembly Definition files.
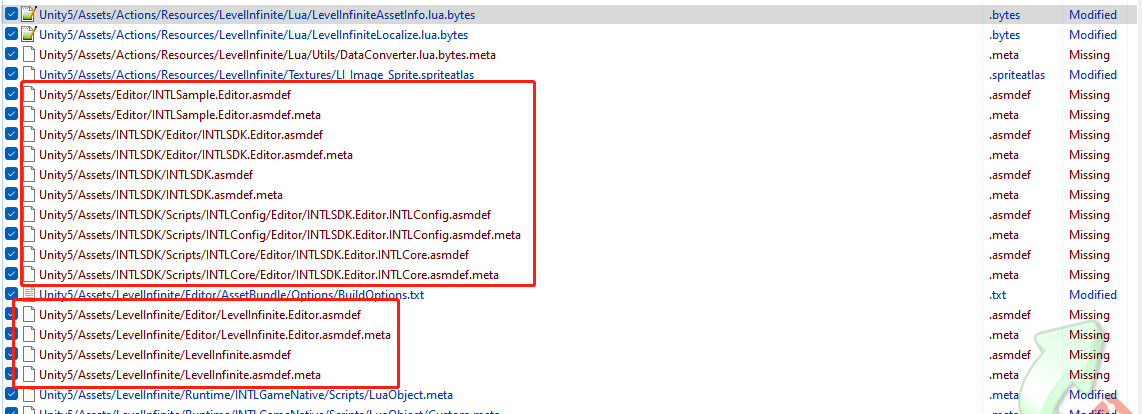
- Edit
luaSvr.cs, changing the assembly name fromLevelInfinitetoAssembly-CSharp.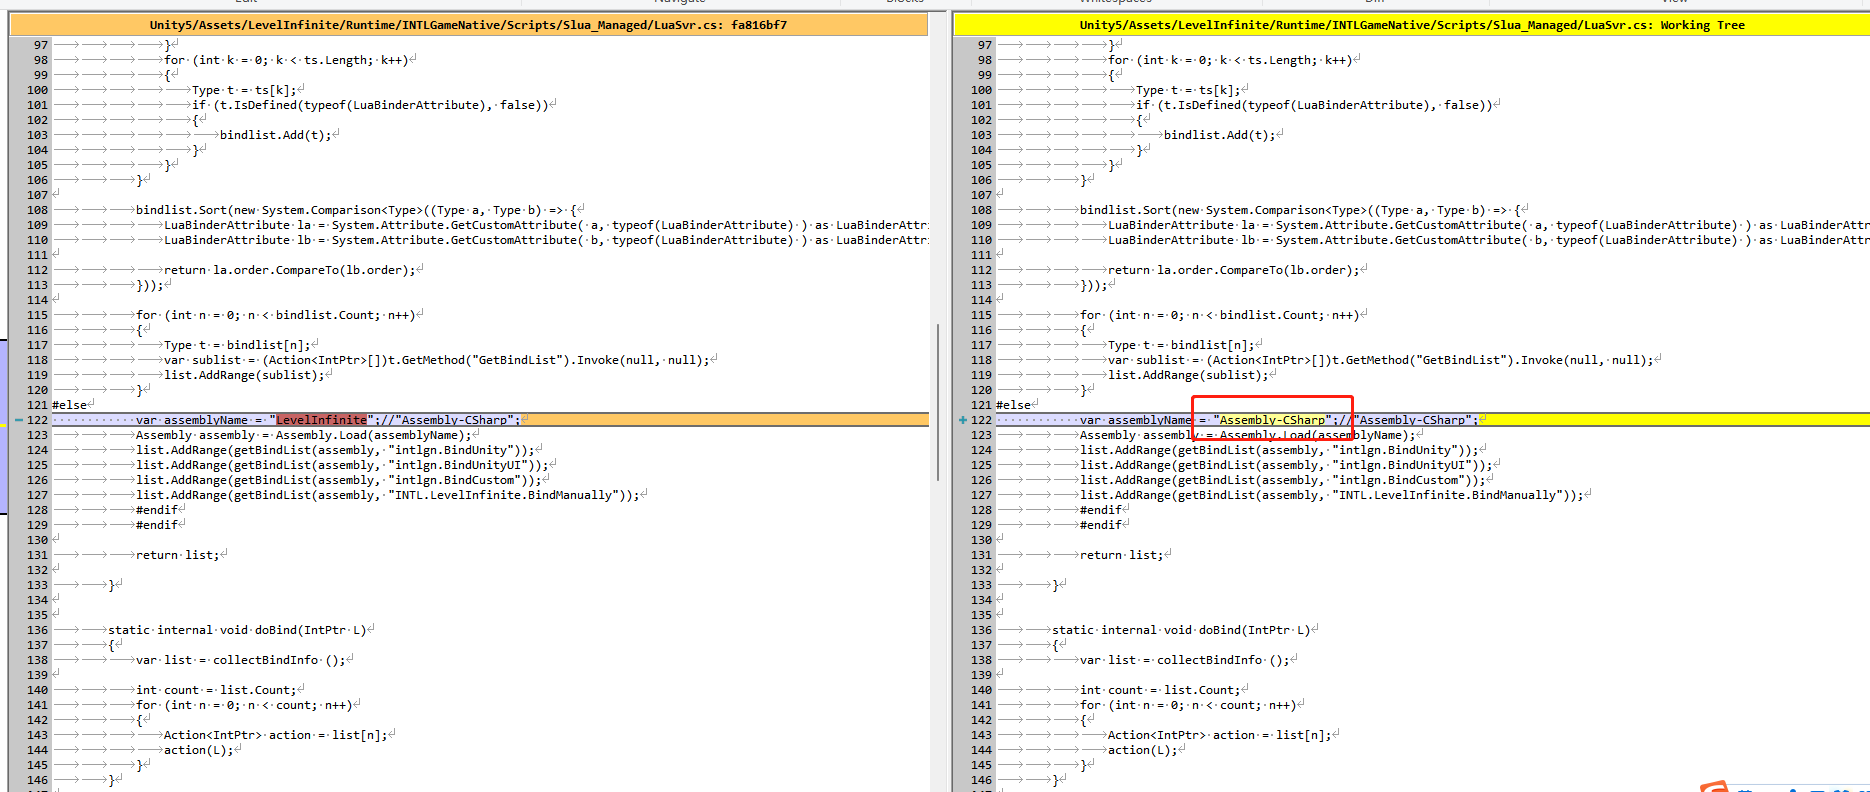
- Contact the Player Network representative for a new
AssetBundlepackage without assembly.
-
In Unity's menu, select INTLLua > All > Clear to delete the
Assets/LevelInfinite/Runtime/INTLGameNative/Scripts/LuaObjectdirectory.
A prompt to generate the Lua interface for Unity appears automatically if the deletion is successful. Otherwise, in Unity's menu, select INTL > INTLLua > All > Make to trigger the popup manually. -
From the popup, click Generate to generate the interfaces exported from C# to Lua.
-
Check if the interface files have been successfully generated in the
Assets/LevelInfinite/Runtime/INTLGameNative/Scripts/LuaObjectdirectory.noteIf Custom and Unity folders appear in the directory, the files have been successfully generated.
- Custom folder: Custom class interfaces exported to Lua.
- Unity folder: Unity engine class interfaces exported to Lua.
6. [Optional] Switch loading modes.
The default loading mode is Editor, which is used for running the LI PASS process normally within the engine editor. During development, the loading mode can be changed to StreamingAssets mode by selecting LevelInfinite > AssetLoadMode from the menu.
The choice of loading mode does not affect the loading mode of the build release package (default CDN).
| Mode | Description |
|---|---|
| Editor | Corresponds to the INTL_DEBUG_LUA macro, reads a local Lua file |
| StreamingAssets | Corresponds to the INTL_USE_LOCAL_ASSETS macro, loads the AssetBundle from StreamingAssets |
| CDN | Corresponds to the AssetBundle from Player Network Console, if the loading of resources fails then AssetBundle from StreamingAssets is loaded instead |
7. [Optional] Configure your project for console games developed using Unity.
-
Install and activate the Input System package:
noteInput System requires Unity 2019.1 or later versions and .NET Framework 4 to work. It does not work with projects running .NET Framework 3.5.
Input System version 1.6.1 must be installed along with the expansion pack
com.unity.inputsystem.gxdk-1.0.1on the Xbox Series X|S (XSX) running the game. For any issues regarding the installation, reach out to the Player Network representative.For more information, see Input System Installation Guide.
-
In Unity's top menu, go to Window > Package Manager to open the Unity Package Manager.
-
Click Advanced, make sure that Show Preview Packages has been enabled.
-
From the list of packages on the left, select the latest Input System package, then click Install.

-
In Unity's top menu, go to Edit > Project Settings, then click Player.
-
Set the value of Active Input Handling to
Input System Package (New).
-
-
Add scripting define symbols:
-
In Unity's top menu, go to Edit > Project Settings, then click Player.
-
Open the Other Settings panel, then navigate to Scripting Define Symbols.
-
Add
INTL_CONSOLE_GAME_INPUTto the textbox, separated by semicolons. -
From
Assets/LevelInfinite, open the assembly definition assetLevelInfinite.asmdef, then addUnity.InputSystemto Assembly Definition References.
-
- SDK 1.26 and later
- Before SDK 1.26
UE4.21 - UE4.27 & UE5 - UE5.5
UE4.21 - UE4.27 & UE5 - UE5.4
-
Copy the
LevelInfinitefolder to thePluginsfolder of the project. If the project does not have aPluginsfolder, create one.cautionDuring Cook, if the error
LongPackageNameToFilename failed to convert '/LevelInfinite'. Path does not map to any rootsoccurs, usually in versions earlier than UE4.27, the Cook path will have to be modified/LevelInfinite -> /LevelInfinite/.noteFor versions before LI PASS V1.16, LI PASS plugins must be placed in the
Plugins/LevelInfinitedirectory. To customize the path, modify thePLUGIN_LI_CONTENT_PATH,LI_LUA_BASE_PATH, andFRAME_LUA_BASE_PATHvariables accordingly then recompile.
For LI PASS V1.16 or later, LI PASS plugins will automatically load resource files dynamically based on the configured custom path.infoLevelInfiniteAssetVersion.luahas the file extension LUA instead of LUAC because it contains the version number of LI PASS, for developers to quickly determine the LI PASS version for troubleshooting purposes. -
Open the build file of your game module, namely
{Project Name}.Build.cs, and add theLevelInfinitemodule as a private dependency of your module by referring to the following code:public INTLSample(ReadOnlyTargetRules Target) : base(Target)
{
PCHUsage = PCHUsageMode.UseExplicitOrSharedPCHs;
PublicDependencyModuleNames.AddRange(new string[] { "Core", "CoreUObject", "Engine", "InputCore", "HeadMountedDisplay" });
// Add the following code
PrivateDependencyModuleNames.AddRange(new string[] {
"INTLCore",
"INTLFoundation",
"INTLConfig",
"LevelInfinite"
});
} -
Include LI PASS Lua resources in the first package, and add the following in the Packaging/Additional Non-Asset option:
../Plugins/LevelInfinite/Content
 note
noteFill in the actual path where the
LevelInfinitefolder is stored. For example, if the actual path is../Plugins/Template/LevelInfinite, then the path to be added should be../Plugins/Template/LevelInfinite/Content. -
Include LI PASS uasset resources in the first package, and add the following in the Packaging/Additional Asset option:
-
/LevelInfinite
-
Step 2: Configure LI PASS
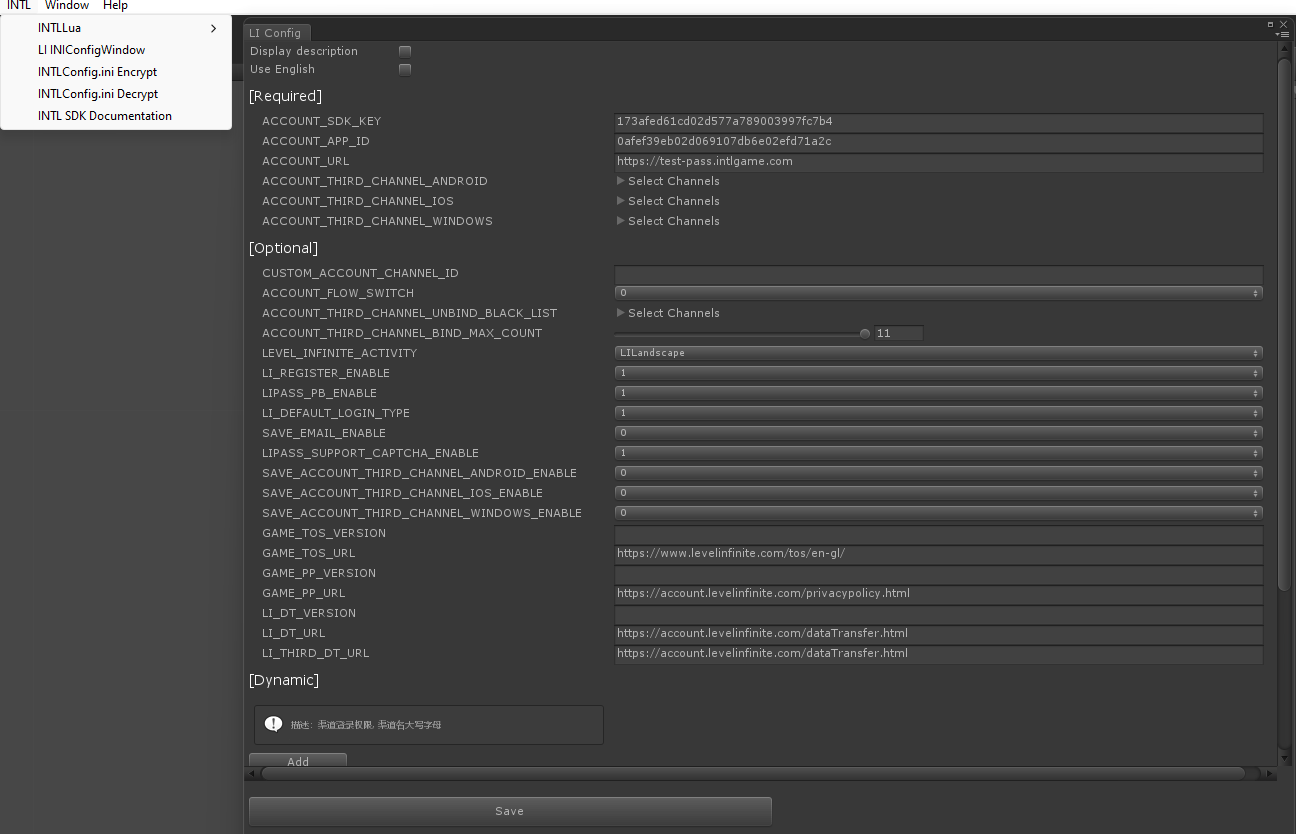
Developers can choose between using the editor window to configure LI PASS, or editing the INTLConfig.ini file directly after opening it from the project directory. The steps below show how LI PASS can be configured easily by using the editor window.
To know more about each configuration item, either select the item on the editor window to display a brief description, or see LI PASS Client Configurations for a list of all configuration items.
For configuration changes to take effect in the editor at runtime, you need to restart the engine. Otherwise, it will take effect automatically when building an installation package.
- Unity
- Unreal Engine
-
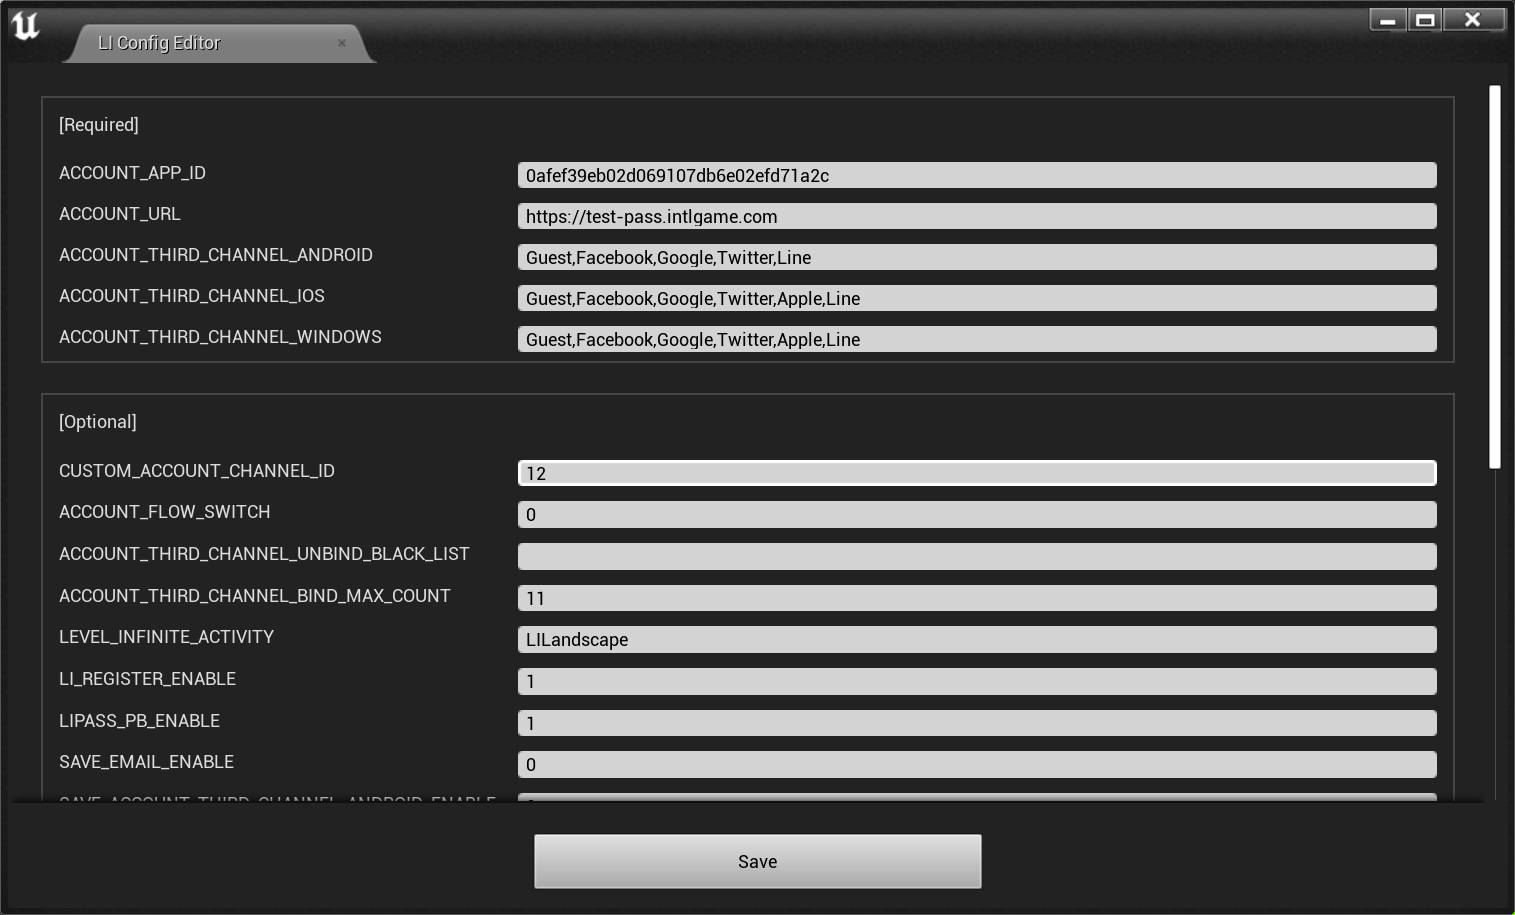
In Unity's menu, select INTL > LI INIConfig Window to open the editor window for LI PASS configurations.

-
In Unreal Engine's menu, select LITools > Config Editor to open the editor window for LI PASS configurations.
-
Set the
ACCOUNT_SDK_KEYandACCOUNT_APP_IDto the values assigned by Player Network Console.noteFor versions before LI PASS V1.16, set
ACCOUNT_URLtohttps://test-pass.intlgame.comto define the LI PASS environment.
For LI PASS V1.16 or later, this configuration is optional. -
Specify the third-party login channels for the designated platform.
For example,ACCOUNT_THIRD_CHANNEL_ANDROID = Facebook,Google.For a complete list of configurations, see Configs.
4. [Optional] Obtain the email of players during third-party channel login.
Set up permissions to obtain the email address of players during third-party channel login.
- Email masking can be performed on the returned
emailaccording to compliance requirements, reach out to the Player Network representative to enable this feature. - The hashed
base64(sha256(email))can be reported to the backend logs, reach out to the Player Network representative to enable this feature. - Can be used to verify if
emailis present in a player's profile or third-party channel information, reach out to the Player Network representative to enable this feature. - Can be used to enable Private Set Membership (PSM) for Firebase on iOS, see Firebase iOS configurations for more details.
The third-party channels below support returning the player email address:
Apple
Player authorization is required to obtain the email address for Apple, and will not be available if player authorization is refused, see Passing email and fullName to the Login API for more information.
-
From the editor window, add the
emailpermission toAPPLE_LOGIN_PERMISSIONunder [Dynamic]. -
Enable email return on Player Network Console by setting return_email to YES, see Configure Third-party Channels for detailed procedures.
Enable email return on Player Network Console by setting return_email to YES, see Configure Third-party Channels for detailed procedures.
-
From the editor window, add the
emailpermission toFACEBOOK_LOGIN_PERMISSIONunder [Dynamic]. IfFACEBOOK_LOGIN_PERMISSIONis not present withinINTLConfig.ini, theemailpermission will be added automatically. -
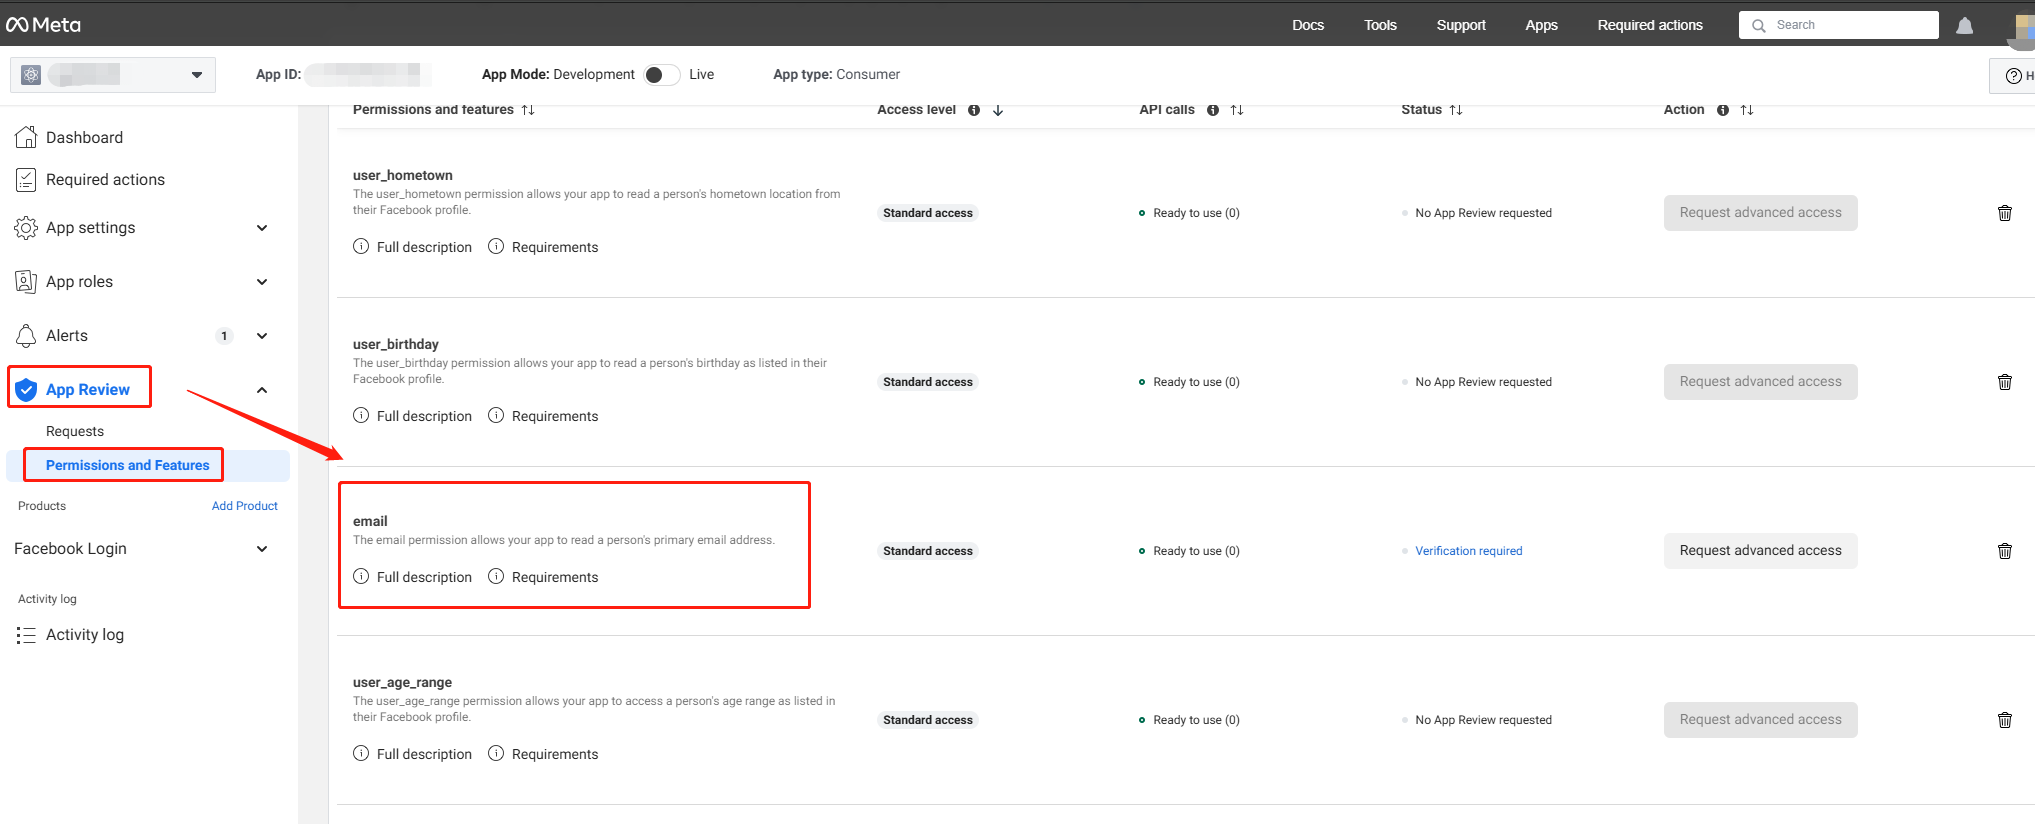
Configure the email permission on Meta for Developers. The email permission requires Advanced access, in order for all apps to be able to obtain player email.
-
Enable email return on Player Network Console by setting return_email to YES, see Configure Third-party Channels for detailed procedures.
-
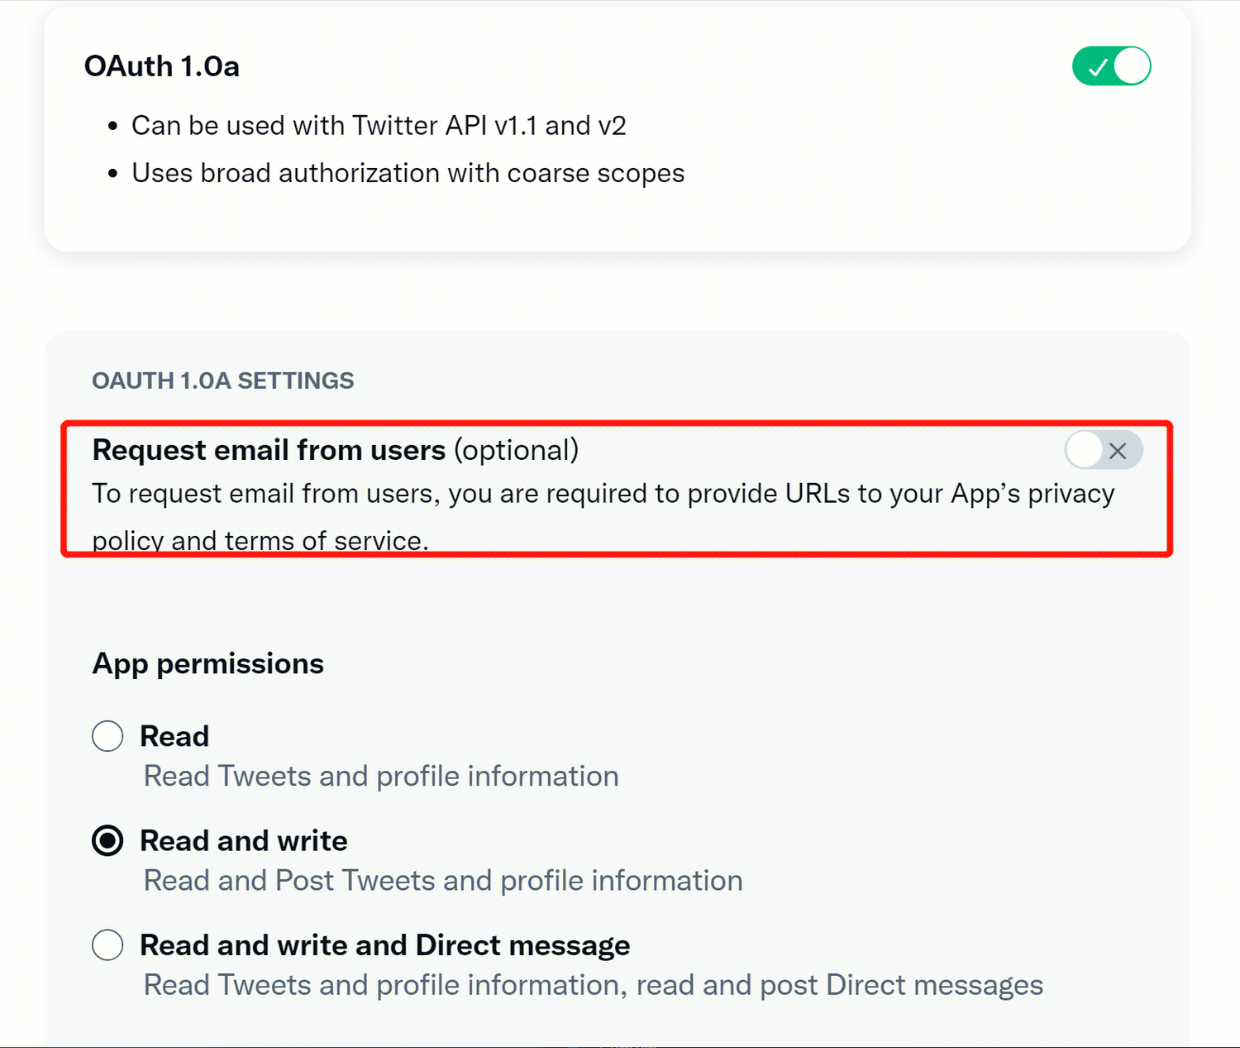
Under User authentication settings in Twitter Developer Platform, enable Request email from users.
-
Enable email return on Player Network Console by setting return_email to YES, see Configure Third-party Channels for detailed procedures.
Step 3: Initialize LI PASS
- Unity
- Unreal Engine
After initializing the SDK during the game's startup process, invoke InitLIP to initialize the LI PASS login panel. The initialization process first checks for any available hotfixes for the current resource version. If available, it downloads the resources for the newer version, and subsequently loads the latest resources. Upon completion of the loading process, the initialization is deemed complete and it triggers the GN_READY event. This event is then processed by the LI PASS callback.
Font font = GetFont();
LevelInfinite.InitLIP(font, Application.version, "en");
After initializing the SDK during the game's startup process, invoke InitLIP to initialize the LI PASS login panel. The initialization process first checks for any available hotfixes for the current resource version. If available, it downloads the resources for the newer version, and subsequently loads the latest resources. Upon completion of the loading process, the initialization is deemed complete and it triggers the GN_READY event. This event is then processed by the LI PASS callback.
FString Version = FApp::GetBuildVersion();
ULevelInfiniteAPI::InitLIP(GetGameInstance<UGameInstance>(), Version, TEXT("en"));
Step 4: Handle LI PASS events
Do not handle any internal callback events for LI PASS, as it may interrupt the LI PASS callback process and cause login exceptions.
Follow the below example to handle LI PASS callback events, such as OpenLoginPanel and AutoLogin.
- Unity
- Unreal Engine
Developers need to add AuthResultObserver, AuthBaseResultObserver, and LIEventObserver to receive login callback and callback for opening or closing the LI PASS login panel. The callback data structure is INTLAuthResult, which includes login information and account information, such as OpenID, account linking information, and account deletion status.
// Add callbacks
public void AddAuthBaseObserver()
{
    INTLAPI.AddAuthBaseResultObserver(OnAuthBaseResultEvent);
}

// Remove callbacks
public void RemoveAuthBaseObserver()
{
    INTLAPI.RemoveAuthBaseResultObserver(OnAuthBaseResultEvent);
}

// Add callbacks
public void AddAuthObserver()
{
    INTLAPI.AddAuthResultObserver(OnAuthResultEvent);
}

// Remove callbacks
public void RemoveAuthObserver()
{
    INTLAPI.RemoveAuthResultObserver(OnAuthResultEvent);
}

// Handle AuthResultObserver callback result
private void OnAuthResultEvent(INTLAuthResult AuthResult)
{
    switch (AuthResult.MethodId)
    {
        // LI PASS third channel / LI channel enter game
        case (int)INTLMethodID.LI_LOGIN_ENTER_GAME:
            if(AuthResult.RetCode == (int)ERROR_CODE.SUCCESS) {
                Debug.Log("LI PASS Login success");
            } else {
                Debug.Log("LI PASS Login failed, ret_code = " + AuthResult.RetCode + ", ret_msg = " + AuthResult.RetMsg);
                LevelInfinite.OpenLoginPanel();
            }
            break;
        // LI PASS autologin enter game
        case (int)INTLMethodID.LI_AUTOLOGIN_ENTER_GAME:
            if(AuthResult.RetCode == (int)ERROR_CODE.SUCCESS) {
                Debug.Log("LI PASS Autologin success");
            } else {
                Debug.Log("LI PASS Autologin failed, ret_code = " + AuthResult.RetCode + ", ret_msg = " + AuthResult.RetMsg);
                LevelInfinite.OpenLoginPanel();
            }
            break;
        default:
            break;
    }
}

// Process the INTLBaseResult callback
public void OnAuthBaseResultEvent(INTLBaseResult ret)
{
    Debug.Log($"MethodID: {ret.MethodId}");

    string methodTag = "";
    if (ret.MethodId == (int)INTLMethodID.INTL_AUTH_LOGOUT)
    {
        methodTag = "Logout";
    }
    ShowLogInNewLine(methodTag + Tools.Instance.GetRetString(ret));
}

// Add callbacks
LevelInfinite.AddLIEventObserver(OnLIBaseEventResult);
// Handle LIEventObserver callback result
private void OnLIBaseEventResult(LIBaseEventResult liRet)
    {
        Debug.Log("<color=#ff00ff>OnLIBaseEventResult.  lIEventType : " + Enum.GetName(typeof(LIEventType), liRet.lIEventType) + ", extraJson:" + liRet.extraJson + "</color>");
        ShowLogInNewLine("OnLIBaseEventResult.  lIEventType : " + Enum.GetName(typeof(LIEventType), liRet.lIEventType) + ", extraJson:" + liRet.extraJson);
        switch (liRet.lIEventType)
        {
            // LI PASS Init Finish
            case LIEventType.GN_READY:
                // LevelInfinite.AutoLogin()
                // LevelInfinite.OpenLoginPanel()
                break;
            // LI PASS Panel Open
            case LIEventType.LIP_PANEL_OPEN:
                break;
            // LI PASS Panel Close
            case LIEventType.LIP_PANEL_CLOSE:
                break;
            // LI PASS Open Login Panel
            case LIEventType.OPEN_LOGIN:
                break;
            // LI PASS Close Login Panel
            case LIEventType.CLOSE_LOGIN:
                break;
            // LI PASS Open Account Center
            case LIEventType.OPEN_ACCOUNT_CENTER:
                break;
            // LI PASS Close Account Center
            case LIEventType.CLOSE_ACCOUNT_CENTER:
                break;
            // LI PASS Close Delete Account Panel
            case LIEventType.CLOSE_DELETE_ACCOUNT:
                break;
            // LI PASS Close Parent Certificate Panel
            case LIEventType.CLOSE_PARENT_CERTIFICATE:
                break;
            // LI PASS Close Parent Tip Panel
            case LIEventType.CLOSE_PARENT_TIP:
                break;
            // LI PASS Close Parent Deny Panel
            case LIEventType.CLOSE_PARENT_DENY:
                break;
            // LI PASS Init Repeat
            case LIEventType.GN_REPEAT:
                break;
            // LI PASS Closed
            case LIEventType.GN_DISABLED:
                break;
            default:
                break;
        }
    }
// Remove callbacks
LevelInfinite.RemoveLIEventObserver(OnLIBaseEventResult);
Developers can also add an optional LILuaErrorObserver to handle lua errors.
Developers need to add AuthResultObserver, AuthBaseResultObserver, and LIEventObserver to receive login callback and callback for opening or closing the LI PASS login panel. The callback data structure is FINTLAuthResult, which includes login information and account information, such as OpenID, account linking information, and account deletion status.
//configure callback
FINTLAuthBaseEvent authBaseEvent;
authBaseEvent.AddUObject(this, &OnAuthBaseResult_Implementation);
UINTLSDKAPI::SetAuthBaseResultObserver(authBaseEvent);
// Remove callbacks
UINTLSDKAPI::GetAuthBaseResultObserver().Clear();
//Handle AuthBaseResult callback result
void OnAuthBaseResult_Implementation(FINTLAuthBaseResult ret)
{
    UE_LOG(LogTemp, Warning, TEXT("MethodID: %d"), ret.MethodId);
}
// Add callbacks
AuthResultObserver = UINTLSDKAPI::GetAuthResultObserver().AddUObject(this, &ULevelInfiniteWindow::OnAuthResult_Callback);
// Handle AuthResultObserver callback result
void ULevelInfiniteWindow::OnAuthResult_Callback(FINTLAuthResult AuthResult)
{
    if(AuthResult.MethodId == (int32)LIEnterGameMethodId::kLILoginEnterGame)
    {
        FString logStr;
        if(AuthResult.RetCode == INTL_NAMESPACE::ErrorCode::SUCCESS)
        {
            logStr = TEXT("LI PASS login success");
        }else{
            ULevelInfiniteAPI::OpenLoginPanel();
            logStr = FString::Printf(TEXT("LI PASS login failed, ret_code = %d, ret_msg = %s"), AuthResult.RetCode, *AuthResult.RetMsg);
        }
        UE_LOG(LogTemp, Warning, TEXT("%s"), *logStr);
    } else if (AuthResult.MethodId == (int32)LIEnterGameMethodId::kLIAutoLoginEnterGame){
        if(AuthResult.RetCode == INTL_NAMESPACE::ErrorCode::SUCCESS)
        {
            UE_LOG(LogTemp, Warning, TEXT("LI PASS Autologin success"));
        }else{
            ULevelInfiniteAPI::OpenLoginPanel();
            UE_LOG(LogTemp, Warning, TEXT("LI PASS Autologin failed, ret_code = %d, ret_msg = %s"), AuthResult.RetCode, *AuthResult.RetMsg);
        }
    }
}
// Remove callbacks
UINTLSDKAPI::GetAuthResultObserver().Remove(AuthResultObserver);

// Add callbacks
FDelegateHandle LIEventObserver;
LIEventObserver = ULevelInfiniteAPI::GetEventDelegate().AddUObject(this, &ULevelInfiniteWindow::OnLIEvent_Callback);
// Handle LIEventObserver callback result
void ULevelInfiniteWindow::OnLIEvent_Callback(FLIBaseEvent Event)
{
	FString logStr;
    switch(Event.EventType){
        // LI PASS Closed
		case ELIEventType::GN_DISABLED:
		{
			break;
		}
        // LI PASS Panel Open
		case ELIEventType::LIP_PANEL_OPEN:
        // LI PASS Open Login Panel
        {
            logStr = TEXT("LI PASS panel open");
            break;
        }
        // LI PASS Panel Close
		case ELIEventType::LIP_PANEL_CLOSE:
        {
            logStr = TEXT("LI PASS panel close");
            break;
        }
        // LI PASS Open Login Panel
        case ELIEventType::LOGIN_PANEL_OPEN:
        {
			logStr = TEXT("Login panel open");
            break;
        }
        // LI PASS Close Login Panel
        case ELIEventType::LOGIN_PANEL_CLOSE:
        {
			logStr = TEXT("Login panel close");
            break;
        }
        // LI PASS Open Account Center
        case ELIEventType::ACCOUNT_CENTER_OPEN:
        {
			logStr = TEXT("Account center open");
            break;
        }
        // LI PASS Close Account Center
        case ELIEventType::ACCOUNT_CENTER_CLOSE:
        {
			logStr = TEXT("Account center close");
            break;
        }
        // LI PASS Save Protocol Version
        case ELIEventType::SET_PROVISION:
		{
			logStr = FString::Printf(TEXT("LI set provision: %s"), *Event.ExtraJson);
			break;
		}
        // LI PASS Real Name Compliance Success
		case ELIEventType::COMPLIANCE_AGE_SUCESS:
		{
			logStr = TEXT("LI age and region compliance success");
			break;
		}
        // LI PASS Minor Compliance Success
		case ELIEventType::COMPLIANCE_MINOR_SUCESS:
		{
			logStr = TEXT("LI minor compliance success");
			break;
		}
        // LI PASS Close Parent Tip Panel
		case ELIEventType::CLOSE_PARENT_TIP_PANEL:
        {
        	logStr = TEXT("LI close parent tip panel");
        	break;
        }
        // LI PASS Close Parent Deny Panel
		case ELIEventType::CLOSE_PARENT_DENY_PANEL:
        {
        	logStr = TEXT("LI close parent deny tip panel");
        	break;
        }
        // LI PASS Close Parent Certificate Panel
		case ELIEventType::CLOSE_PARENT_CERTIFICATE_PANEL:
        {
        	logStr = TEXT("LI close parent certificate panel");
        	break;
        }
        // LI PASS Close Delete Account Panel
		case ELIEventType::CLOSE_DELETE_ACCOUNT_PANEL:
        {
        	logStr = TEXT("LI close delete account panel");
        	break;
        }
        // LI PASS Init Repeat
        case ELIEventType::INTL_REPEAT:
        {
            break;
        }
        // LI PASS Init Finish
		case ELIEventType::GN_READY:
		{
			// ULevelInfiniteAPI::AutoLogin();
            // ULevelInfiniteAPI::OpenLoginPanel();
			break;
		}
    }
}
// Remove callbacks
ULevelInfiniteAPI::GetEventDelegate().Remove(LIEventObserver);
Developers can also add an optional LILuaErrorObserver to handle lua errors.
Step 5: Set language for LI PASS UI
Call SetLanguage with the language code as the input parameter to set the language used in all LI PASS UI and emails. It is recommended to align this setting with the game's language to ensure consistency. Otherwise, the language used in LI PASS interfaces and emails may differ from the game's language.
- Unity
- Unreal Engine
LevelInfinite.SetLanguage("zh-Hans");
ULevelInfiniteAPI::SetLanguage(TEXT("zh-Hans"));
Step 6: Set LI PASS UI root
Call the SetUIRoot method to establish the root node for all LI PASS UI before calling any other LI PASS functions.
Once the UI root node is set, avoid deleting it. Doing so could prevent the LI PASS UI from being mounted, leading to unexpected behavior.
The LI PASS UI should be released via UI buttons and not force destroyed. If garbage collection (GC) is controlled by Unity when switching scenes, a null pointer error may occur.
- Unity
- Unreal Engine
For more details regarding the canvas resolution, see SetUIRoot.
LevelInfinite.SetUIRoot(uiRoot);
For Unreal Engine, the root node is required to cover the entire screen.
ULevelInfiniteAPI::SetUIRoot(uiRoot);
Step 7: Set country/region
The LI PASS login panel includes built-in compliance workflows. Developers must call UpdateCountryList with allowList and blockList arrays as parameters. The allowList array should contain ISO 3166-1 numeric codes of countries/regions to be displayed in the LI PASS country selection page, while the blockList array should contain codes of countries/regions that should not be displayed.
The specified countries/regions will be automatically processed by the LI PASS login panel's compliance workflow.
- Unity
- Unreal Engine
string[] allowArray = new string[] {"496","400"};
string[] blockArray = new string[] {"400"};

LevelInfinite.UpdateCountryList(allowArray,blockArray);
TArray<FString> allowList;
allowList.Add(TEXT("496"));
allowList.Add(TEXT("400"));
TArray<FString> blockList;
blockList.Add(TEXT("400"))

ULevelInfiniteAPI::UpdateCountryList(allowList,blockList);
Step 8: Add LI PASS functions to your game client
-
Login panel
Add the LI PASS login panel, which supports features such as account registration, login, logout, and access to the account center. -
Reward
Configure reward events for the game. -
Account linking
The LI PASS Account Center includes features such as account linking, account unlink, personal information, and more.
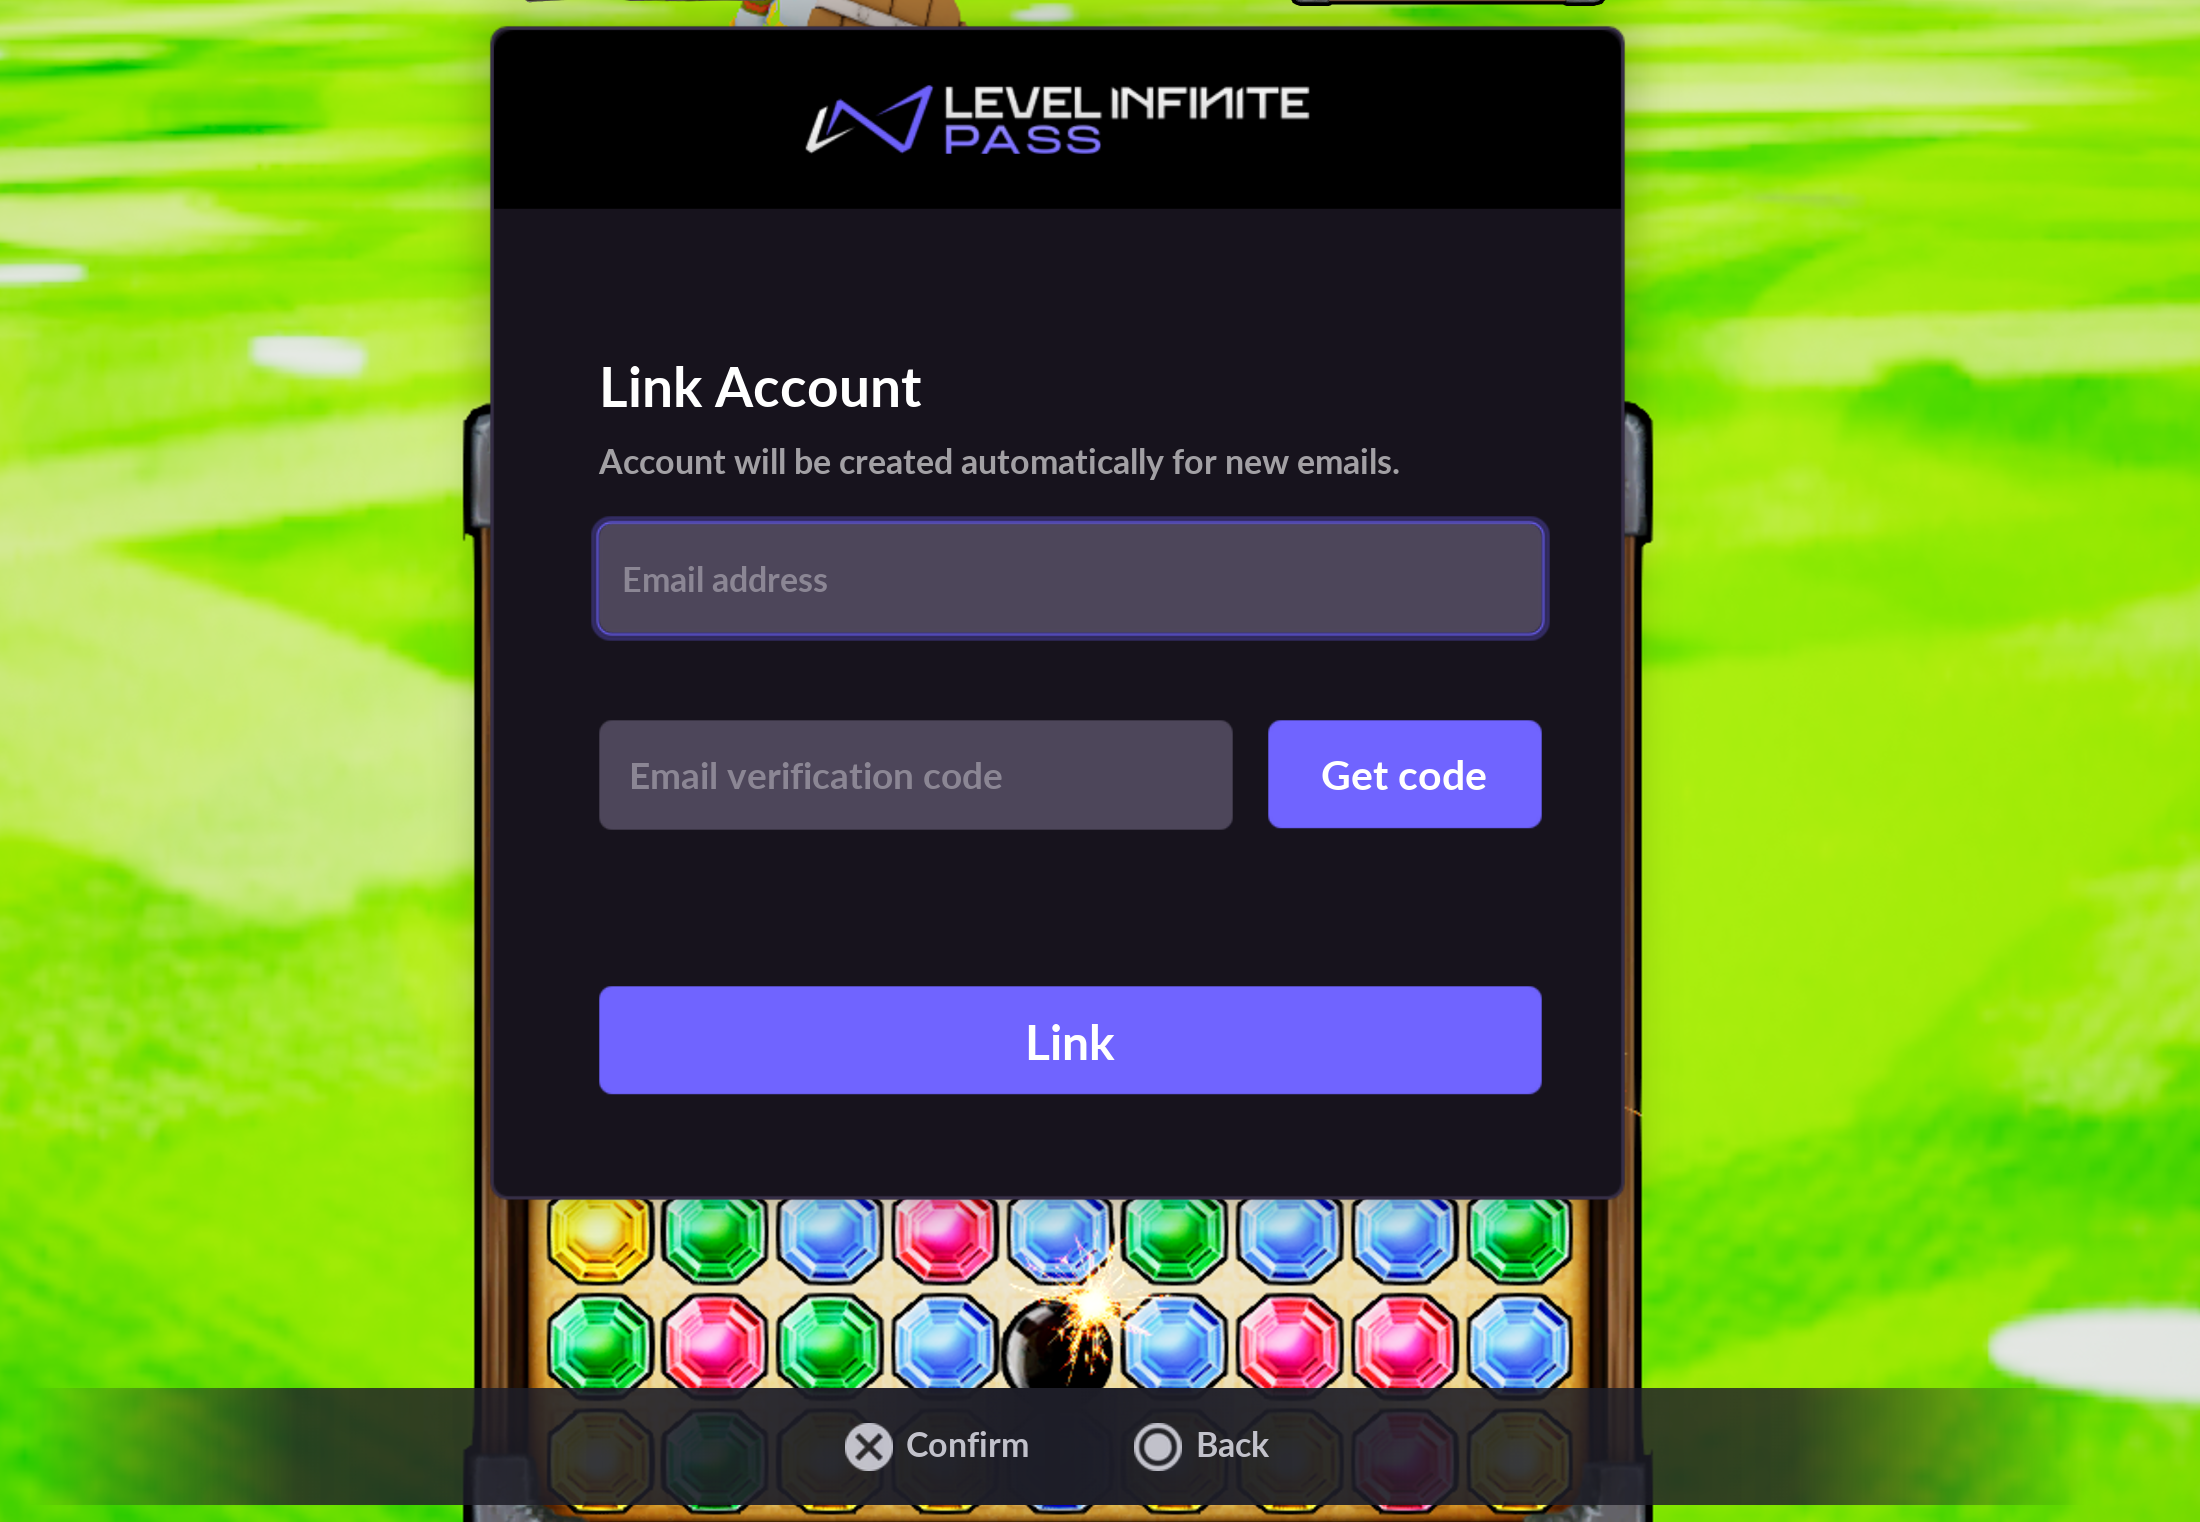
In-game account link for Console platforms on Unreal Engine
The in-game account link function is only for use in console platforms running on Unreal Engine, and is not required for other platforms.
Use this function to display a popup to link with LI PASS within the game.
// Add callback
AuthResultObserver = UINTLSDKAPI::GetAuthResultObserver().AddUObject(this, &UFloatingSidebar::OnAuthResult_Callback);

// Query user bind info
UINTLSDKAPI::QueryBindInfo();

// handle callback
void UFloatingSidebar::OnAuthResult_Callback(FINTLAuthResult AuthResult)
{
	UE_LOG(LogTemp, Warning, TEXT("UFloatingSidebar::OnAuthResult_Callback AuthResult.MethodId: %d"),AuthResult.MethodId);
	if(AuthResult.MethodId == (int32)LIMethodId::kLIQueryBindInfo) {
		if(AuthResult.RetCode == INTL_NAMESPACE::ErrorCode::SUCCESS)
        {
            UE_LOG(LogTemp, Warning, TEXT("LI query bind info success bindlist = %s"), *AuthResult.BindList);
			TArray <TSharedPtr<FJsonValue>> bindInfoArray;
			TSharedRef<TJsonReader<TCHAR>>jsonReader = TJsonReaderFactory<TCHAR>::Create(AuthResult.BindList);
			bool isSe = FJsonSerializer::Deserialize(jsonReader, bindInfoArray);
			if (isSe)
			{
				UE_LOG(LogTemp, Warning, TEXT("LI query bind info format JsonObject success"));
				bool haveBindLI = false;
				FString liEmail;
				for(int i = 0; i < bindInfoArray.Num(); i++)
				{
					int32 channelId = bindInfoArray[i]->AsObject()->GetIntegerField("channelid");
					FString email = bindInfoArray[i]->AsObject()->GetStringField("email");
					UE_LOG(LogTemp, Warning, TEXT("LI query bind info channelId = %d, email = %s"), channelId, *email);
					if(channelId ==  (int32)EINTLLoginChannel::kChannelLevelInfinite) {
						haveBindLI = true;
						liEmail = email;
						break;
					}
				}
				if(!haveBindLI) {
                    // open link account in game panel
					ULevelInfiniteAPI::OpenBindAccount();
				} else {
                    // account already linked to LI PASS
                    UE_LOG(LogTemp, Warning, TEXT("Account have bind LI"));
				}
			} else {
				UE_LOG(LogTemp, Warning, TEXT("LI query bind info format JsonObject failed"));
			}
        }else{
			UE_LOG(LogTemp, Warning, TEXT("LI query bind info failed, ret_code = %d, ret_msg = %s"), AuthResult.RetCode, *AuthResult.RetMsg);
            // token unavailable
			FINTLAuthResult CurrentAuthResult;
			if (UINTLSDKAPI::GetAuthResult(CurrentAuthResult)) {
				EINTLLoginChannel channel = static_cast<EINTLLoginChannel>(CurrentAuthResult.ChannelID);

				if (channel == EINTLLoginChannel::kChannelPS5) {
					FString permissions = "psn:s2s openid id_token:psn.basic_claims";
					ULevelInfiniteAPI::LoginChannelWithLIPass(channel, permissions, "{}");
				} else if (channel == EINTLLoginChannel::kChannelXbox) {
					ULevelInfiniteAPI::LoginChannelWithLIPass(channel, "", "{}");
				} else {
					ULevelInfiniteAPI::LoginChannelWithLIPass(channel, "", "{}");
				}
			}
        }
	}
}
Sample image:
For Web
The LI PASS Web widget includes login, registration, linking, and preregistration functions, and supports multiple configurations under the same project (i.e. GAME_ID). It can meet your needs for both LI PASS and third-party channel accounts in various webpage scenarios, seamlessly integrating with accounts in the game client.
With just a few lines of code, you can complete the integration, eliminating the need to integrate APIs individually and say goodbye to building your own interactions and UI.
Player Network Console is recommended to be used to Configure LI PASS for Web, as it is simpler to configure and offers more flexibility when updating.
For projects already configured through code, you can go to the Player Network Console to add Web configurations. The configurations from the console will overwrite the webpage's code configuration. For more information, reach out to the Player Network representative.
Step 1: Import the JavaScript SDK
Install the JavaScript SDK from CDN.
// SDK Test Version Package
<script src="https://test-common-web.intlgame.com/sdk-cdn/infinite-pass/latest/index.umd.js"></script>
<link rel="stylesheet" href="https://test-common-web.intlgame.com/sdk-cdn/infinite-pass/latest/index.css" />


// SDK Production Version Package
<script src="https://common-web.intlgame.com/sdk-cdn/infinite-pass/latest/index.umd.js"></script>
<link rel="stylesheet" href="https://common-web.intlgame.com/sdk-cdn/infinite-pass/latest/index.css" />
Step 2: Configure LI PASS in Player Network Console
For detailed configuration steps, see Configure LI PASS.
After completing login configurations for Web, the WEB_ID will be available after publishing.
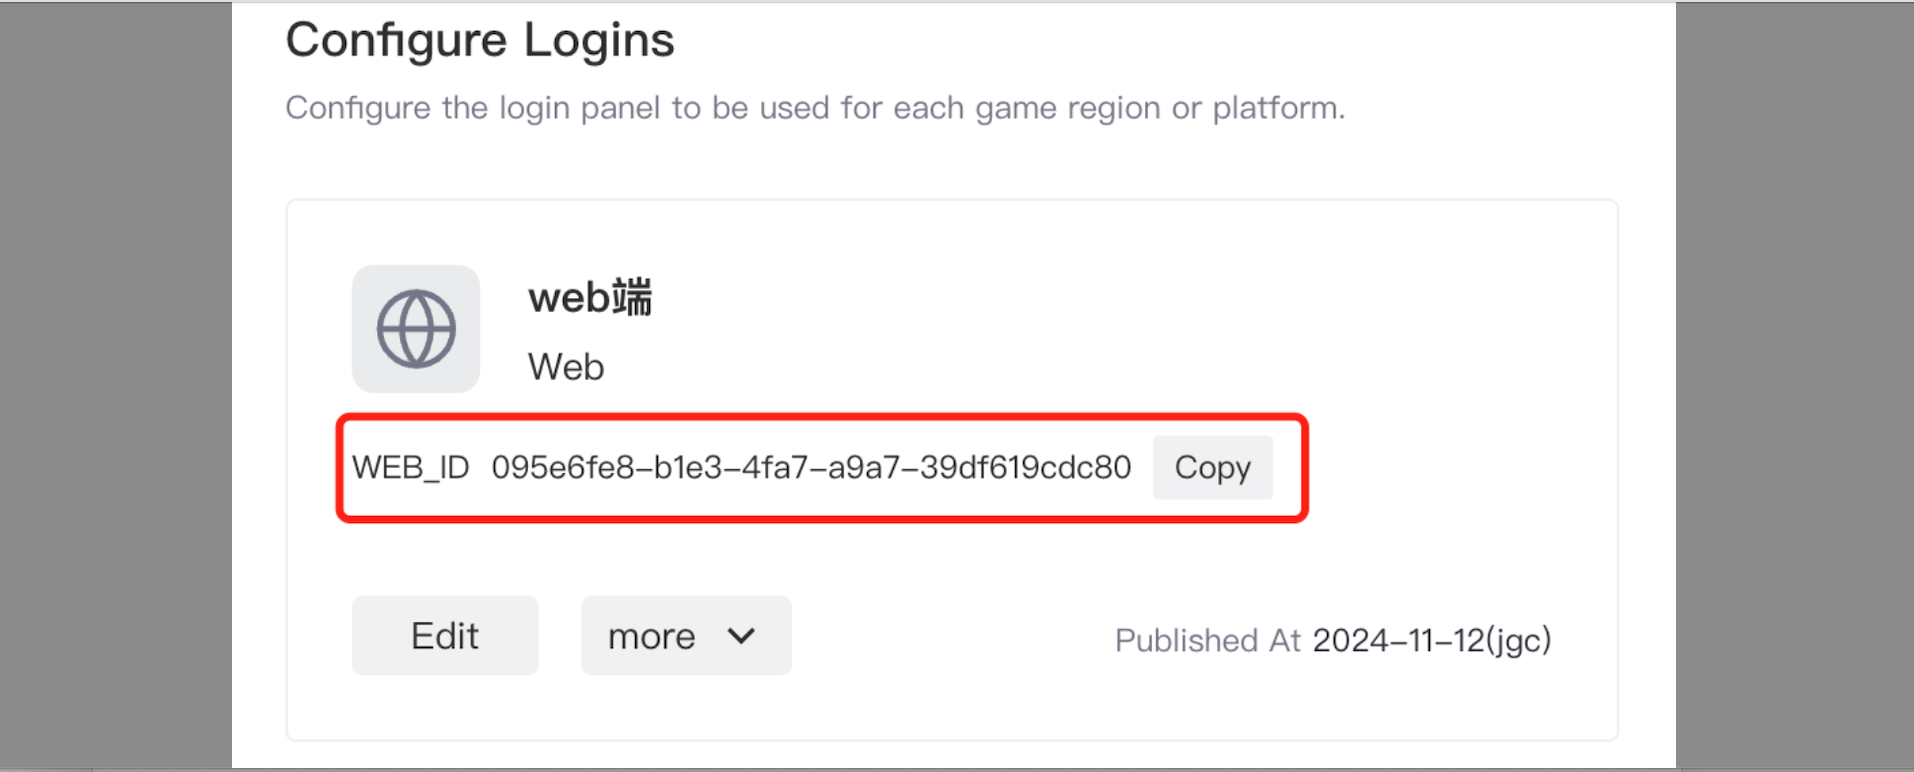
Multiple LI PASS Web configurations can be created in Player Network Console, for use in different Web scenarios.
Step 3: Instantiate the JavaScript SDK
Import the JS and CSS resources.
<script src="https://test-common-web.intlgame.com/sdk-cdn/infinite-pass/latest/index.umd.js"></script>
<link rel="stylesheet" href="https://test-common-web.intlgame.com/sdk-cdn/infinite-pass/latest/index.css" />
<!-- For the production environment, please use the production version sdk -->

<!-- mount node -->
<div id="infinite-pass-component"></div>
Instantiate the SDK.
const pass = new PassFactory.Pass({
  env: "test", // For production environment, reach out to the Player Network representative
  gameID: xxxxx, // GAME_ID configured in Player Network Console
  appID: "", // APP_ID configured in Player Network Console
  webID: "", // WEB_ID in Player Network Console

  config: {}, // required if webID is not provided, not required if webID is provided
});
For more details on initialization parameters and other advanced configurations, see Web Widget Configurations.
If configurations for LI PASS Web have been completed in Player Network Console, the WEB_ID can be passed during code initialization, with support for real-time modifications.
Else, if Web configurations have not been completed in Player Network Console, manually configure config in the code according to LI PASS Web Configurations.
Step 4: Add LI PASS login/registration
The LEVEL INFINITE PASS Web widget supports both LEVEL INFINITE PASS login and third-party channel login.
After instantiating the pass component, call the start method to mount the LI PASS Web Web widget to the specified DOM node. After a successful login, the login result will be returned in intlSignResp.
After successful login/registration, the UI of the component is not changed automatically and requires manual handling. For example, storing the login information in a cookie or the localStorage, then navigate the UI to the successful login page.
For more information about customizing the Web widget, see Web。
<div id="infinite-pass-component"></div>
const pass = new PassFactory.Pass({
  env: "test", // Environment
  gameID: xxxxx, // GAME_ID configured in Player Network Console
  appID: "", // APP_ID configured in Player Network Console
  webID: "", // WEB_ID in Player Network Console
});

// Call `start` to mount the Web widget to the specified DOM node
// After a successful login, the login result is returned in the `onLogin` and `onRegister` events.
pass.start("#infinite-pass-component");

// You should listen to the events and obtain the user's authentication information when the user completes login or registration.
pass.on("onLogin", (userInfo) => {
  // After the user fails to log in, the 'onLoginError event' will be triggered, and the game logic after the user successfully logs in, can be processed in the event callback
  // For example, redirect to a specific page
  console.log(userInfo);
});

pass.on("onRegister", (userInfo) => {
  // Logic added after successful registration
  // For example, redirect to a specific page
  console.log(userInfo);
});
Return parameters
| Parameter | Type | Description |
|---|---|---|
| ret | number | Return code 0: Request success !=0: Request failure, see msg for detailed return message |
| msg | string | Result description |
| token | string | Player Network SDK generated user authorization token length 40 bytes, see Token |
| openid | string | Player Network SDK unique user ID Default is a string of 64-bit unsigned integers, 32-bit is also supported |
| token_expire_time | int64 | Token expiration time Unix time |
| user_name | string | Username used for login |
| channel_info | object | Channel information for the current channel. For more information, see Channel Information. |
| del_account_status | number | Account deletion status -1: Query failure 0: No record of revoking Player Network account deletion request (including email account and phone account) 1: Cooling-off period for deletion 2: Account deletion completed 3: Account deleted 4: Account deletion failed |
| seq | string | Sequence number of the message in the data stream |
| first_login | number | Whether the current login is the first login Unknown: -1 No: 0 Yes: 1 |
Return sample
{
    channel_info:{
        account:"wuqinghao@outlook.com",
        account_plat_type: 131,
        account_type: 1,
        channelId: 131
    },
    del_account_status: 0,
    first_login: 0,
    msg: "success",
    openid: "xxx",
    ret: 0,
    seq: "1638194026-0180225310-032531-0000292460",
    token: "xxx",
    token_expire_time: 1638494026,
    user_name: "user",
}
Step 5: Add third-party channel login
LI PASS Web login for third-party channels is only supported in the system browser, and is not supported for the built-in WebView component of any game or app:
- Based on security concerns, Google and Facebook has prohibited the use of built-in WebView for web login.
- The WebView component cannot load multiple pages simultaneously, and therefore cannot load the third-party login page to complete the login process.
The LI PASS Web widget currently supports Apple, Discord, Epic, Facebook, Google, LINE, PS5, Steam, Twitch, Twitter, VK, QQ, Wechat.
Method 1: Configure with Player Network Console (recommended)
Configure the third-party channels for login in Player Network Console, changing the channels to be displayed in real-time. For detailed configuration steps, see Login channels for web.
[Optional] Automatically trigger LI PASS linking process during user login
For users logging in through third-party channels, if their email address has not been linked to LI PASS, they can be prompted to link to LI PASS when logging in.
To use this feature, turn on the switch for Prompt players to link to LI PASS with their email and Trigger during player login under Account linking strategy in Player Network Console, and pass in webID when instantiating the pass component.
You may listen to the onBindError event to obtain information related to linking errors:
const pass = new PassFactory.Pass({
  env: "test", // Environment
  gameID: xxxxx, // GAME_ID configured in Player Network Console
  appID: "", // APP_ID configured in Player Network Console
  webID: "xxxxxxxxxxxx", // WEB_ID in Player Network Console
});

// Call `start` to mount the login widget to the specified DOM node
// After a successful login, the login result is returned in the `onLogin` and `onRegister` events.
pass.start("#infinite-pass-component");

// When a user completes login and linking, the `onLogin` event will be triggered, and the result `has_bind_lip` will be returned.
pass.on("onLogin", (userInfo) => {
  console.log(userInfo.has_bind_lip);
});

// The `onBindError` event will be triggered when an error occurs while linking.
pass.on("onBindError", (result) => {
  console.log(result);
});

// You may listen for the `onClose` event. When a user clicks the close button during the linking process, and the link policy in Player Network Console is configured as **Force players to complete linking**, this event will be triggered.
pass.on("onClose", (accountApi) => {
  console.log(accountApi);
});
| Parameter | Type | Description | Remarks |
| -------------------- | ------ | ---------------------------------------------------------------------------------------------------------------------------------------------------------- |
| has_bind_lip | boolean | Whether LI PASS is linked.
true: LI PASS is already linked, or user has completed linking during this login process
false: user has skipped linking
[Optional] Automatically trigger third-party channel linking process during user login
Users can be prompted to link to a third-party channel during login. If the user has not linked to LI PASS yet, LI PASS linking will have to be completed first. Only one channel can only be linked on each login.
The scope for the third-party channels that can be linked is a subset of the third-party channels displayed in the login interface.
To use this feature, turn on the switch for Prompt players to link to third-party channels and Trigger during player login under Account linking strategy in Player Network Console, and pass in webID when instantiating the pass component.
You may listen to the onBindError event to obtain information related to linking errors:
const pass = new PassFactory.Pass({
  env: "test", // Environment
  gameID: xxxxx, // GAME_ID configured in Player Network Console
  appID: "", // APP_ID configured in Player Network Console
  webID: "xxxxxxxxxxxx", // WEB_ID in Player Network Console
});

// Call `start` to mount the login widget to the specified DOM node
// After a successful login, the login result is returned in the `onLogin` and `onRegister` events.
pass.start("#infinite-pass-component");

// When a user completes login and linking, the `onLogin` event will be triggered, and the result `has_bind_lip` will be returned.
pass.on("onLogin", (userInfo) => {
  console.log(userInfo.has_bind_lip);
});

// The `onBindError` event will be triggered when an error occurs while linking.
pass.on("onBindError", (result) => {
  console.log(result);
});

// You may listen for the `onClose` event. When a user clicks the close button during the linking process, and the link policy in Player Network Console is configured as **Force players to complete linking**, this event will be triggered.
pass.on("onClose", (accountApi) => {
  console.log(accountApi);
});
| Parameter | Type | Description | Remarks |
| -------------------- | ------ | ---------------------------------------------------------------------------------------------------------------------------------------------------------- |
| has_bind_lip | boolean | Whether LI PASS is linked.
true: LI PASS is already linked, or user has completed linking during this login process
false: user has skipped linking
| socialBindList | object | List of linked third-party channels for the user. |
socialBindList
| Parameter | Type | Description |
|---|---|---|
| channelId | number | Channel ID |
| channelName | string | Channel name |
| isNewlyBound | boolean | Whether the channel is linked by this operation, to distinguish from channels previously linked |
[Optional] Obtain email of players during third-party channel login
This setting is part of third-party channel configurations in Player Network Console, and users with only Web Admin permissions will not have access. Contact the project team to complete the configurations.
To use the quick registering feature of Web linking, permissions to obtain the email address of players during third-party channel login has to be set up first.
- Email masking can be performed on the returned
emailaccording to compliance requirements, reach out to the Player Network representative to enable this feature. - The hashed
base64(sha256(email))can be reported to the backend logs, reach out to the Player Network representative to enable this feature. - Can be used to verify if
emailis present in a player's profile or third-party channel information, reach out to the Player Network representative to enable this feature. - Can be used to enable Private Set Membership (PSM) for Firebase on iOS, see Firebase iOS configurations for more details.
The third-party channels below support returning the player email address:
Apple
Player authorization is required to obtain the email address for Apple, and will not be available if player authorization is refused, see Passing email and fullName to the Login API for more information.
-
From the editor window, add the
emailpermission toAPPLE_LOGIN_PERMISSIONunder [Dynamic]. -
Enable email return on Player Network Console by setting return_email to YES, see Configure Third-party Channels for detailed procedures.
Enable email return on Player Network Console by setting return_email to YES, see Configure Third-party Channels for detailed procedures.
-
From the editor window, add the
emailpermission toFACEBOOK_LOGIN_PERMISSIONunder [Dynamic]. IfFACEBOOK_LOGIN_PERMISSIONis not present withinINTLConfig.ini, theemailpermission will be added automatically. -
Configure the email permission on Meta for Developers. The email permission requires Advanced access, in order for all apps to be able to obtain player email.

-
Enable email return on Player Network Console by setting return_email to YES, see Configure Third-party Channels for detailed procedures.
-
Under User authentication settings in Twitter Developer Platform, enable Request email from users.

-
Enable email return on Player Network Console by setting return_email to YES, see Configure Third-party Channels for detailed procedures.
Method 2: Configure with code
<div id="infinite-pass-component"></div>
const pass = new PassFactory.Pass({
  env: "test", // Environment
  gameID: xxxxx, // GAME_ID configured in Player Network Console
  appID: "", // APP_ID configured in Player Network Console

  config: {
    socialList: ['facebook', 'twitter']
  }
});

// Call the `start` method to mount the login enabler to the specified DOM node
pass.start("#infinite-pass-component");

// You can listen to a list of events to get information about a user's credentials when they log in or register.
pass.on("onLogin", (userInfo) => {
  // After the user fails to log in, the 'onLoginError event' will be triggered, and the game logic after the user successfully logs in, can be processed in the event callback
  // For example, redirect to a specific page
  console.log(userInfo);
});

pass.on("onLoginError", (userInfo) => {
  // The 'onLogin event' will be triggered after the user successfully logs in, and the game logic after the user fails to log in, can be processed in the event callback.
  console.log(userInfo);
});
Key configuration parameters
| Parameter | Type | Description | Remarks |
|---|---|---|---|
| socialList | string[] | Channel list, see config for detailed configurations. | Optional |
| socialParams | object | Configuration required when logging in through three-party channels, see socialParams for detailed configurations. | Optional |
Return parameter
| Parameter | Type | Description |
|---|---|---|
| ret | number | Return code 0: Request success !=0: Request failure, see msg for detailed return message |
| msg | string | Result description |
| token | string | Player Network SDK generated user authorization token length 40 bytes, see Token |
| openid | string | Player Network SDK unique user ID Default is a string of 64-bit unsigned integers, 32-bit is also supported |
| token_expire_time | int64 | Token expiration time Unix time |
| user_name | string | Username used for login |
| channel_info | object | Channel information for the current channel. For more information, see Channel Information. |
| del_account_status | number | Delete account -1: Query failure 0: No record of cancellation of Player Network account deletion request (including email account and phone account) 1: Cooling-off period for deletion 2: Account deletion completed 3: Account deleted 4: Account deletion failed |
| seq | string | Data stream message sequence number |
Return sample
{
    channel_info: {
        access_token:"xxxxx",
        expire_ts: 1641527900,
    }
    first_login: 0,
    msg: "success",
    openid: "xxxx",
    picture_url: "https://www.google.com/Images/profileA.png",
    ret: 0,
    seq: "1638935899-1006943754-018668-0000656615",
    token: "xxx",
    token_expire_time: 1641527900,
    del_account_status: 0,
    user_name: "user",
}
Step 6: Implement authentication state retention
When using the LI PASS Web widget, you can customize how the authentication state is retained by varying how the information is being stored:
- Retain authentication state indefinitely (stored in cookie or localStorage) for logged in users, until explicitly logged out
- Clear authentication state when window is closed (stored in sessionStorage)
- Clear authentication state on page reload (not stored)
The below table lists the user credentials to be stored, which can be obtained by listening to the onLogin and onRegister events.
| Parameter | Type | Read method |
|---|---|---|
| openid | string | userInfo.openid |
| token | string | userInfo.token |
| channelId | string | userInfo.channel_info.channelId |
Disable default behavior
After logging in using the LI PASS Web widget, the authentication state is automatically stored in the logined_account_cache_key cookie. To avoid overreliance on this cookie, instead handle authentication state retention by storing the user credentials in the localStorage or sessionStorage.
To disable this default behavior, set the following when initializing the widget:
const pass = new PassFactory.Pass({
  env: "", // Environment
  gameID: "", // Game ID
  appID: "", // LI PASS App ID

  config: {
    disableCookie: true
  }
});
Step 7: Set UI display method
Method 1: Configure with Player Network Console (recommended)
Player Network Console is recommended to be used to configure the Display mode for Web:
- Embedded in the content page - Inline mode, can be embedded into any DOM node in your webpage.
- Displayed as a popup in the content page - Modal mode, similar to inline mode, and supports using
showandhideto control the display of the modal
Method 2: Configure with code
Set config.renderMode to inline or modal, superseded by configurations in Player Network Console.
Initialize widget: Call the start method to render automatically.
const pass = new PassFactory.Pass({
  env: "test", // Environment
  gameID: xxxxx, // GAME_ID configured in Player Network Console
  appID: "", // APP_ID configured in Player Network Console
  webID: "", // WEB_ID in Player Network Console
});

// Call `start` to mount the Web widget to the specified DOM node
pass.start("#infinite-pass-component");
Close modal:
pass.hide()
Reopen modal after being closed (do not retain user input): Re-initialize modal every time
<div id="infinite-pass-component"></div>
<button onclick="login">登录</button>

function login() {
    const pass = new PassFactory.Pass({
        env: "test", // Environment
        gameID: xxxxx, // GAME_ID configured in Player Network Console
        appID: "", // APP_ID configured in Player Network Console
        webID: "", // WEB_ID in Player Network Console
    });

    // Call `start` to mount the Web widget to the specified DOM node
    pass.start("#infinite-pass-component");
}
Reopen modal after being closed (retain user input): Store a reference to the instance during first initialization, then call pass.show to display the modal again.
<div id="infinite-pass-component"></div>
<button onclick="login">login</button>

function login() {
    // Store a reference to the pass instance here
    if (!pass) {
        const pass = new PassFactory.Pass({
            env: "test", // Environment
            gameID: xxxxx, // GAME_ID configured in Player Network Console
            appID: "", // APP_ID configured in Player Network Console
            webID: "", // WEB_ID in Player Network Console
        });

        // Call `start` to mount the Web widget to the specified DOM node
        pass.start("#infinite-pass-component");
    } else {
        pass.show()
    }
}
Step 8: Add LI PASS functions to your website
LI PASS linking widget
For users logging in to LI PASS with a third-party channel, call the bind method to manually trigger the LI PASS linking process.
- If the third-party channel is able to return the email of the user, and the email has not been linked to LI PASS, the quick linking process will be started.
- If the third-party channel cannot return the email of the user, or the returned email has been linked to another LI PASS, the user will be prompted to enter their email to link the LI PASS.
- If the user has already linked to LI PASS, their link information will be returned.
Create a configuration for LI PASS Web from Player Network Console, and turn on the switch for Prompt players to link to LI PASS with their email and Allow players to manually trigger under Account linking strategy. After the configuration is published, pass in the WEB_ID generated when instantiating the pass component.
You may listen to the onBindError event to obtain information related to linking errors:
const pass = new PassFactory.Pass({
  env: "test", // Environment
  gameID: xxxxx, // GAME_ID configured in Player Network Console
  appID: "", // APP_ID configured in Player Network Console
  webID: "xxxxxxxxxxxx", // WEB_ID in Player Network Console
});


// Call the `bind` method to display the link widget.
pass.bind({
  bindOpenid: '', // openid of current user
  bindToken: '', // token of current user
  bindChannelID: 6, // channelid of current user
})

// Listen to the `onBind` event, `has_bind_lip` in the results will show the linking status of the user.
pass.on("onBind", (result) => {
  console.log(result);
});

// When a user clicks the close button during the linking process, the `onClose` event is triggered and the user has not completed linking.
pass.on("onClose", (accountApi) => {});

// The `onBindError` event will be triggered when an error occurs while linking.
pass.on("onBindError", (result) => {
  console.log(result);
});
Return parameters
| Parameter | Type | Description |
|---|---|---|
| has_bind_lip | boolean | Whether LI PASS is linked |
| openid | string | Player Network SDK unique user ID Default is a string of 64-bit unsigned integers, 32-bit is also supported |
| token | string | Player Network SDK generated user authorization token length 40 bytes, see Token |
| channel_info | object | Channel information for the current channel |
channel_info
| Parameter | Type | Description |
|---|---|---|
| channelId | number | channel ID |
Third-party channel linking widget
When the user has completed login authorization, call the bindSocial method to manually trigger the third-party channel linking process.
Create a configuration for LI PASS Web from Player Network Console, and turn on the switch for Prompt players to link to third-party channels and Allow players to trigger manually under Account linking strategy. After the configuration is published, pass in the WEB_ID generated when instantiating the pass component.
You may listen to the onBindError event to obtain information related to linking errors:
const pass = new PassFactory.Pass({
  env: "test", // Environment
  gameID: xxxxx, // GAME_ID configured in Player Network Console
  appID: "", // APP_ID configured in Player Network Console
  webID: "xxxxxxxxxxxx", // WEB_ID in Player Network Console
});


// Call the `bind` method to display the link widget.
pass.bindSocial({
  bindOpenid: '', // openid of current user
  bindToken: '', // token of current user
  bindChannelID: 6, // channelid of current user
})

// Listen to the `onBind` event, `has_bind_lip` in the results will show the linking status of the user.
pass.on("onBind", (result) => {
  console.log(result);
});

// When a user clicks the close button during the linking process, the `onClose` event is triggered and the user has not completed linking.
pass.on("onClose", (accountApi) => {});

// The `onBindError` event will be triggered when an error occurs while linking.
pass.on("onBindError", (result) => {
  console.log(result);
});
Return parameters
| Parameter | Type | Description |
|---|---|---|
| has_bind_lip | boolean | Whether LI PASS is linked |
| openid | string | Player Network SDK unique user ID Default is a string of 64-bit unsigned integers, 32-bit is also supported |
| token | string | Player Network SDK generated user authorization token length 40 bytes, see Token |
| socialBindList | object | List of linked third-party channels for the user |
socialBindList
| Parameter | Type | Description |
|---|---|---|
| channelId | number | channel ID |
| channelName | string | channel name |
| isNewlyBound | boolean | Whether the channel is linked by this operation, to distinguish from channels previously linked |
Preregister widget
Use the preOrder method to preregister users, preregistered users do not have to register again after downloading the game. This can be used to collect valid email addresses from your users to achieve greater effective reach.
Parameters
| Parameter | Type | Description | Remarks |
|---|---|---|---|
| apiKey | string | Use the same gameid to apply for an apiKey in SmartLink | Required |
| tags | string[] | Add custom tags to contacts in SmartLink | Optional |
Sample
const pass = new PassFactory.Pass({
  env: "", // Environment
  gameID: "", // Game ID
  appID: "", // LI PASS App ID

  config: {
    langType: 'en' // Defaults to 'en', change this configuration to change the default language
  }
});

// Call the `preOrder` method to display the preregistration widget
pass.preOrder({
  apiKey: 'xxxxxxxxx',
  tags: ['tag1', 'tag2'],
})
Recommended services
Now that the LI PASS Web widget has been successfully integrated, you are ready to start building your website.
We recommend using the following features in the Web widget:
- Check Login Configuration for Web to learn how to configure your login/registration process to access more features.
- If you want to conduct channel account linking for Web, see Web linking.
- If you want to conduct game preregistration for Web, see Web preregistration.
- Regardless of the login method, we provide a complete compliance process, see Compliance Services.
- A simple configuration can adjust the personalized web components to better suit the game style, see Customize Appearance.
- For application scenario examples, see Web Scenarios for more inspiration.
The Web widget can be easily integrated, with flexible features that can be adapted to any application scenario.
For more information, reach out to the Player Network representative.
API list
| Method name | Description |
|---|---|
| start | Initialize LI PASS Web widget |
| unmount | Unmount/close LI PASS Web widget |
| changeLanguage | Switch language, see Language list for a list of supported languages |
| on | Monitor events, see Event list for a list of supported events |
| bind | LI PASS 绑定方法 |
| preOrder | Method to preregister on LI PASS |
unmount
Calling the unmount method will unmount the LI PASS Web widget from the DOM.
changeLanguage
Switch the widget language by calling the changeLanguage method, if the passed language parameter is not supported yet, the default language en will be displayed.
Sample
// Switch widget language to Italian
pass.changeLanguage("it");
Language list
| Code | Language type |
|---|---|
| ar | Arabic |
| cs | Czech |
| de | German |
| en | English |
| es | Spanish (Latin America) |
| es-eu | Spanish (Europe) |
| fi | Finnish |
| fil-PH | Filipino |
| fr | French |
| hi | Hindi |
| id | Indonesian |
| it | Italian |
| ja | Japanese |
| ko | Korean |
| ms | Malay |
| nl | Dutch |
| pl | Polish |
| pt | Portuguese (Latin America) |
| ru | Russian |
| th | Thai |
| tr | Turkish |
| vi | Vietnamese |
| zh-Hant | Chinese (Traditional) |
| zh-Hans | Chinese (Simplified) |
| zh-TW | Chinese (Taiwan) |
on
Call the on method of the pass component to register a callback event handler. When a user interacts with the LI PASS Web widget, the component will callback the event correspondingly.
The event needs to be registered before the user triggers the corresponding event.
Sample
pass.on("onLogin", (userInfo) => {
  // After the user fails to log in, the 'onLoginError event' will be triggered, and the game logic after the user successfully logs in, can be processed in the event callback
  // For example, redirect to a specific page
  console.log(userInfo);
});

pass.on("onLoginError", (userInfo) => {
  // The 'onLogin event' will be triggered after the user successfully logs in, and the game logic after the user fails to log in, can be processed in the event callback.
  console.log(userInfo);
});

pass.on("onRegister", (userInfo) => {
  // Logic added after successful registration
  // For example, redirect to a specific page
  console.log(userInfo);
});
Event list
| Method name | Description | Callback parameters |
|---|---|---|
| onLoad | Load rendered component | accountApi |
| onClose | Close component by clicking the close button while in modal mode | userInfo, accountApi |
| onLogin | Login successful | userInfo, accountApi |
| onLoginError | Login failed | error |
| onLoginTabChange | Tab switch on widget | activeTab |
| onRegister | Registration successful | userInfo, accountApi |
| onRegisterError | Registration failed | error |
| onPwdReset | Reset password successful | accountApi |
| onPwdResetError | Reset password failed | error, accountApi |
| onPreOrder | Preregistration successful | result |
| onPreOrderError | Preregistration failed | result |
| onBind | Linking successful | result |
| onBindError | Linking failed | result |