Switch
This article guides you through setting up Nintendo Switch as an identity provider, enabling your game to access Player Network authentication services.
Prerequisites
1. Register for an account and create a channel
Games should apply for Nintendo developer accounts on their own, create their game app using the developer account, then enter respective configurations on Player Network.
Games must apply a different set of client ID and client secret for the development version and release version to deploy to different server environments.
For more information, see The Client ID and Secret and Nintendo Switch Independent Server Setup Manual.
| Field | Type | Description |
|---|---|---|
| switch_app_id | string | Switch app ID |
| redirect_uri | string | Login redirect URI for mobile devices |
| client_id | string | Switch assigned client ID |
| client_secret | string | Switch assigned client secret |
Create Product
-
Log in to Nintendo Developer Portal.
-
Go to MY PRODUCTS.
-
In the Products section, click Create Product.
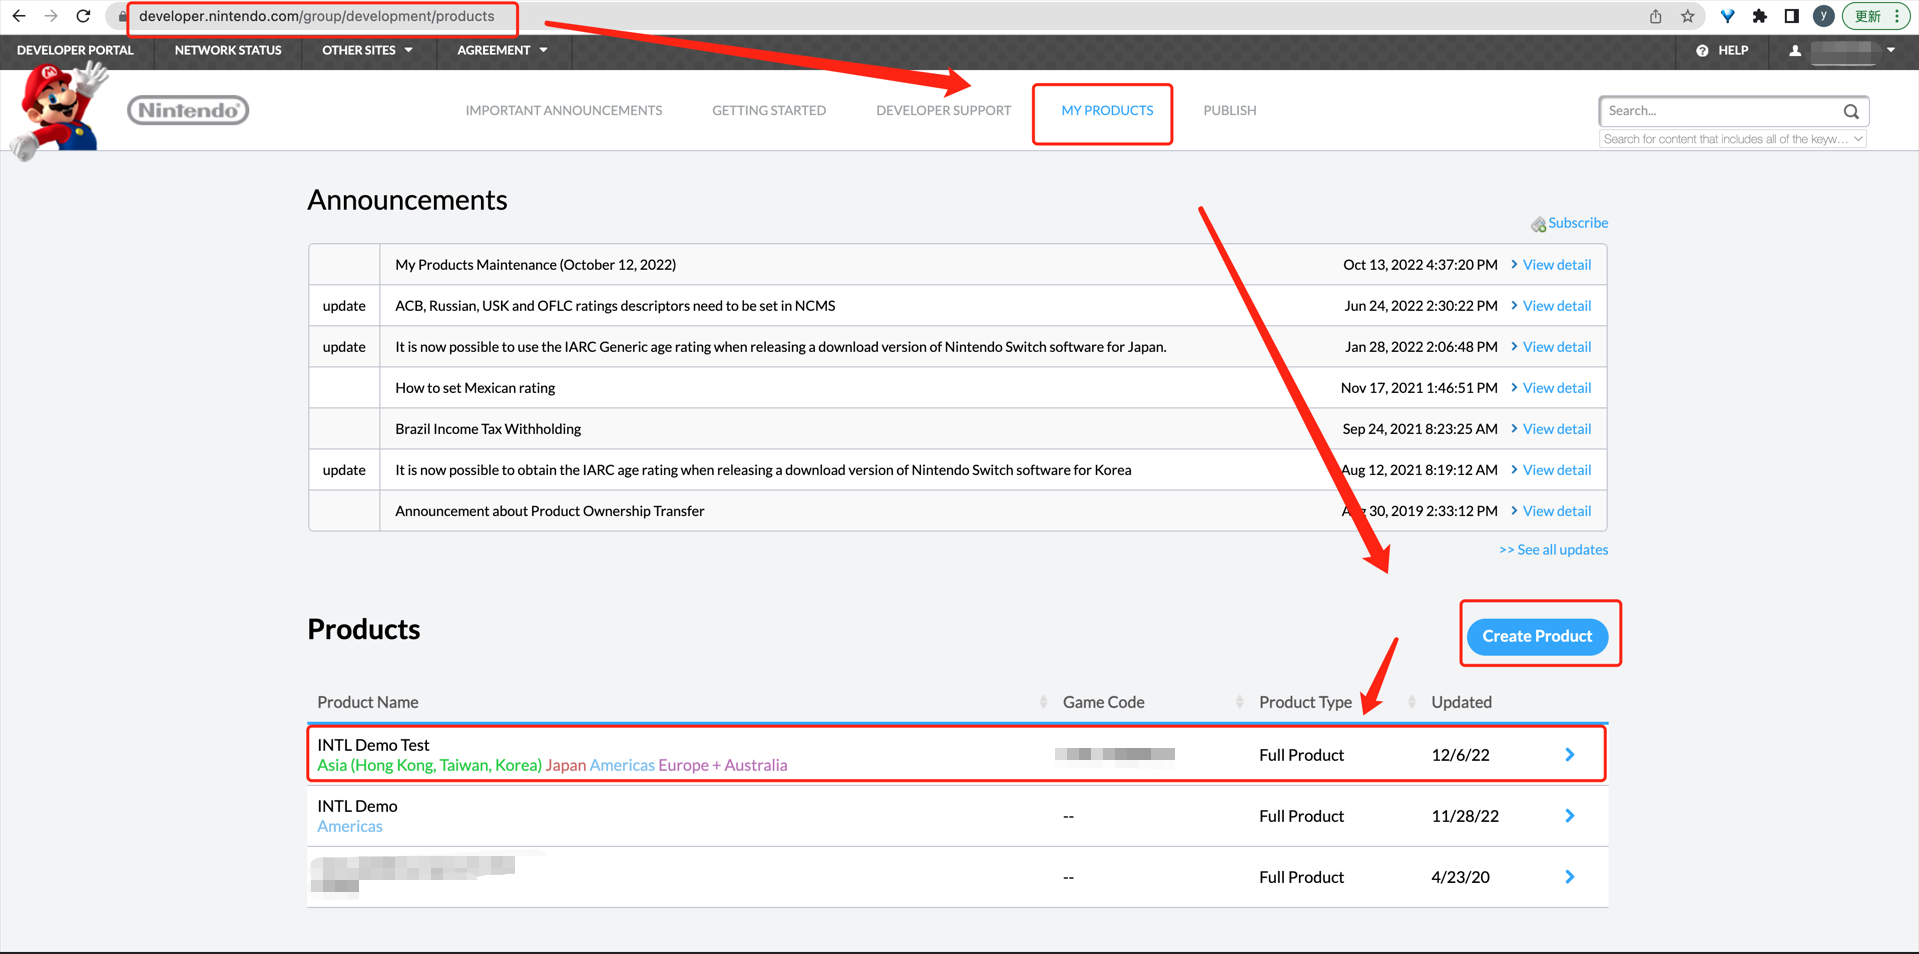 note
noteSelect a region other than China.
Issue Game Code
-
Go to the specific products page.
-
From the top right corner, click Issue Game Code to generate
switch_app_id.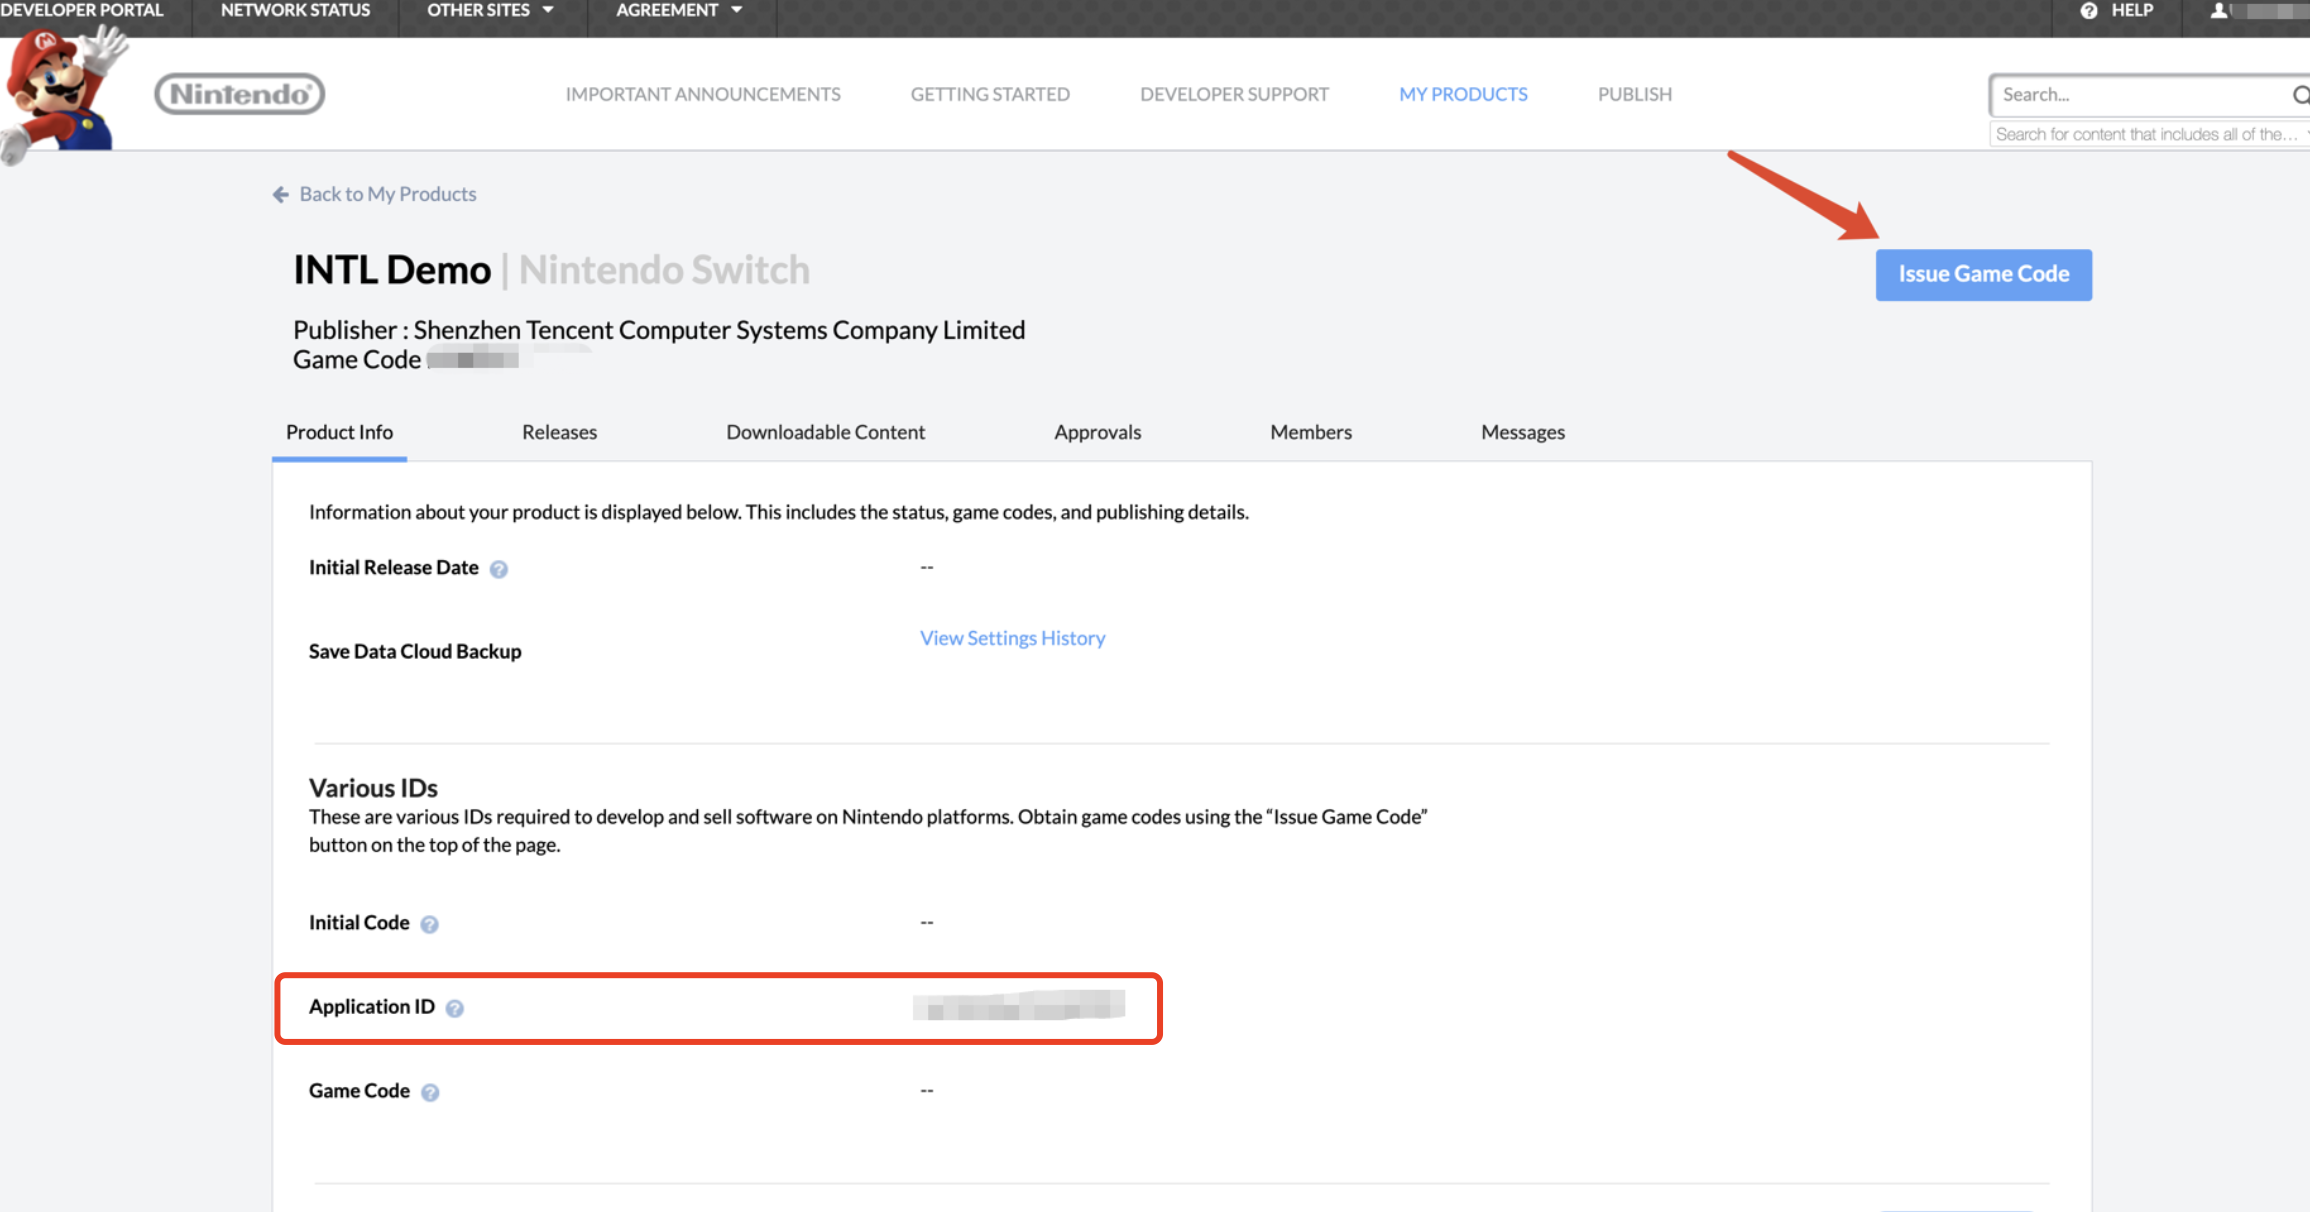
Enter socket and HTTP communication usage
If it is not a stand-alone game, the app description says "There is communication with the original server", then add a project with the following information.
Apply for client_id and client_secret
-
Enter OMAS2 with Nintendo Developer ID and password.
-
Enter the required information as shown in the image.
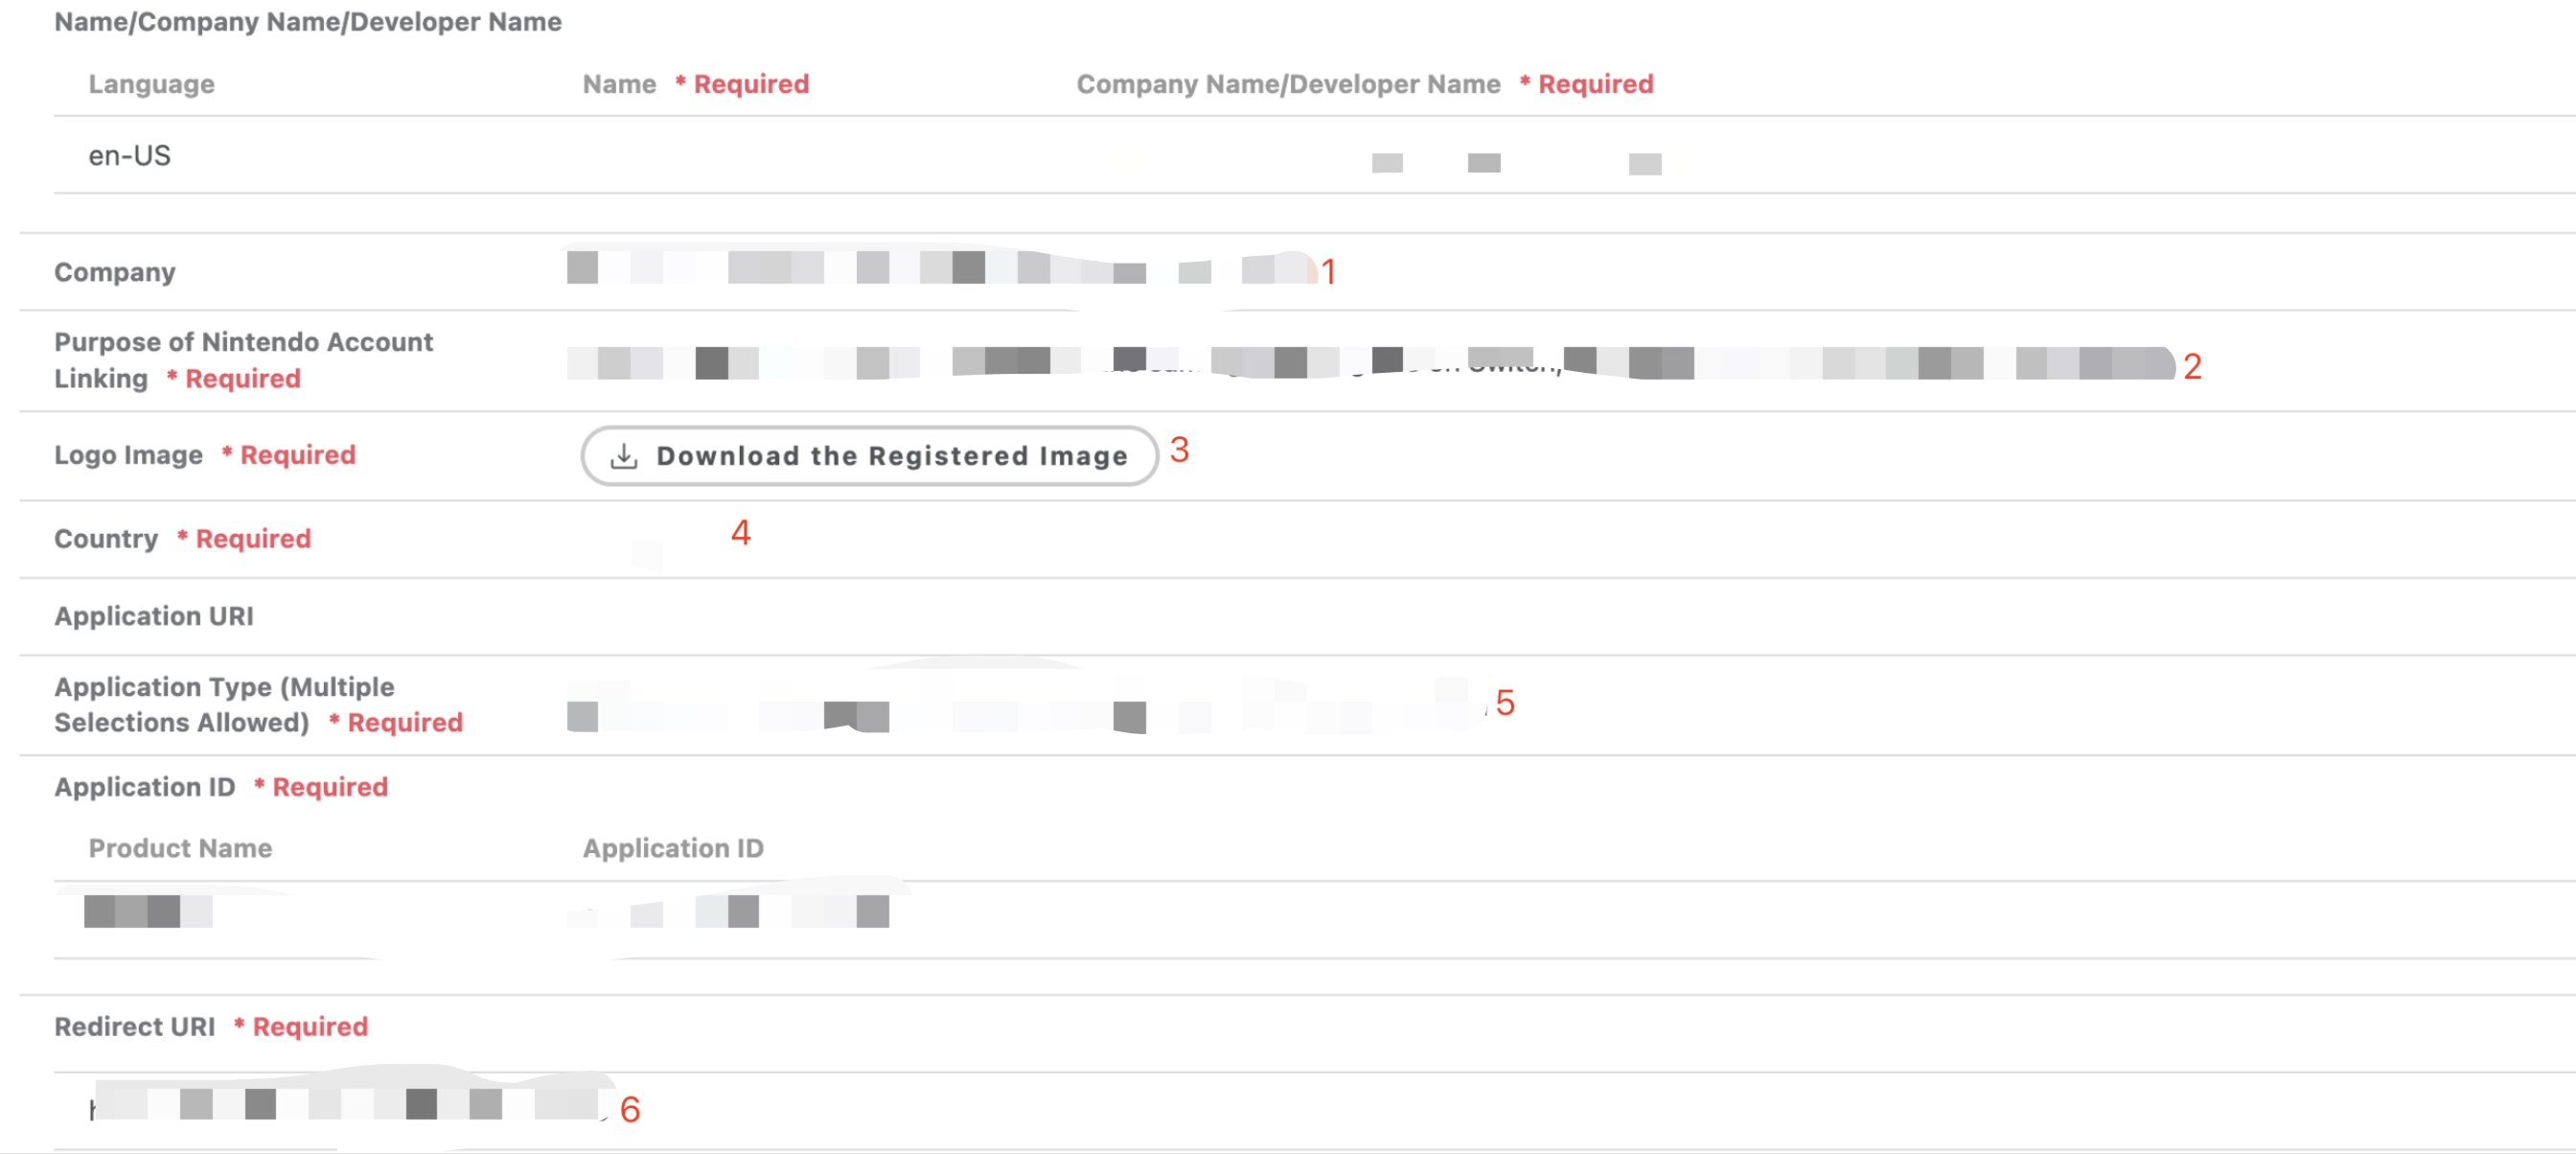 note
noteIf the app is not open to China market, do not enter China in the field marked by number 4.
In the testing stage, you may enter any redirect URI in the field marked by number 6. However, games should update this field to the actual redirect URI before releasing the game. This field can be modified after the application is completed.
-
Get
client_idandclient_secretonce the application is approved.
Get app configuration for Nintendo
Contact business representatives from the Nintendo Collaboration Department to apply for a Nintendo app and get the corresponding app configuration information, which is the applicationId.
- Create an account for Player Network Console.
- Create a new project for your game, or join an existing one.
- Download the SDK.
- Integrate the SDK.
- Add Nintendo as an authentication method for your project on Player Network Console.
Step 1: Complete INTL Configurations
- Unity
- Unreal Engine
Version requirements:
Nintendo SDK 9.41
Unity 2019.3.13f1
Through the non-editable SwitchPreProcess.cs script, INTLSDK copies the configuration files INTLConfig.ini and INTLResultMsg.json to the StreamingAssets folder, then packages them together into the NSP file, which can then be read by INTLSDK.
The NSP file structure is as follows:

Version requirements:
Unreal Engine 4.26 non-public version
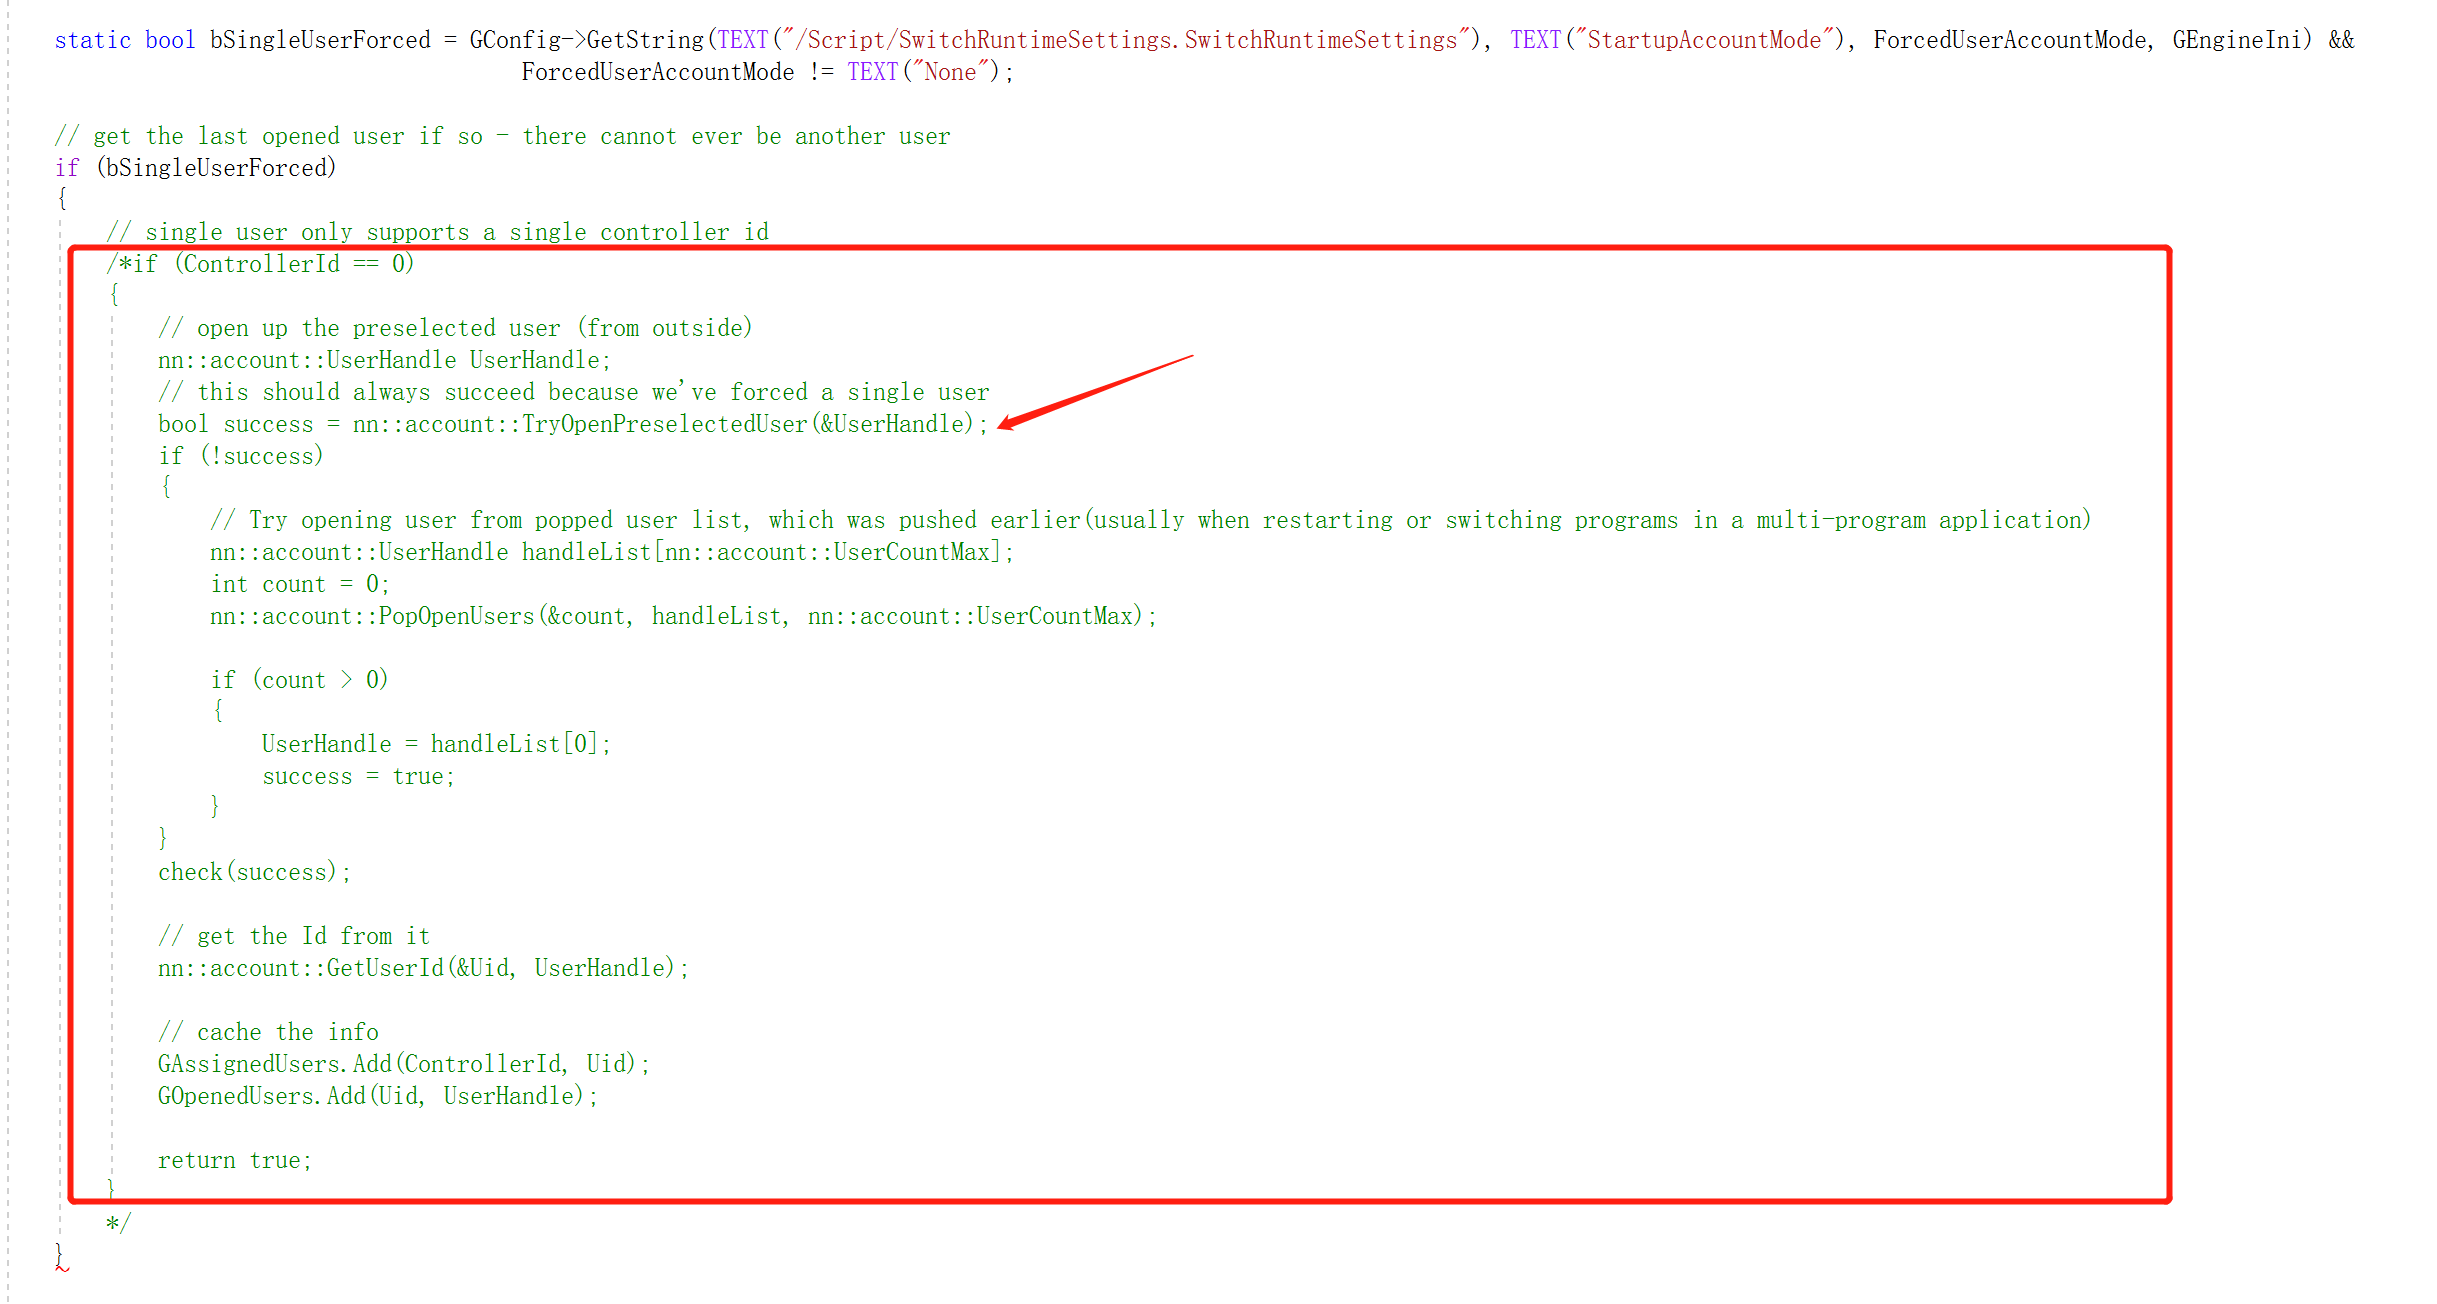
Switch games enable players to select their account by default when the game starts. As Unreal Engine retrieves player account by default, INTLSDK may crash due to repeated retrieving player account. Therefore, games need to update the Unreal Engine source code.
Delete the code to automatically obtain player account when game starts in the FSwitchPlatformMisc::GetUidForControllerId(int32 ControllerId, struct nn::account::Uid& Uid) function from SwitchPlatformMisc.cpp
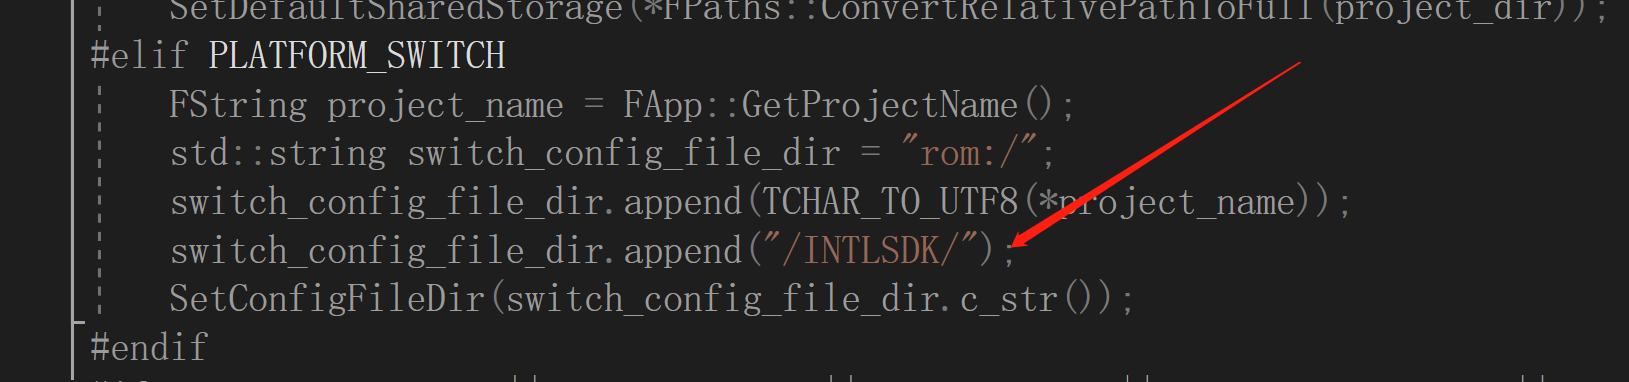
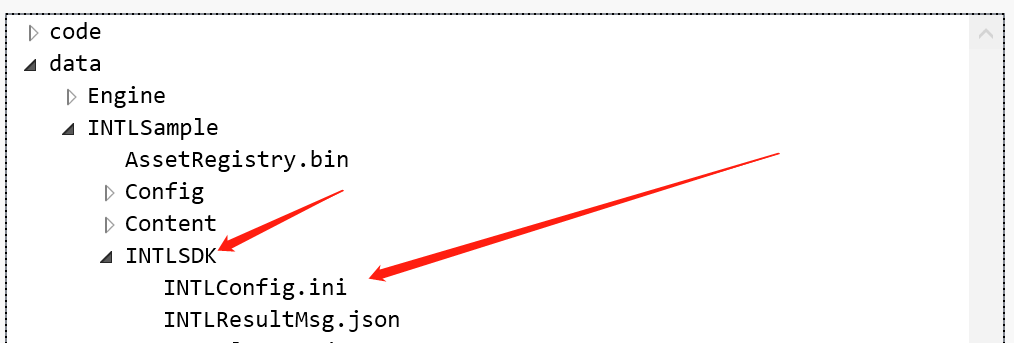
Through the INTLPlugin.Build.cs script, INTLSDK creates a new INTLSDK folder in the NSP package, and copies the configuration files INTLConfig.ini and INTLResultMsg.json to the new INTLSDK folder, which can then be read by INTLSDK.
The NSP file structure is as follows:
Adjust file path
For games to adjust the file path as needed:
-
Update the file path for INTLConfig.ini and
INTLResultMsg.jsoninINTLPlugin.Build.csaccording to their actual paths in the game project.
-
Update the corresponding file path in
INTLWrapper.cpp.